Behind the Scenes: Hamari
Hi! My name is Marcin Cieśla. I live in Poland, and I’m a 3D Artist mainly focused on characters. I love Disney style and old PlayStation games. Currently I’m working on my personal animated short film project and finishing my first comic book.
Background in 3D
Well, my adventure with 3D graphics, or even graphics overall started many years ago. Actually I think it was in elementary school. When I was playing a game as a kid, I couldn’t resist thinking about how they were made, how games worked. Usually I was more interested in that than in game itself, heh. Because of that curiosity, it was only a matter of time before I first attempted to create something similar. At that time I was working on 2D projects, but that was not enough; I was constantly looking for something more complex, more attractive. One day I found Blender. I spent a lot of time trying to figure out how to create my own 3D characters, environments, animations, and even games thanks to BGE. It was like working with pure magic. I was working on some Naruto fanarts, Disney-like characters and animations, but, more importantly, games. Some may say that learning a programming language is hard or boring, but for me the opportunity to create something with Python in Blender Game Engine was hypnotizing. Still is, to be honest. :)
Some time later I tried Unreal Engine 4. As a part of learning this engine, I created a small fan project related to the MediEvil franchise.
Inspiration
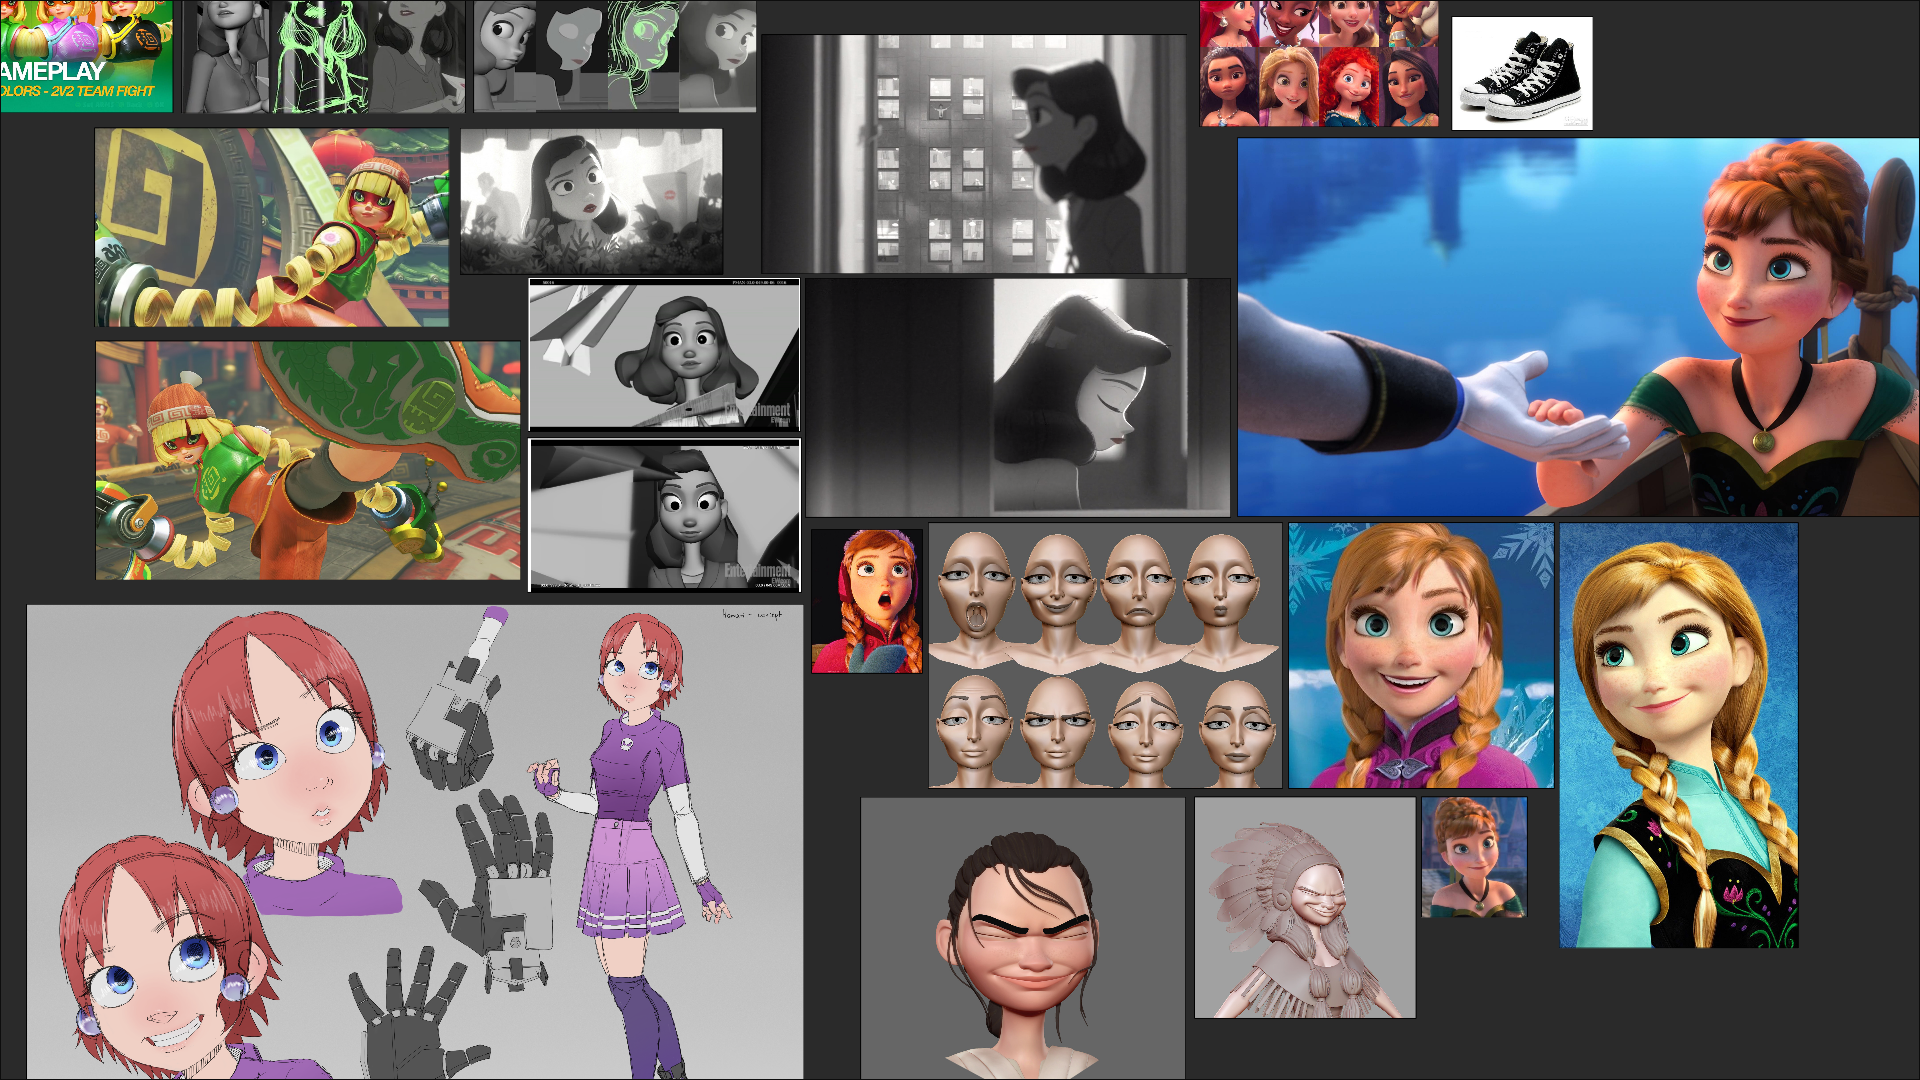
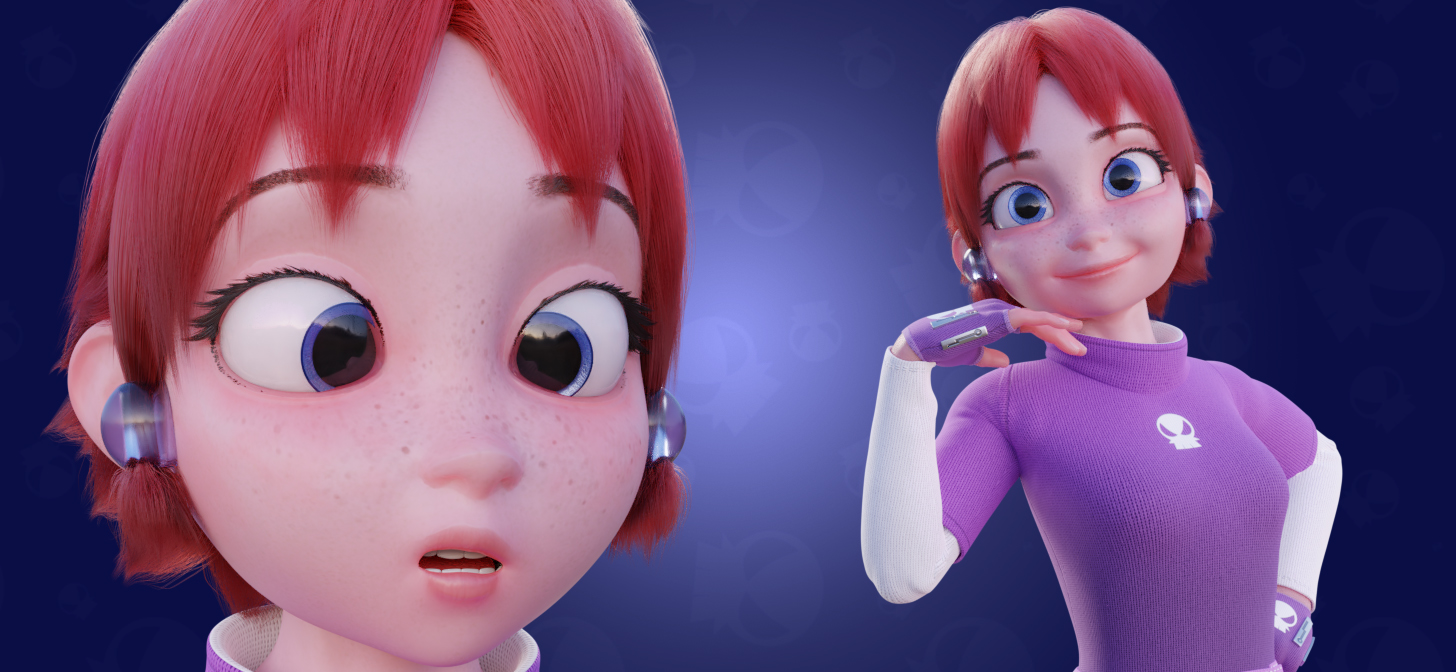
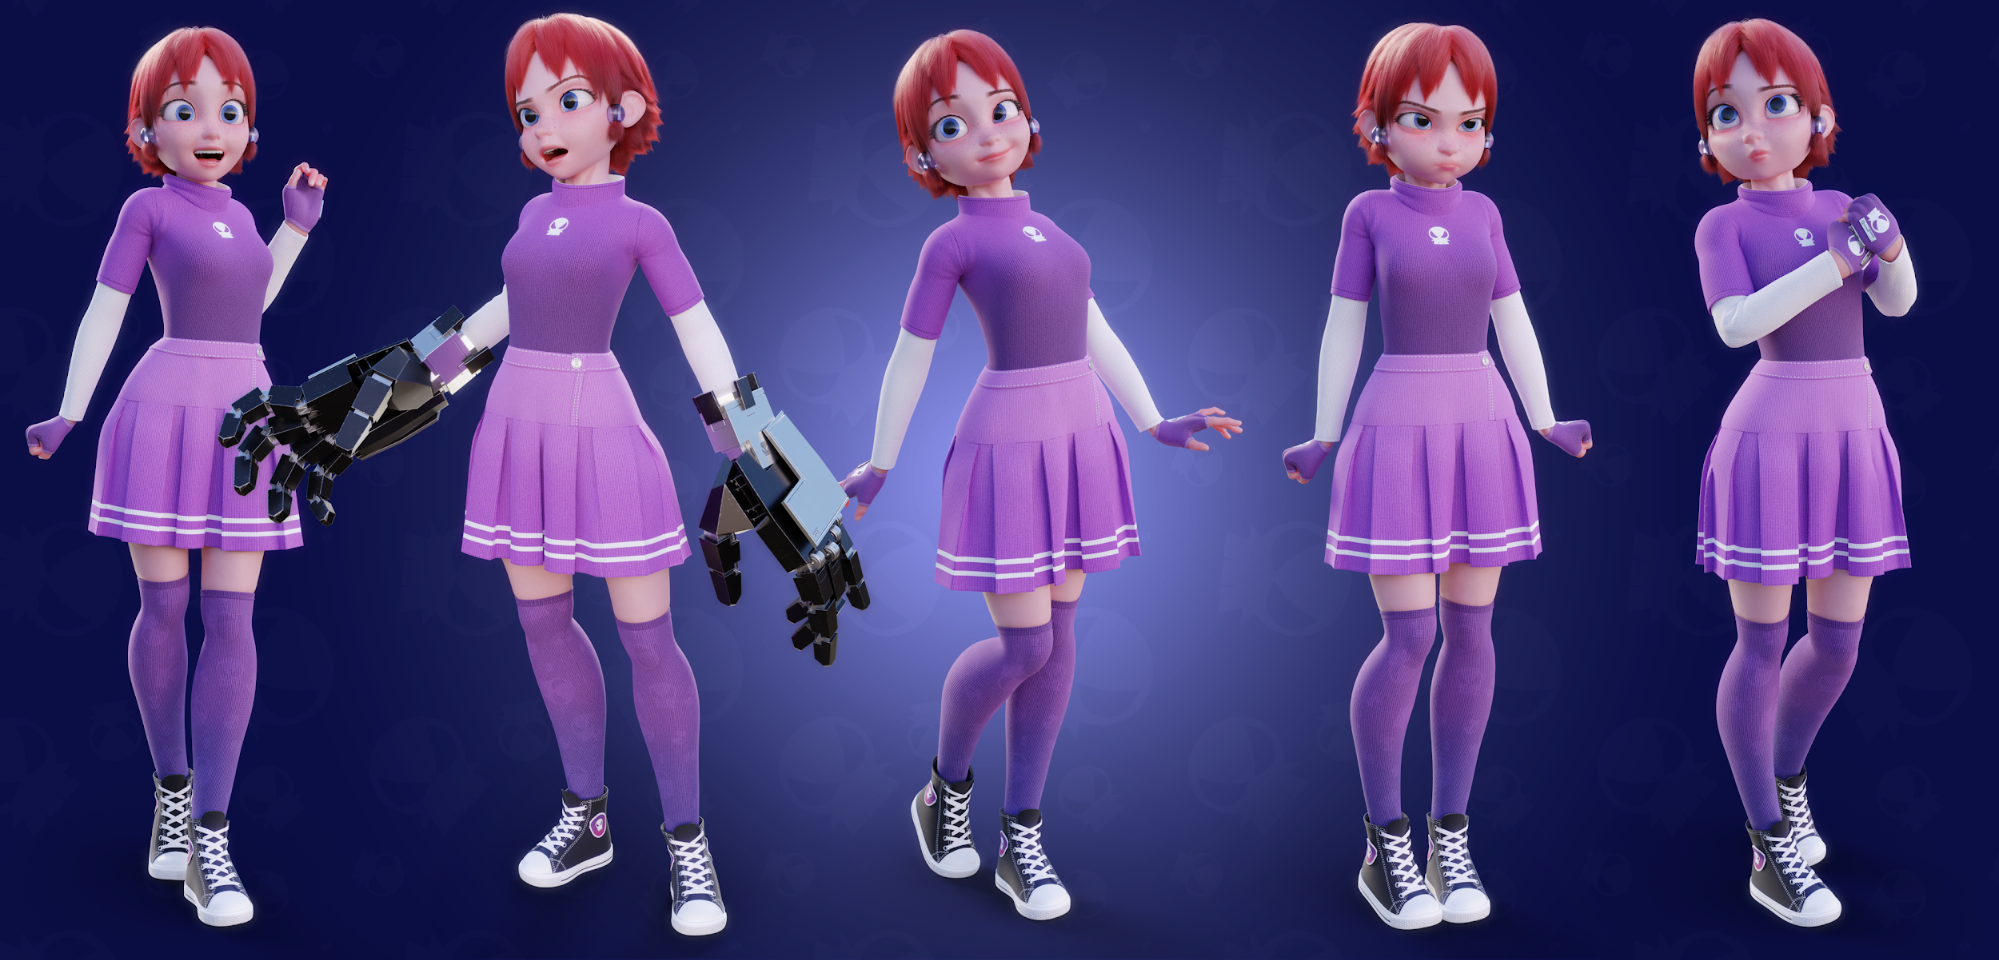
The idea to create Hamari didn’t suddenly appear in my head one day. She is one of my beloved characters that I designed way back in my school years. From time to time I like to take my characters and check how they look like in my current style, how I would make them with my current knowledge. This time I challenged myself to create a short animation in Blender with two of my characters. One of them is Hamari. Before I started looking for references, I asked myself: Who do I think is similar to her, what look do I want for her? At this level of work I like to look for ideas in Disney characters. It quickly became clear to me that Anna from Frozen, Meg from Paperman and Merida in Wreck it Ralph 2 were perfect for what I was looking for. I could start my work.
Concept

The first thing to do is, obviously, concept art. I wanted to keep the original design from years ago, but still make some small improvements. This was also a good moment to decide which parts would be simulations and which would be animated by hand. First of all—a blouse that hugs the whole body. This can be a challenge, because when the character has his arms down, quite a problematic accumulation of collisions in the armpit is created. At this stage, I don’t yet know how to handle it. Another element of the outfit is the skirt. This definitely needs to be simulated. A potential problem is the upper part, where it touches the rest of the outfit. If the blouse and skirt were actually simulations, then a problematic collision at the point of contact could form. This is something I have to keep in mind. In addition, the mecha-hands will press the sleeves from all sides after activation. So this will be another problem to solve.
Modeling
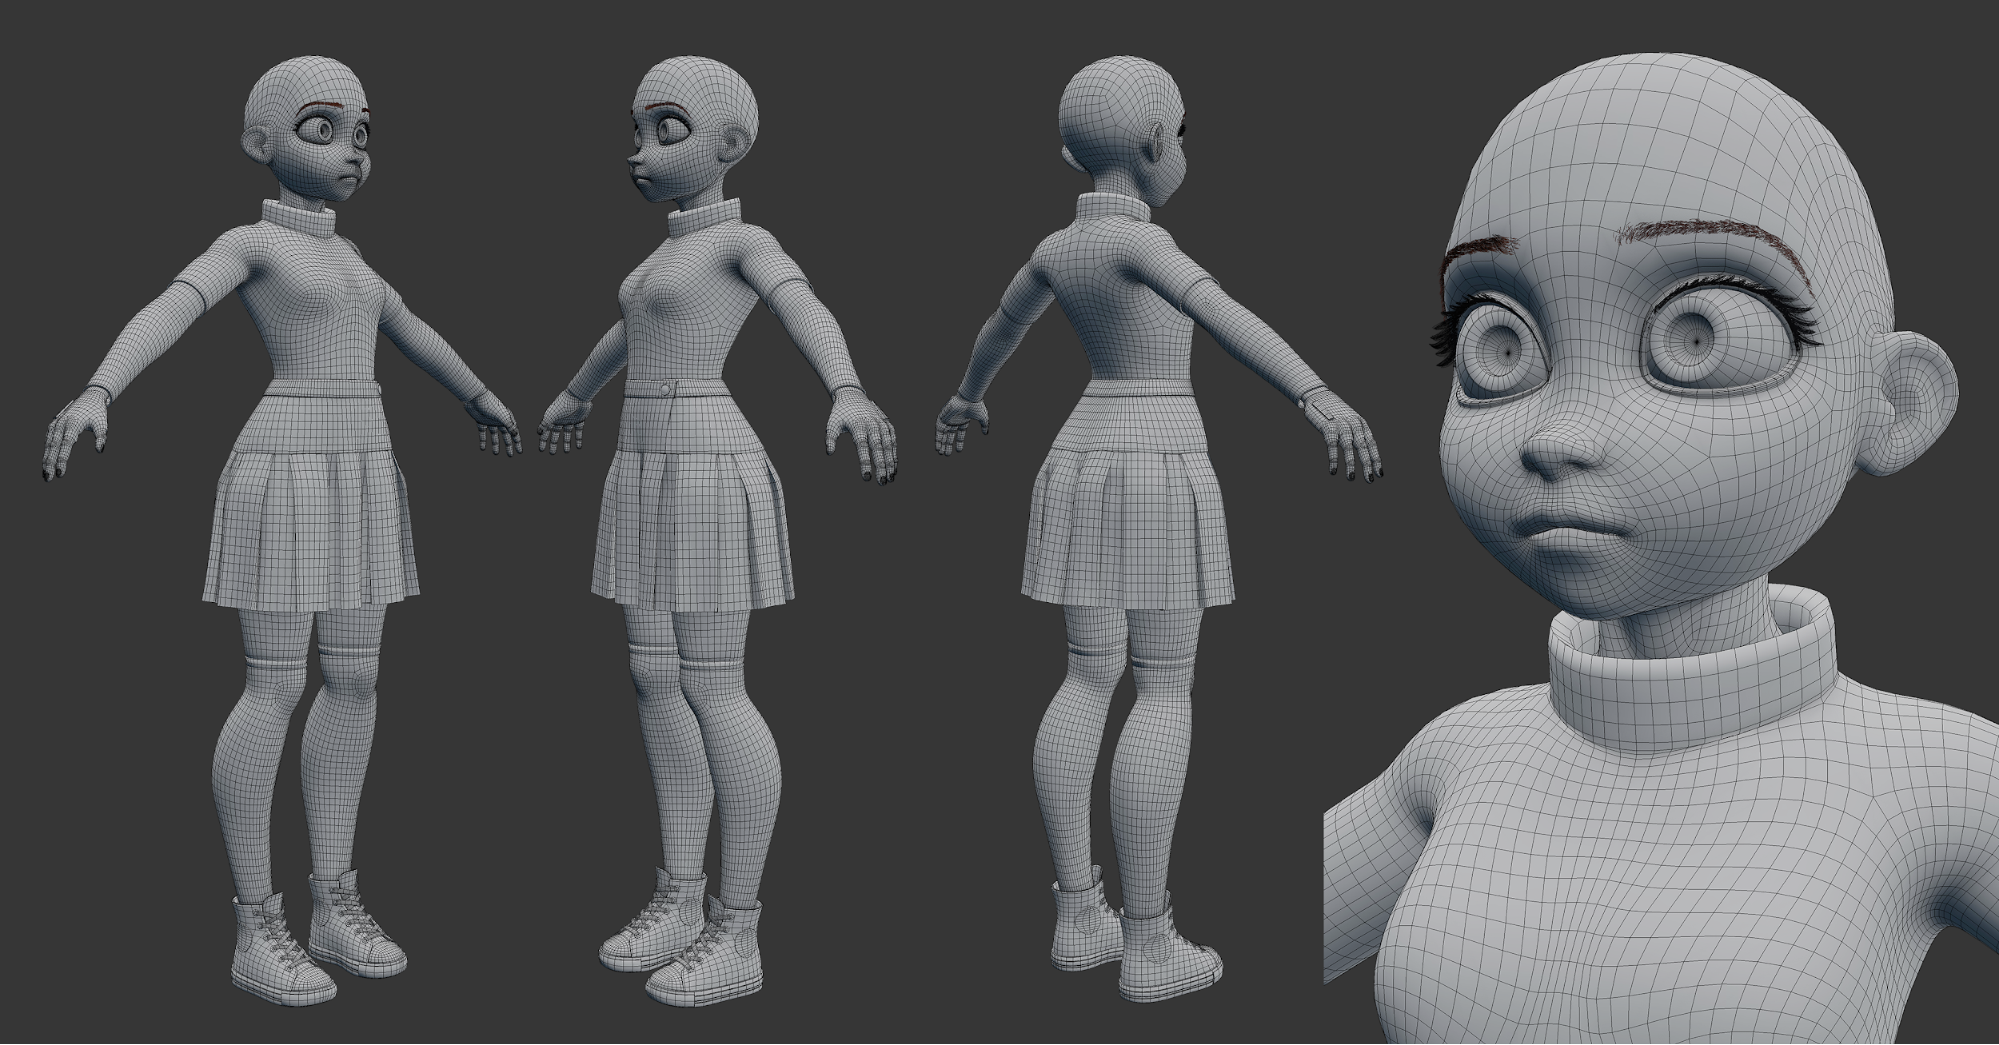
As I said earlier, my main references are Anna (Frozen) and Meg (Paperman). I’m not trying to create an exact copy any of them, but their facial features are close to result I want to get. Now I have a sketch, so theoretically I know what my goal is, what I’m trying to achieve. But it’s harder than it sounds. My first attempt is not even close to my drawing—it looks completely different. The second one is better, but still something is missing. I set the sketch in the background and try to adjust the height of the nose, size of the eyes, mouth – everything seems to be fine. But it’s not. When I compare a finished model with a sketch, they still look different, even if I have adjusted the position of the nose, lips, eyes, or ears before. A good solution turns out to be to outline the face contours (e.g., in Photoshop) and compare this drawing with the original sketch. Thanks to that, the drawing is compared to the drawing instead of the drawing to the 3D model. This approach allows me to catch a lot of differences. I can’t count how many small fixes I have done in this way until I was happy with the result. The sketch still looks different than the model, but at this stage it is enough, I need to go further. There will be time for corrections.
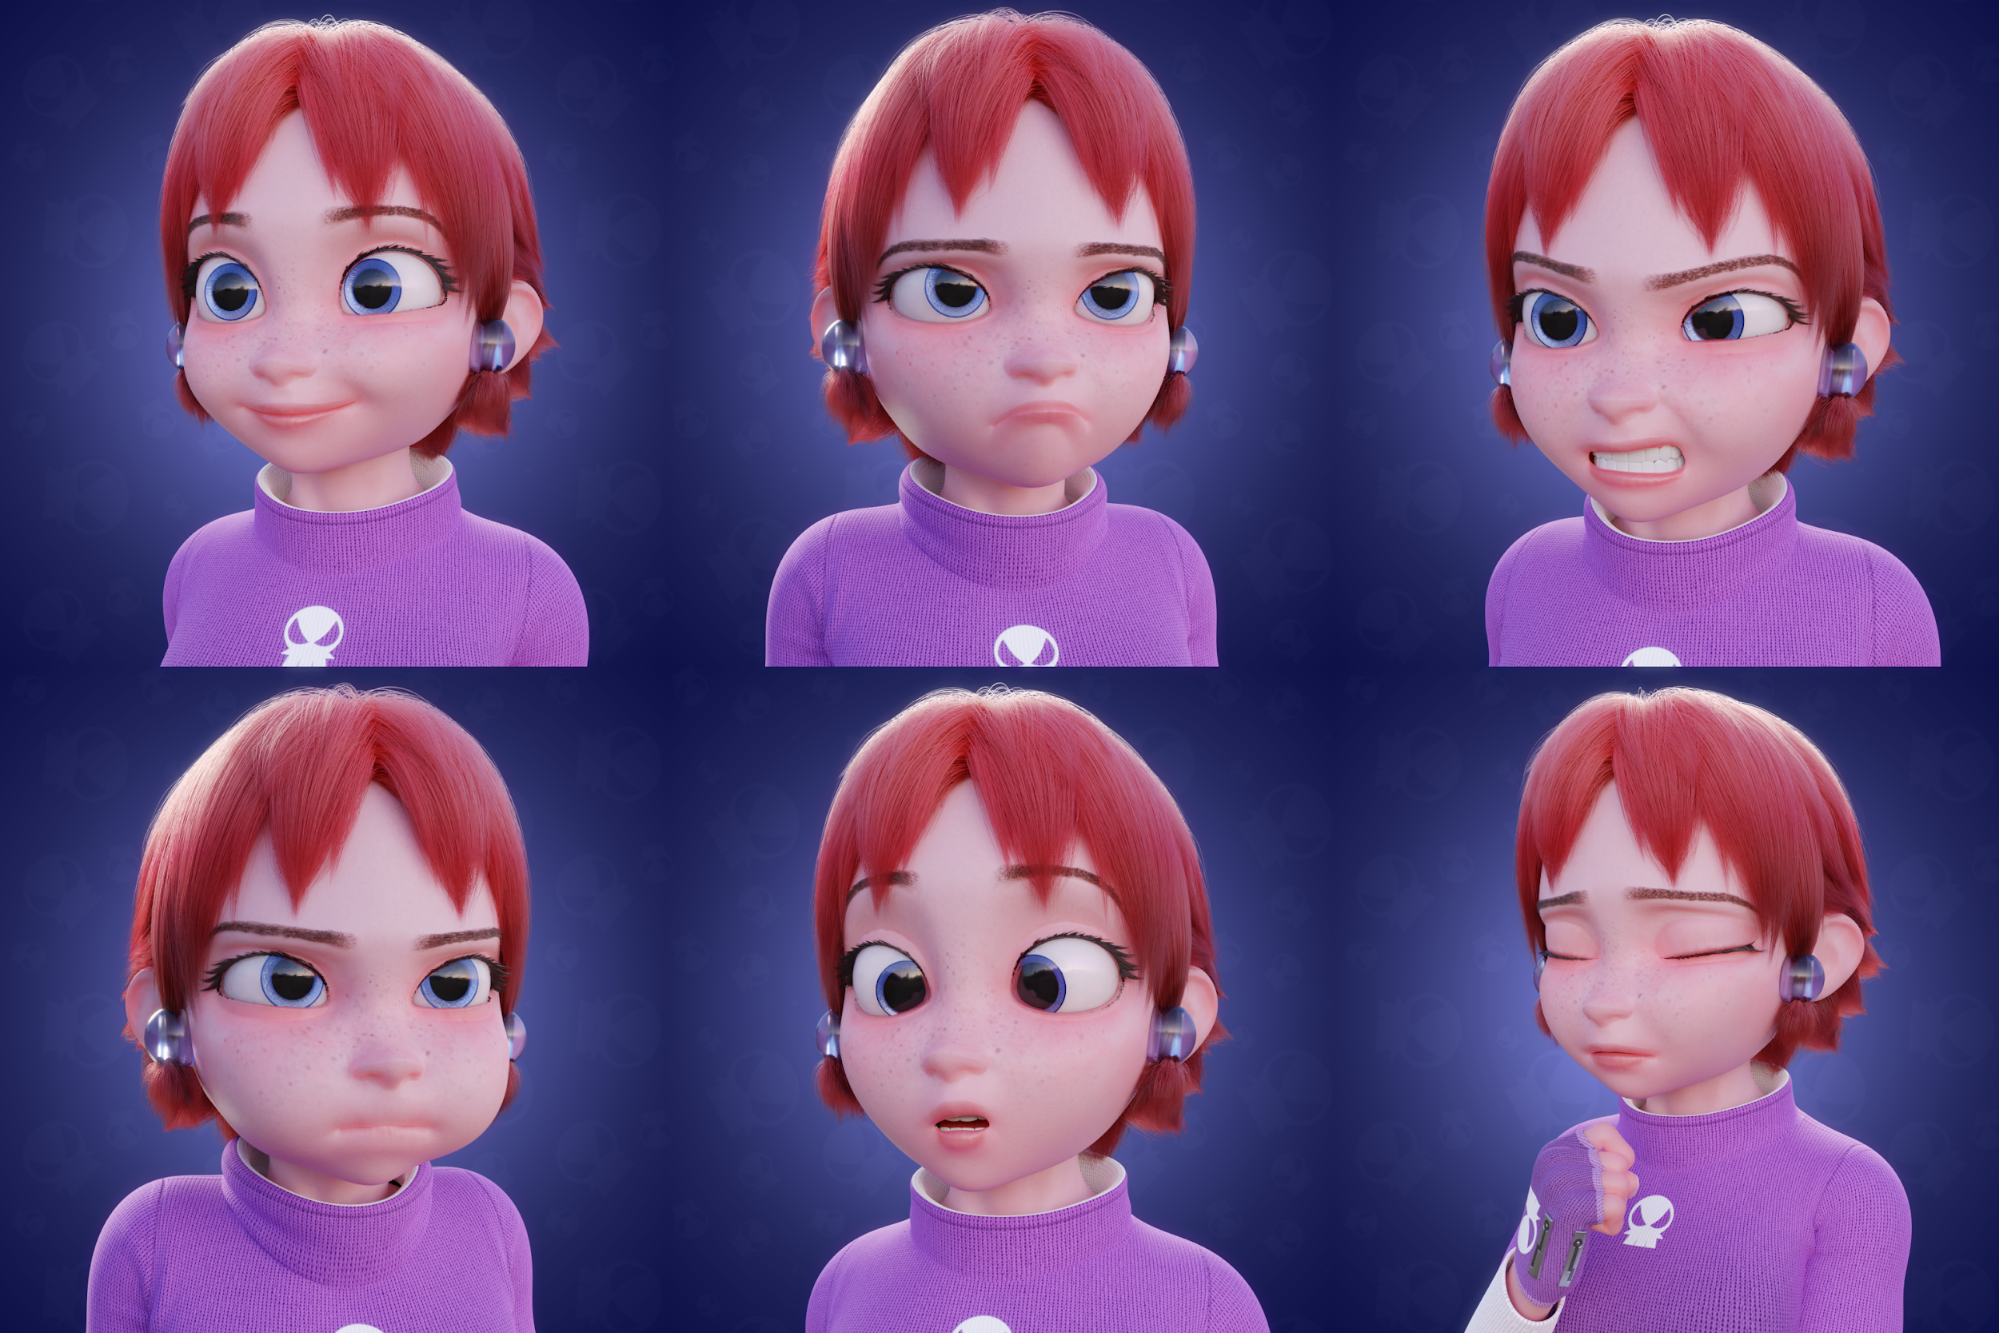
Facial Expressions
After the face, I finished the rest of the body and clothes. Then I prepared UV maps and textures. But more importantly, and what I was waiting for, were the facial expressions. As I mentioned earlier, Hamari is the second character for my animation project. For previous characters I prepared about 100 different shape keys, mainly dedicated to facial expressions. This time, of course, I wanted to do something similar, maybe even better. So I grabbed the mouse and graphic tablet, and got to work. I already have one ready, fully functioning facial expressions system, so I thought this part should be easy.
It wasn’t.
But let’s not get ahead of ourselves. At this stage, I’m trying to recreate each facial expression of the previous character, one by one. It worked once, should work here as well. Several days pass and I consistently reconstruct the entire list of deformations. It’s nearly finished. I render some sample images, I ask people for opinions… and no one likes the outcome. I decide to accept the criticism and start work from scratch. I throw away the result of the last few days of work and start again.
This is a pretty good opportunity to work on the character’s face again, and improve it a bit here and there. Now I’m wondering what went wrong with facial expressions. The answer is pretty simple. When I was working on the first character, I was using my own face as a reference. When I was working on the second character, Hamari, I was using the first character as a reference. This is a bigger mistake than it seems.
So I equip myself with a book about human facial expressions (FACS – Facial Action Coding System), I take the mirror in my hand, and get to work. I’m comparing each grimace many times—not only with the muscle system pattern in the book, but also with my own face to make sure everything is done at least correctly this time. Fortunately, this time the effect of my work was better.
Body and Clothes
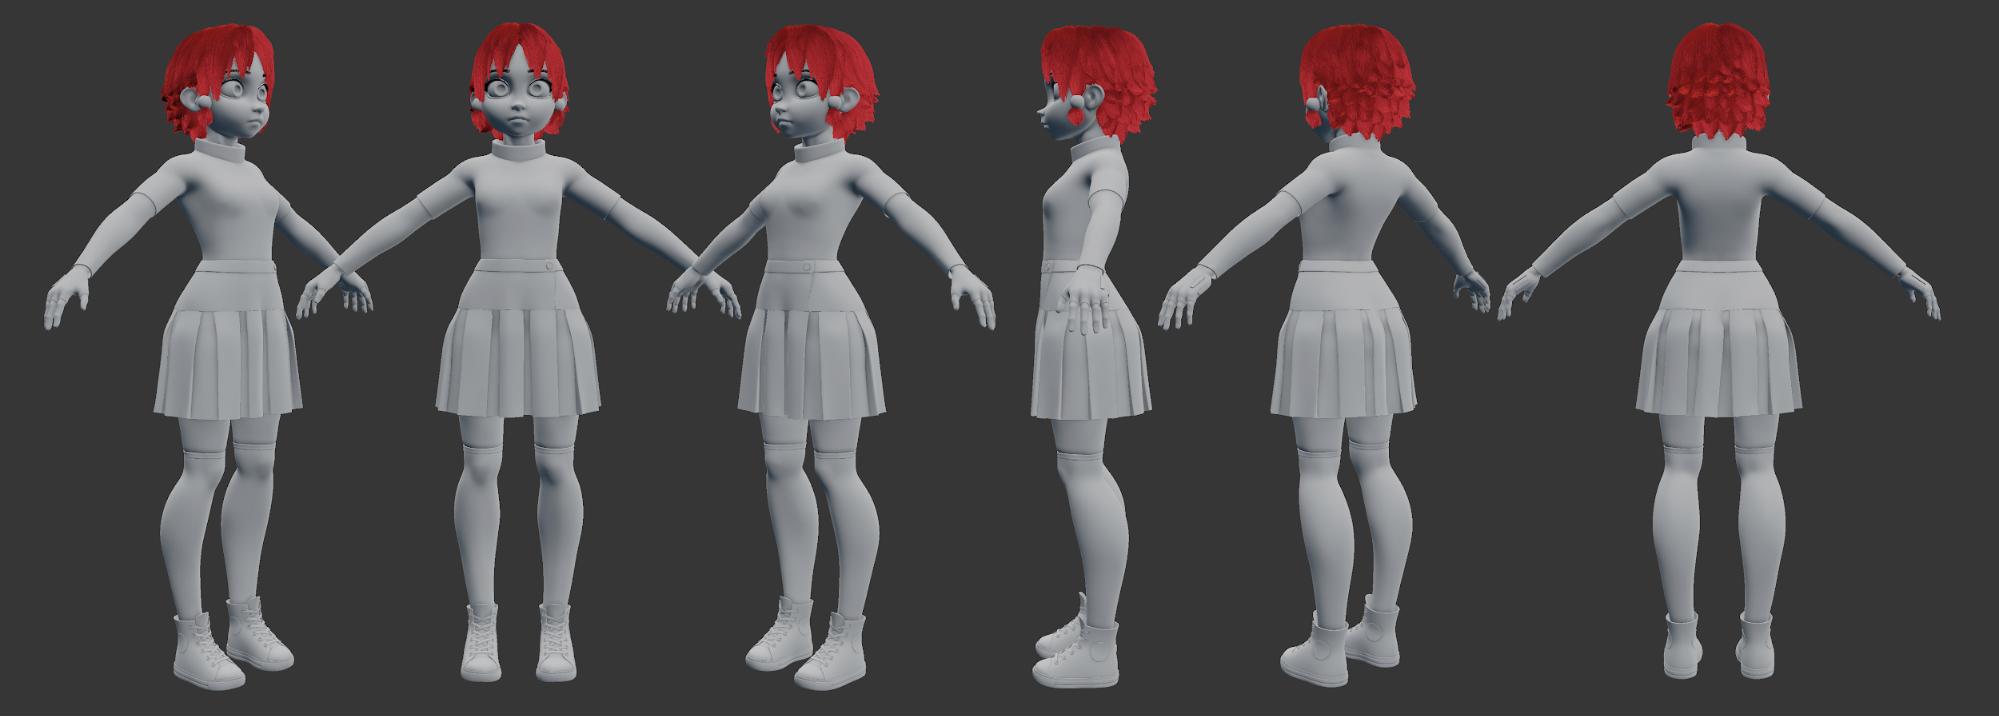
All other body parts put together are much less problematic and time consuming than the facial expressions, so I won’t dwell on them.
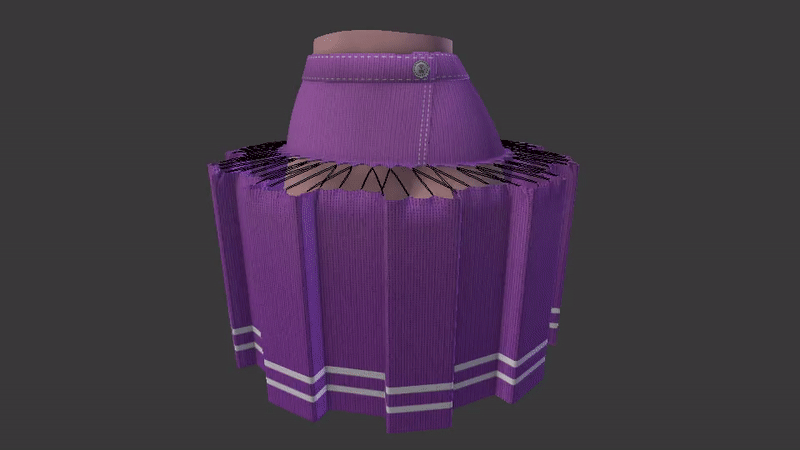
Now it’s time for clothes physics. First in line is the skirt. My plan is to make a simple model first and try to simulate it before texturing. And this is exactly what I’m doing. First attempt: fail. The whole thing behaves very strangely—it’s shrinking in weird places and folding unnaturally. Second attempt: slightly better, but still not as it should be. Another, and another attempt: all the time something is wrong. I just think about changing the character’s design a little, because the problem seems insurmountable. But one thing gives me no peace—there are a lot of animated films in which it is evident that the clothes react to physics correctly. There are also a lot of people on the Internet who create various simulations of this type on their own. So why does it work for others and it doesn’t work for me? Do they have better tools, secret knowledge, magical skills?
The answer turned out to be quite different and can be summarized in one short word: tailoring. It seemed logical to me to make a skirt in the same way as the rest of the character. Well, I was wrong. I searched the internet for information about how skirts look before sewing. With that knowledge I created it again. All the strange folds, shrinks, collision problems suddenly disappeared. Well, apparently if I want to use realistic physics, I also have to create objects in a realistic way.
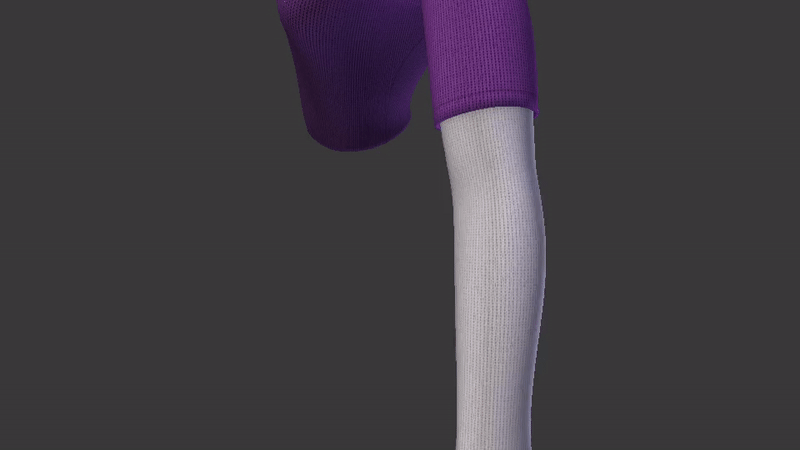
Blouse
From the beginning I knew that simulating this part of the outfit would be very problematic, but now is the moment I have to decide what to do with it. Well, this part of the outfit is relatively tightly arranged on the character, at least not as loosely as the skirt. The decision has been made, the blouse will not be simulated… but at the same time it will look as if it were. The first, and most important, reason: it will be too problematic. Secondly, on most of the blouse it won’t even be visible that it is simulated. Any folds that appear on the blouse will be predefined. Some displacement textures, some shape keys, some drivers, and voila! The blouse is ready to be animated. After all, the ends of the sleeves in motion look a little stiff. I want to simulate at least this part. So now the blouse has simulation, but it’s affecting only the ends of the sleeves. It gives the impression that the entire blouse is simulated.
Mecha-hands
So, the last thing I want to make for this character are big mecha-hands. After activation they will press the sleeves from all sides. The ends of the sleeves are now simulated, so there is a small problem. Potential collision problems are hard to predict, but luckily I found a solution. I have created a simple system that controls what “mode” the arm is in. There are two modes: normal, and mecha-hand. In the first mode everything works normally, sleeves are loose. In the second, the simulation gradually resets, the sleeve returns to the default position and tightens slightly on the forearm, thereby eliminating all potential problems with collisions. It’s hard to show what I’m talking about, but it’s really helpful when animating.
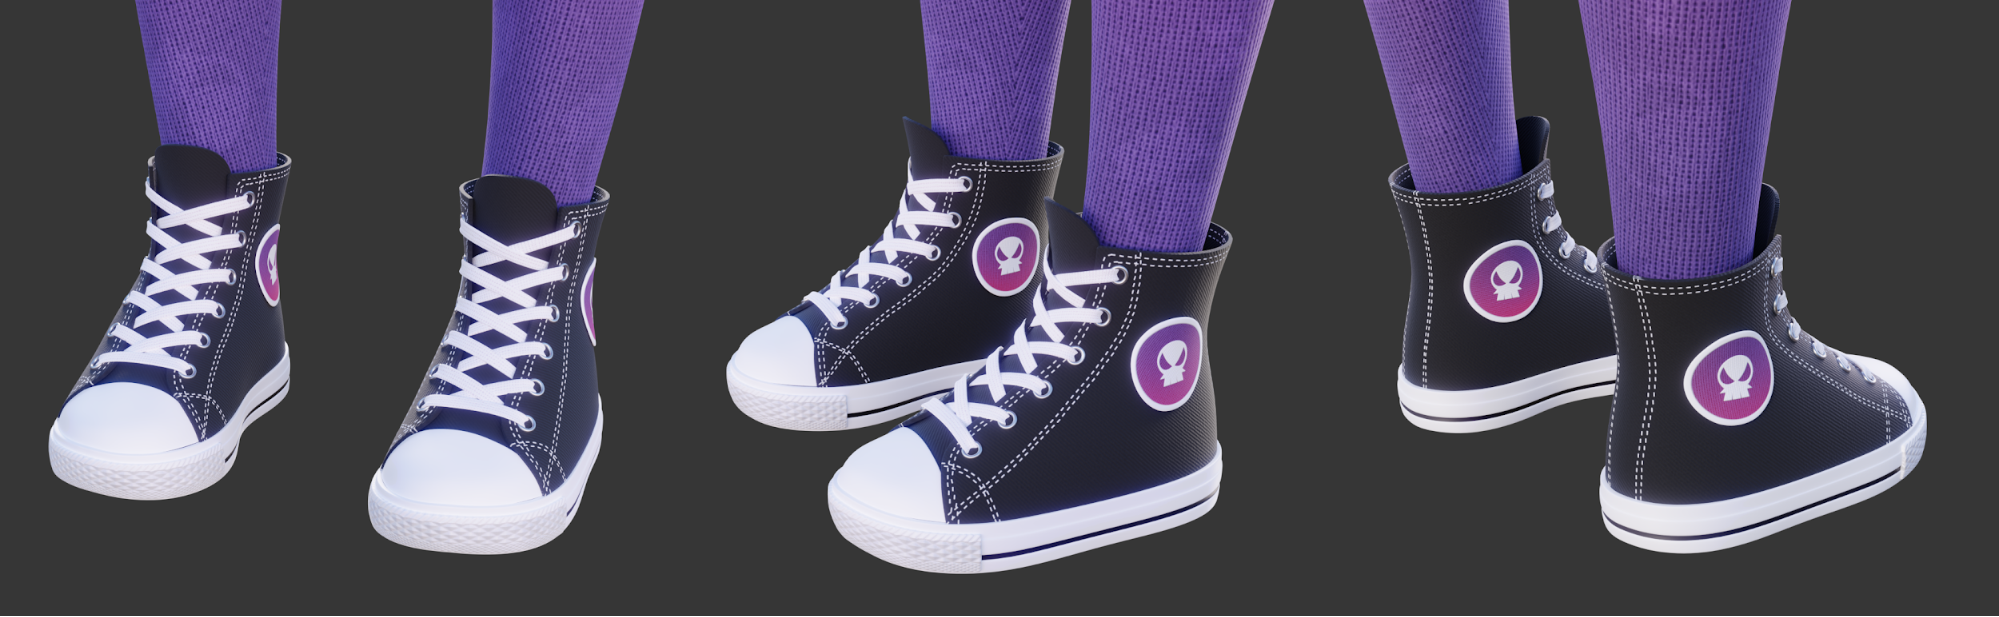
By the way, it’s funny how many things can be created by accident. It happened to me that when painting the texture of the character’s shoes, I accidentally made a pink-purple gradient on the patches on the sides. I didn’t plan it, but I liked this element enough that I refined it a bit and finally left it.
So, that’s all about my little adventure of creating Hamari. A lot has already been done, but much more work still awaits me if I want to finish this project. Keep your fingers crossed. Thanks for reading. Hope you like it.
About the Author
 Marcin Cieśla, 3D Artist mainly focused on characters. Loves everything related to graphics, no matter if it is drawing, modeling, texture painting, rigging or animation. Hopes to get a job at Disney or Pixar someday.
Links


