
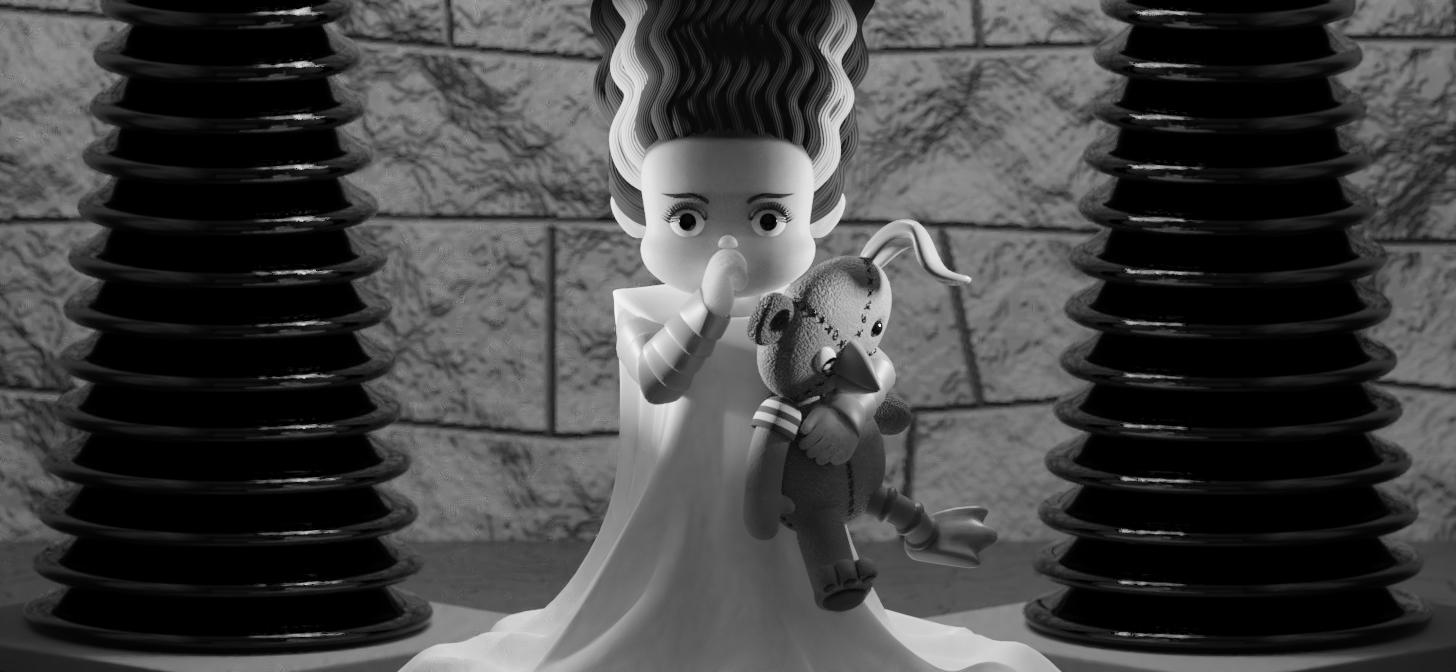
Behind the Scenes: Kid of Frankenstein
About
My name is Jim McNeill and I’m a freelance illustrator living in Arizona, U.S.A. I’ve been making my living as an illustrator since graduating from The School of Visual Arts in New York, NY, primarily using Adobe Illustrator, though I also animated an art education video series in Flash. The extent of my 3D experience before Blender was using Sketchup to create 3D reference for 2D projects. I discovered Blender in 2018 after seeing a friend’s Instagram post of the donut he’d created following Blender Guru’s tutorial, which piqued my curiosity enough to download Blender and see where the donuts were coming from. The second I figured out how to move a vertex around I was hooked and Blender has been the focus of my personal work ever since.
The Idea
Blender’s steep learning curve had me taking every Udemy Blender course I could find and while they’ve been immensely helpful, I’ve never been able to learn very effectively with generic sample projects. Knowing what the finished project is going to look like before I even start takes away a very important part of the whole learning process for me, so I always spend some time coming up with my own ideas for projects that will emphasize particular skills or tools I want to learn that are still open-ended enough to take me somewhere I didn’t know I was going when I started out.
The main goal I had for Kid of Frankenstein was figuring out a way to make the stylization of the texturing consistent with the modeling. Too-realistic textures on simplified, stylized characters is something that bothers me about a lot of the CGI I see and it’s been driving me insane in my own work. The main goal of a previous project had been to get an in-depth knowledge of hair particle systems and while I accomplished what I set out to do, the final image fell apart because every element seemed to be at a different level of stylization, not so much because of the modeling or basic design but because of the texturing. The main problem area was the hair, which got me thinking about ways to stylize hair, which immediately got me thinking about The Bride of Frankenstein, which immediately got me thinking about all the opportunities I’d have for dramatic lighting and Mad Scientist gadgets, which got me wondering how I’d make those Tesla energy bolts that are always coming out of the gadgets. That kind of cascade of ideas had me feeling like I was going in the right direction.
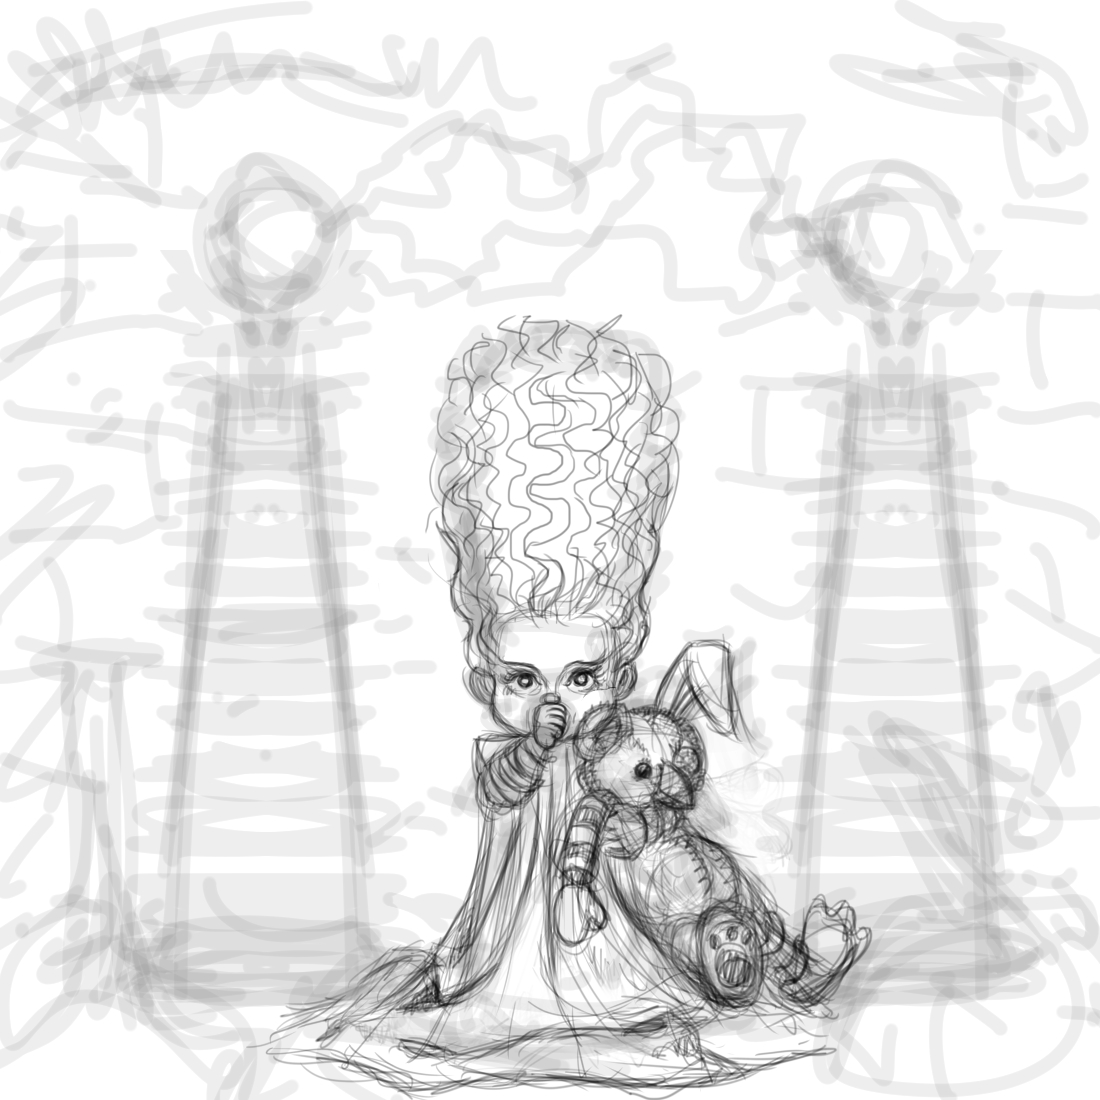
Preliminary Sketch
I started out creating a single sketch in Clip Studio Paint just to establish the overall composition and proportions of the character. I knew from the start that I wanted her hair to be as tall as she was but it wasn’t until I started drawing her that I realized how much I could do with the different parts of her doll. I still left the drawing intentionally vague because I wanted the stylization of the modeling to come from taking what Blender could give me with relatively simple shapes.
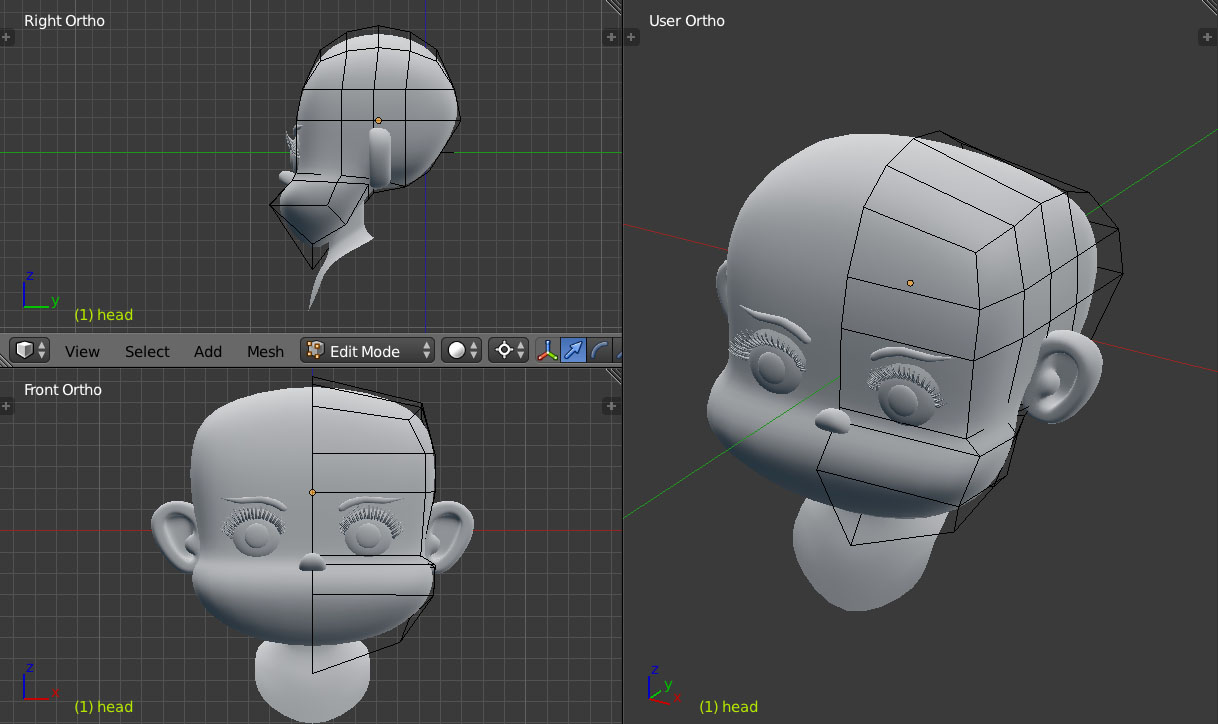
Modeling The Head
I started modeling with her head, using a cube cut in half with a loop cut and mirrored with the Mirror Modifier along the X-axis, with a Subdivision Surface Modifier of 2 subdivisions and the edit cage enabled. I wanted to keep the shapes very simple, so what little geometry needed to be added to the original cube was done with loop cuts, inset faces, and extrusions.
One of the biggest departures for me with this project was not feeling constrained to create her fully dimensionally—since it was going to be a standalone image, she only had to “work” from one viewpoint. I liked the look I got from squashing the head quite a bit along the Y-axis and kept that same kind of compression with the spheres I used for both eye shapes.
The eyelashes were created with curves created from a mesh, then given a taper (there was a great video tutorial on YouTube about this technique, but it seems to have been taken down). The nose and ears were created separately—since I was going to be keeping the textures as simple as the modeling, I didn’t have to worry about any subtle surface texture being marred by any seams between forms and the clean break between the forms added to the stylization I was going for.
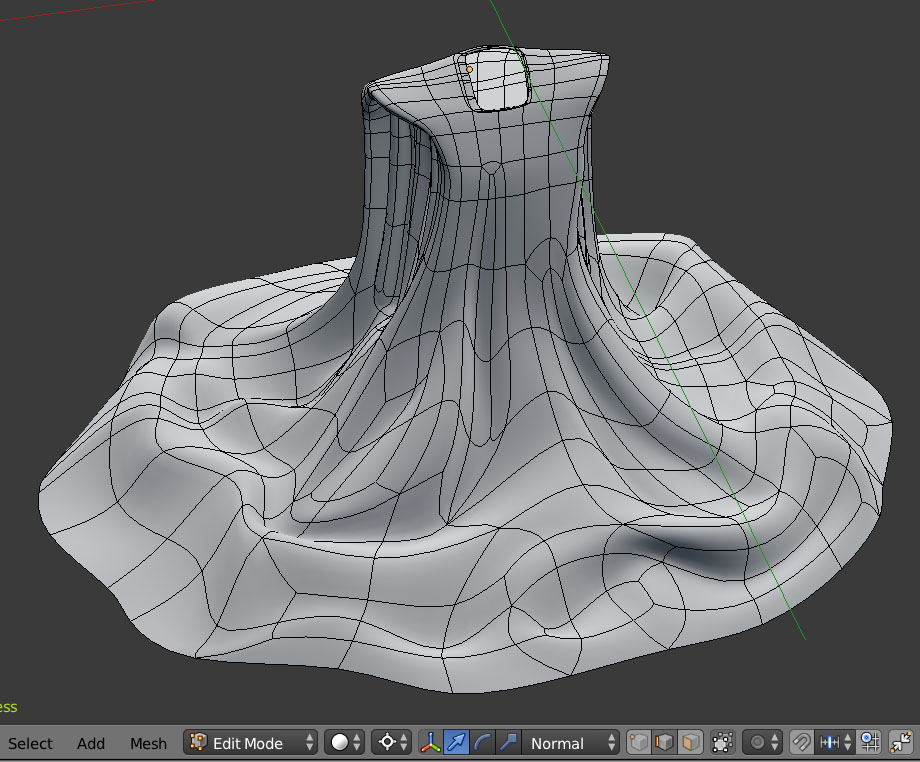
Modeling The Dress
The dress started the same way as the face, though I applied the Mirror Modifier early on once I established the overall inverted funnel shape. The Subdivision Surface Modifier really helped to create smooth folds just by pushing and pulling a few individual vertices around—a situation where you can let Blender do a lot of the modeling for you. I used Inset Faces whenever I wanted a deeper fold and pulled the edge of the dress around using Proportional Editing over a wide area.
Modeling The Hands, Sleeves and Bear
The hands were also started with a cube though without any mirroring—I just created one finger and duplicated it. I created a very basic FK armature to articulate them—even though I wasn’t going to be animating her, modeling the hands in a rest position and then posing them with an armature is definitely the easiest way to go for a hand pose like this.
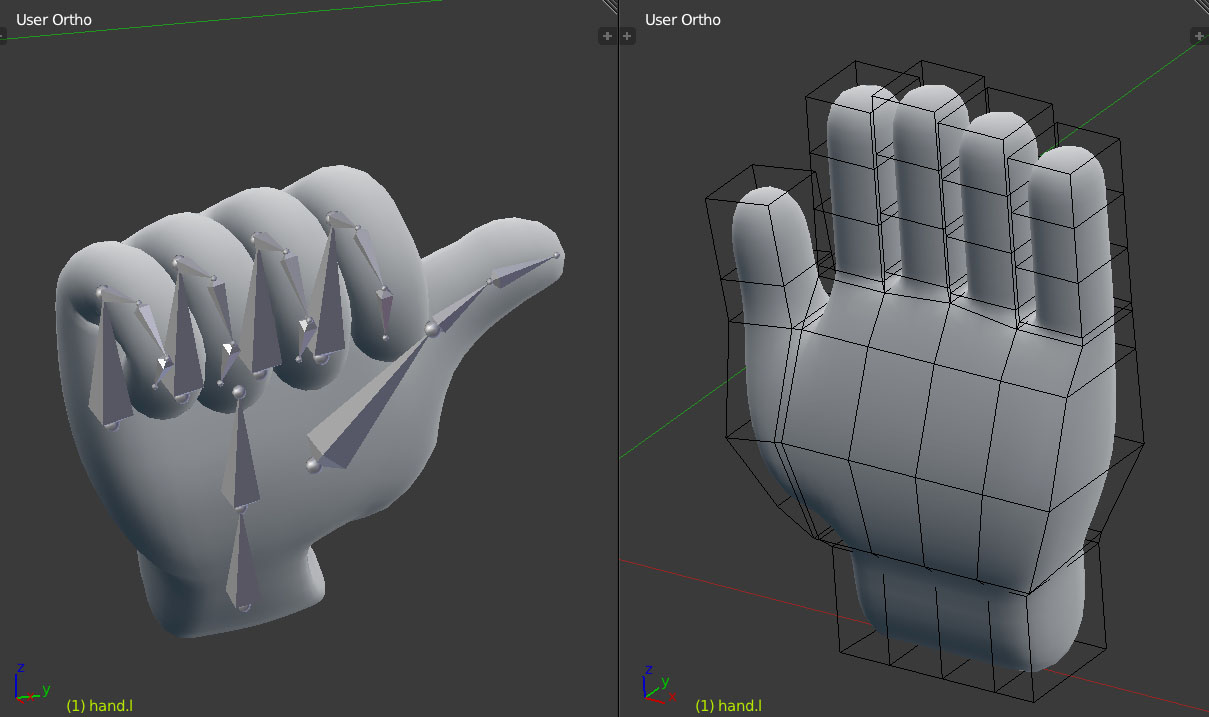
I started the arms with a single vertex and extruded it a couple of times into the pose I wanted, then used the Skin Modifier to fill them out into shape (using Control-A on the individual vertices to taper and bulge the segments that needed bulging and tapering). I applied the Modifier to create the starting geometry for the bandages and then used loop cuts, extrusions and scaling to tuck the edges under each other.

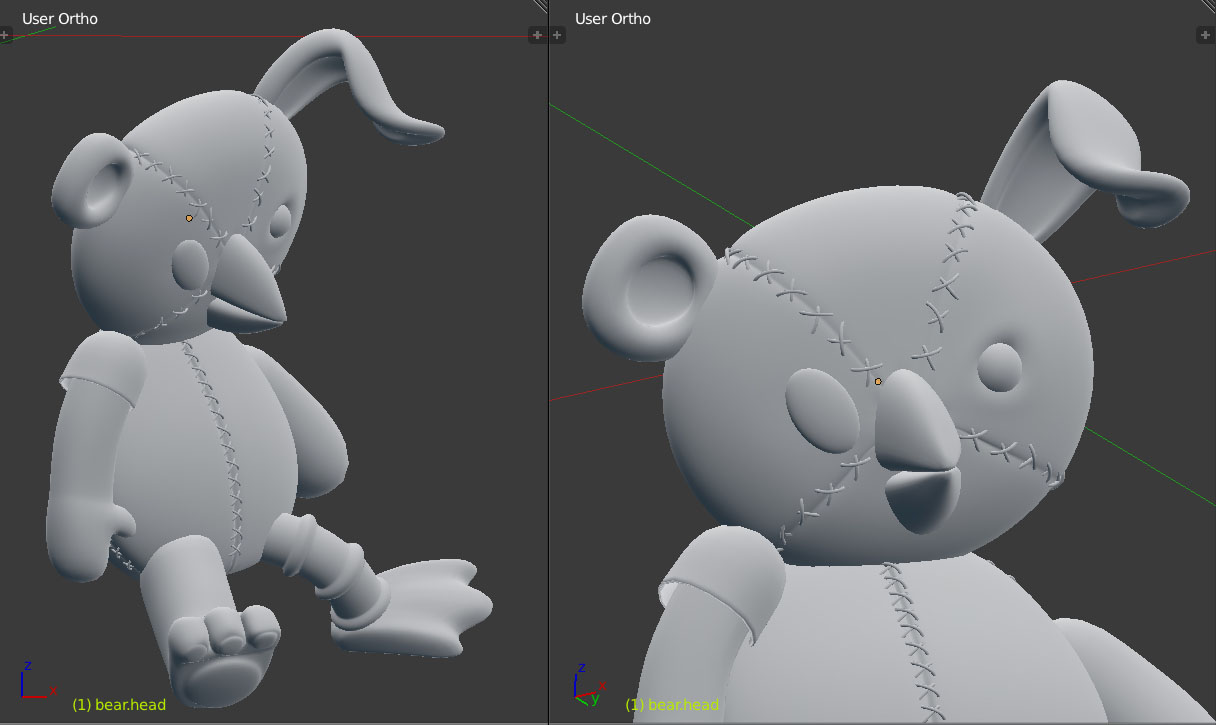
I used a combination of the same techniques to create the separate parts of the bear (the stitching being made with a bezier curve converted to a mesh).
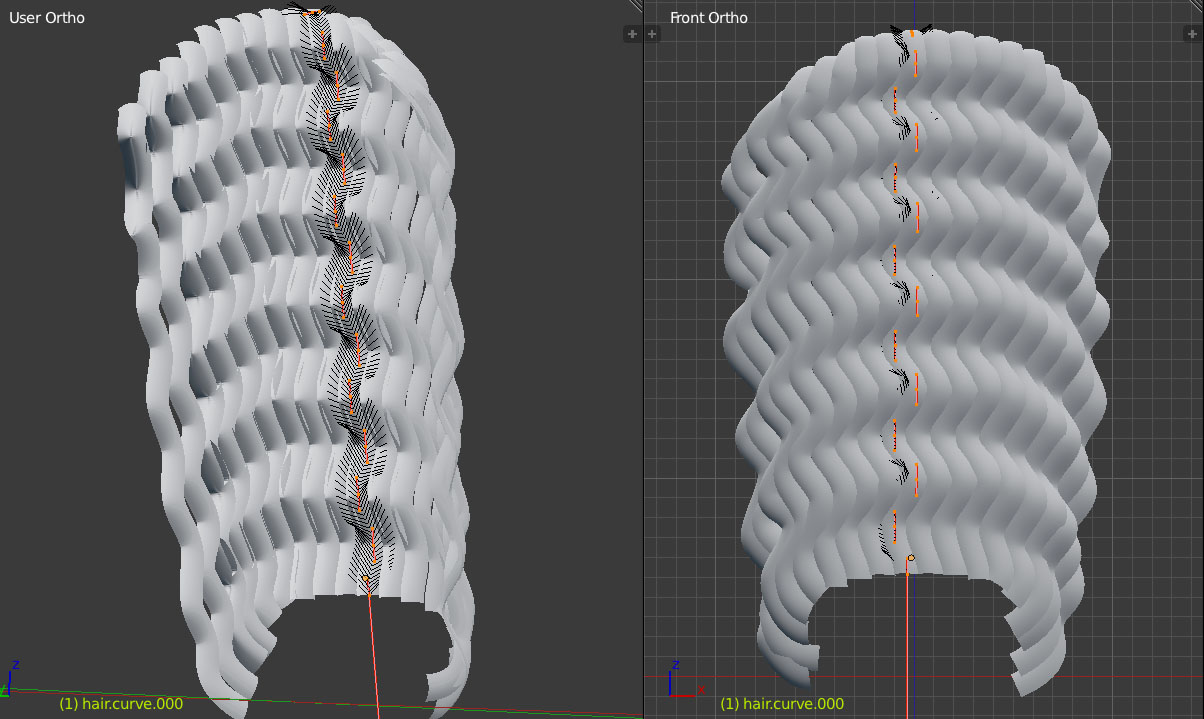
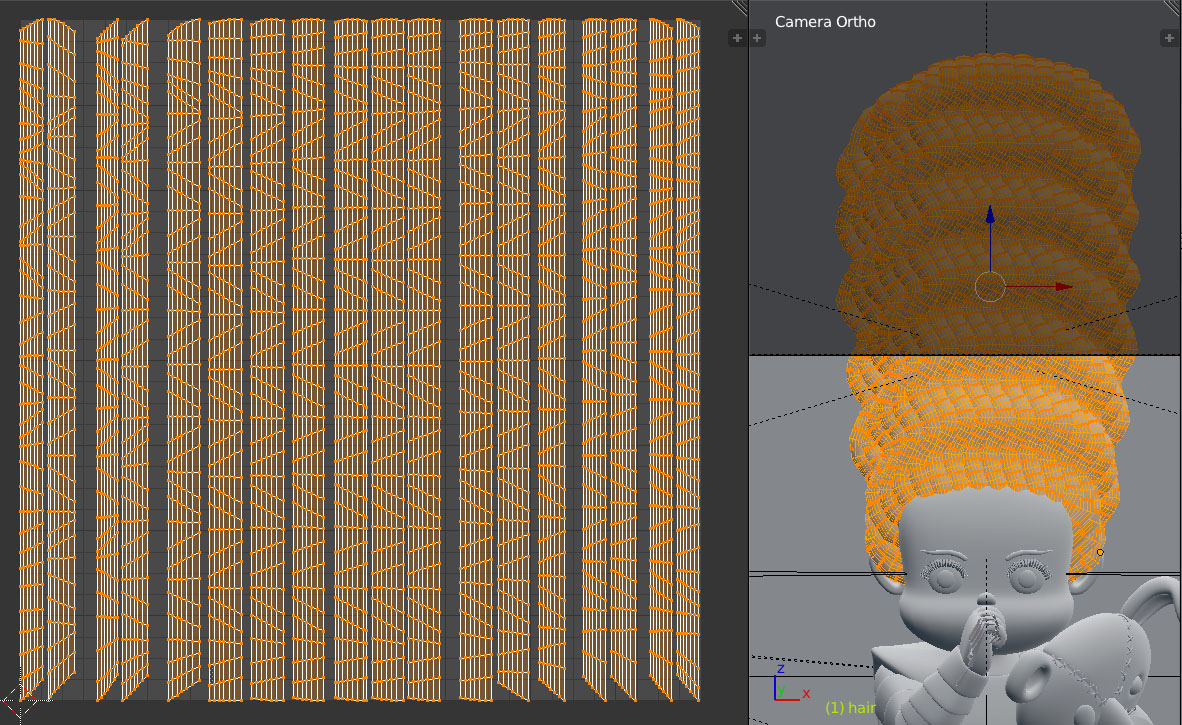
Modeling The Hair
The hair was created with a Bezier curve, something I always avoided using in Blender—I’m so used to the way Bezier curves work in Illustrator that I’m constantly using the wrong hotkeys and end up having to undo everything, multiple times! They were the perfect tool for the job in this case—the control they gave over each undulation of the hair made it the only way to go, so I gritted my teeth and powered through! The User Ortho View in the image shows the rear view of the hair because it gave a clearer indication of the shape of the curve path.
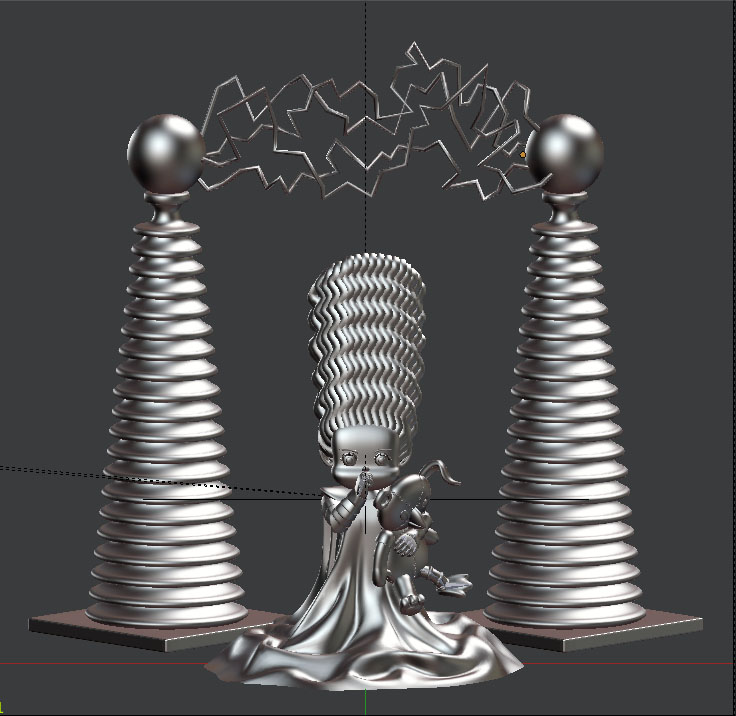
The final modeling:
The modeling for the rest of the scene was straightforward—extruding and scaling a circle a number of times to create a base shape for the towers, using an Array Modifier to stack them up, then applying the modifier and scaling each one in only the x and y dimensions to get the overall tapered shape. I created all 4 walls, a ceiling and a floor for the room because I knew it was going to be reflected in the metal spheres. The energy bolts were created with the Bezier curve, each point set to vector to make them jagged.
Texturing
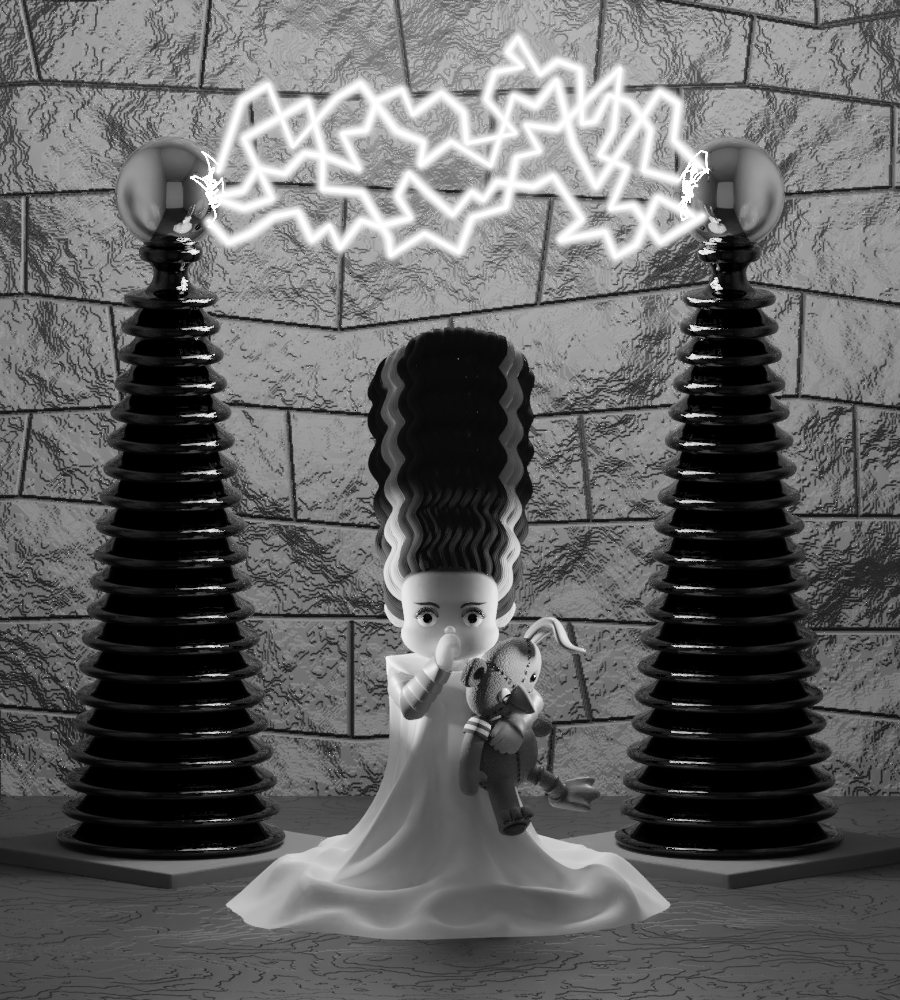
The texturing on just about everything was kept deliberately minimal—I wanted the textures to be as simple as the shapes. I didn’t depart too far from a Principled shader with varying levels of roughness on almost all the elements. I used an Image Texture on the face just to blend the hair color into the flesh color around the hairline. I added Subsurface Scattering to the fleshy parts, actually a bit more than really looked good in color, but I liked the way it made the thumbsucking hand stand out against the face in B&W.
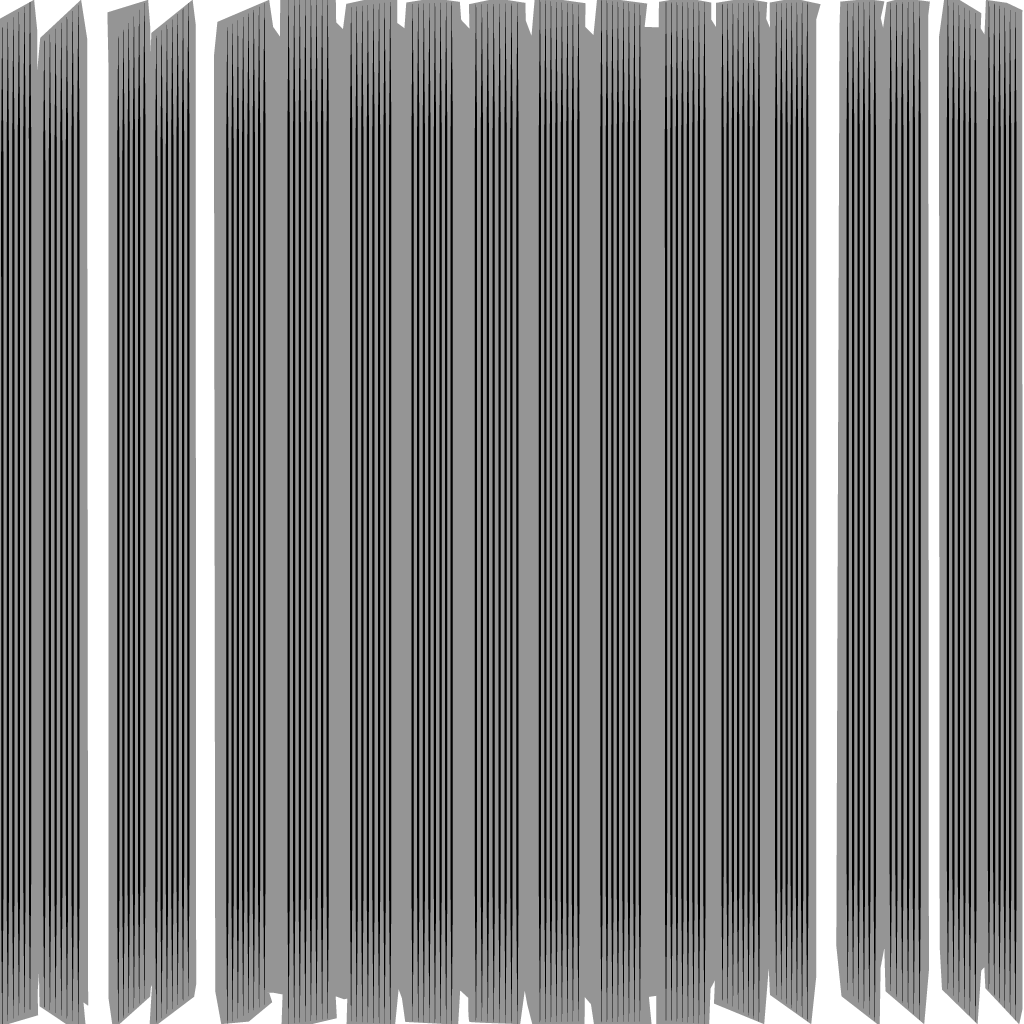
I wanted the hair to have a bit of surface texture but still wanted to maintain the Art Deco, streamlined style of the individual locks, so after unwrapping the UVs and getting them all onto one UV map, I straightened out each UV island into strips using UVs > Weld/Align > Straighten X + Y, Align X +Y and exported the UV map so I could work with it in Adobe Illustrator.
In Illustrator, I just cloned a bunch of straight, tapered lines that were grouped according to the UV map and used the result as a normal map for some texture, black lines on gray so the lines would seem to cut into the surface.
The texturing on the walls came from the Cloud filter in Photoshop and used the resulting image as a normal map. I did the same thing with the floor, but posterized the clouds to make it seem like something you could walk on.
Lighting: Adding Bloom to the Bolts
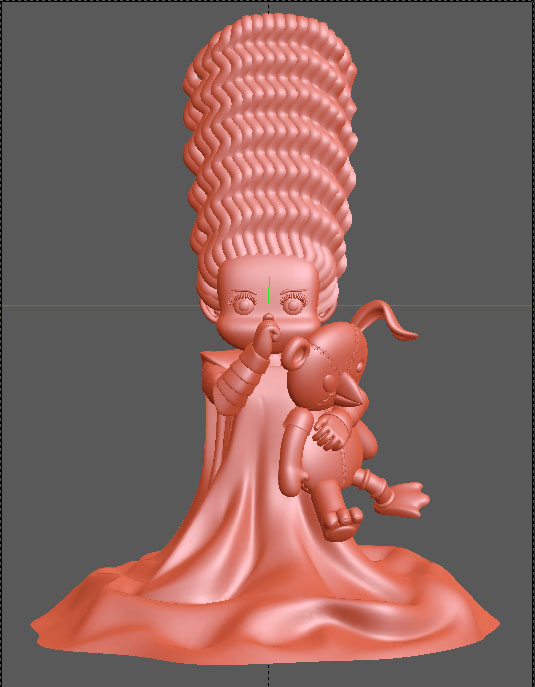
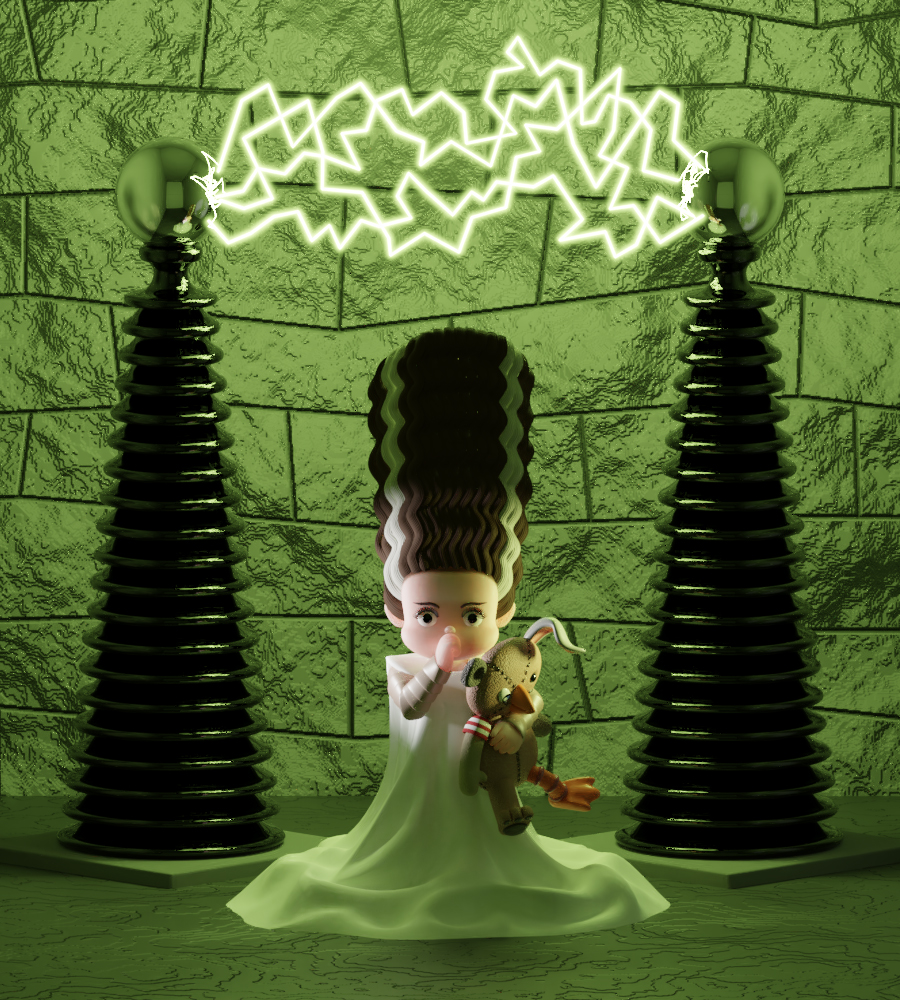
Lastly, the bloom on the energy bolts was created by putting the bolts on separate Render Layers (I have 3 duplicates on 3 different layers with varying emission strengths) and rendering them separately with different levels of blur (Fast Gaussian) in the compositor. I took this straight from Andrew Price’s great Blender Guru lightning tutorial (you can see it here) so I don’t need to make this any longer than it already is! Here are the final images:
Thanks for your interest! I hope this was useful.
About the Author
 Jim McNeill, Freelance illustrator living in Arizona, U.S.A.


Great work, great story and great tutorial !
It is so tempting to model everything perfectly even though parts of the scene will be occluded.
Thanks very much! I was hoping it would be helpful. I always have to resist the temptation to make everything the way I did the project before just out of habit when there could be a better way to get what I want.
This walk through was incredible! Thanks for taking the time to write it up! Loooooove the final image!
Thanks very much! I hope it gives you some ideas–I never stop being amazed at the number of ways there are to do EVERYTHING in Blender!