

About me
Hello, my name is Yuri Ilyin, I'm a reporter, a musician and a CG hobbyist from Moscow, Russia.
As a hobbyist I've got no formal training in Blender. I had a couple of CG training courses at RealTime School, but neither were related to Blender.
I first opened the suite about 10 years ago when it was just version 2.4*. I have kept trying to do things with it ever since. I’m fascinated with Cycles and really looking forward for EEVEE. In fact I have already used its Alpha versions to do some videos for my music projects.
Inspiration for Lotsa Crystals
Right now I'm slowly trudging through a larger project of mine, and at one point I felt like adding some crystals for decorative purposes. The idea, in fact, was to fix up something quick and dirty (and reasonably low-poly) and see if it stuck.
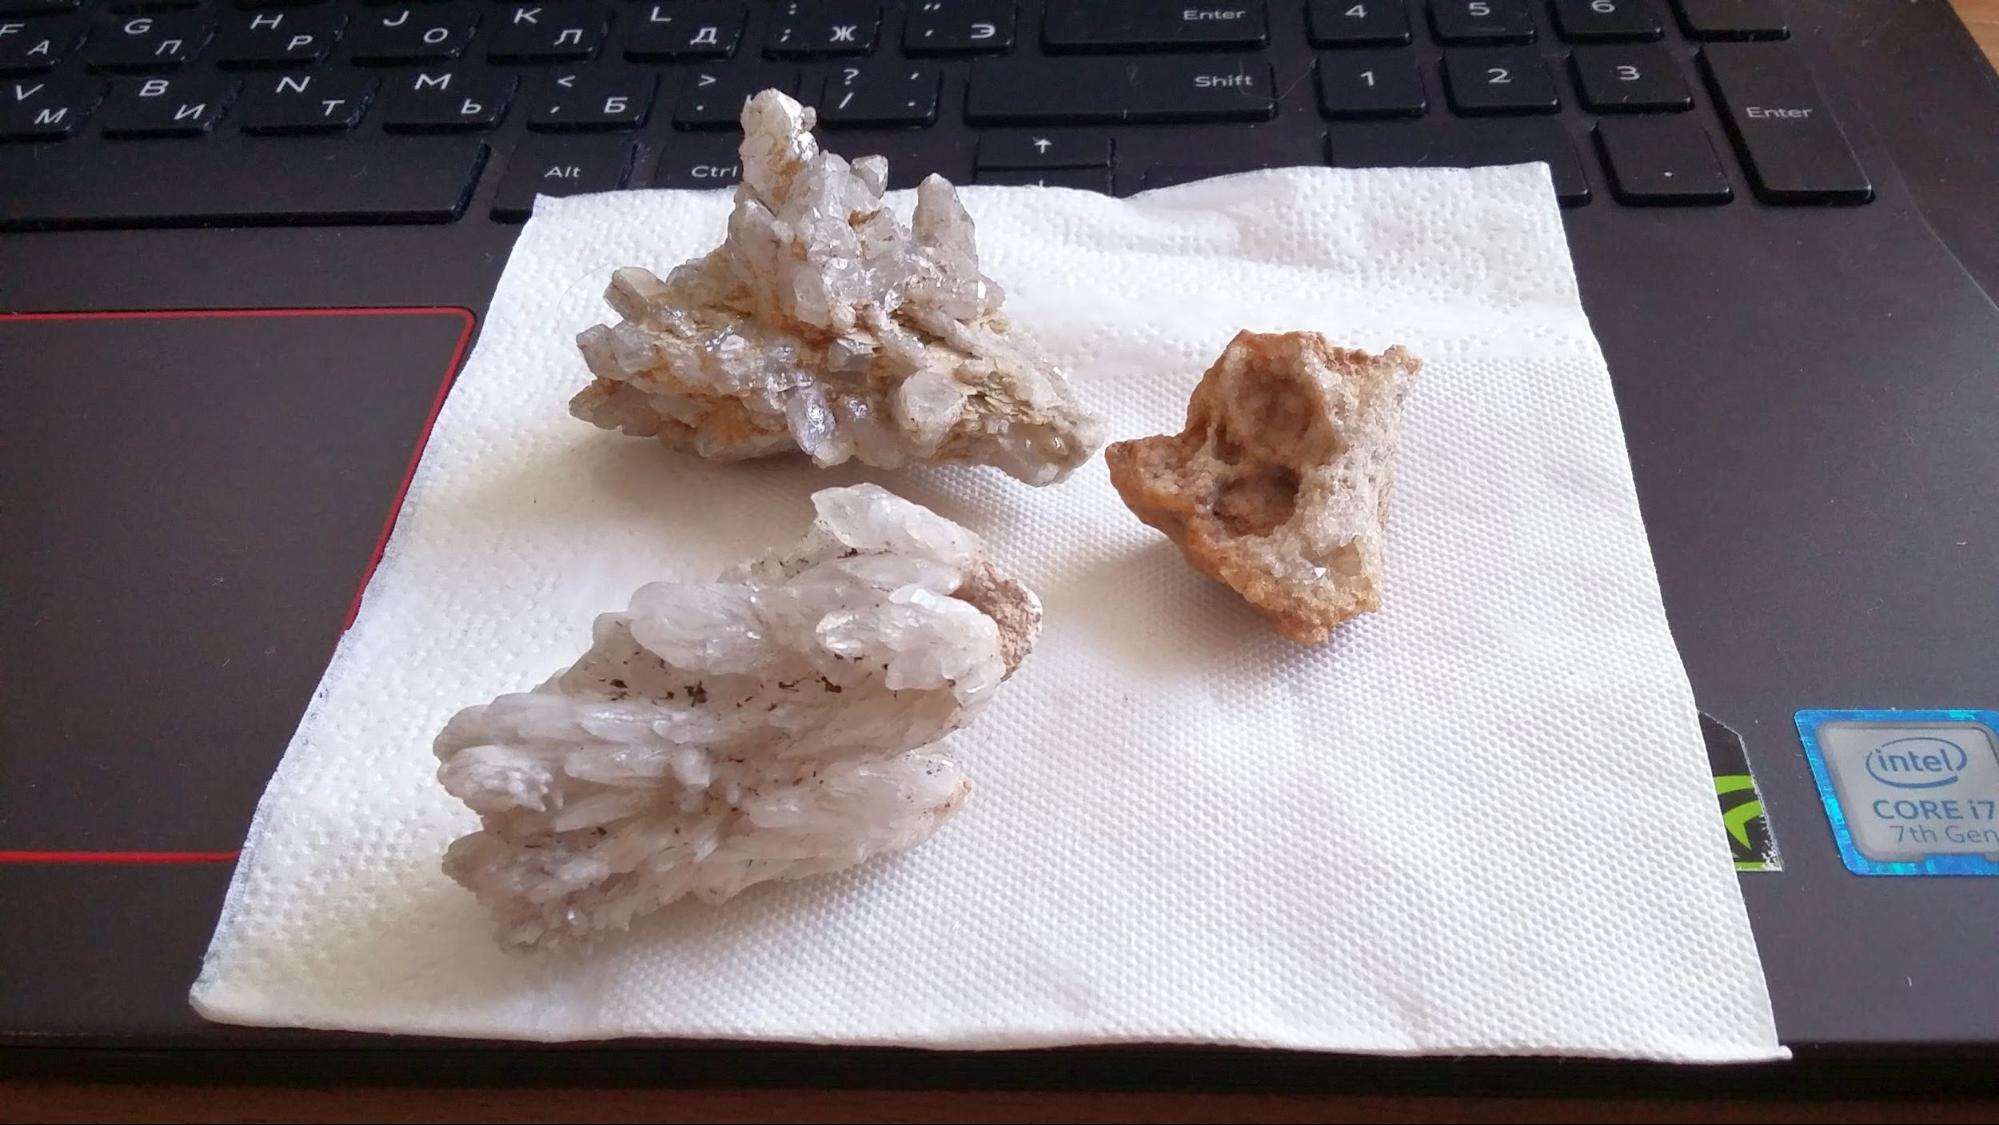
Besides, I had a small crystal cluster on my desk, and more of them in my room. I collected them in my early years. My father brought me some from a shop with a local mineralogy museum; others were provided by our family friends. And quite a few I've picked up myself from the ground. I used to spend most of the summertime in a village not far from fabulous Gzhel; that area has flinty soils with lots of small fossils regularly washed out of the ground by rains, along with some heavily weathered quartz clusters. The latter aren't much to look at until you crack them in two (with a hammer or a hammerlock), and inside there would be a sparkling beauty.
And, of course, a huge part of inspiration was Ivaylo Gogov's fabulous Crystal Inspiration. Unfortunately he has never provided a tutorial for his magic works.
I was especially interested in simulation of the crystal's internal/subsurface content, but eventually failed to reach this goal.
Actually I wasn't going to do anything too sophisticated and advanced. Nevertheless, I ended up with three evenings of tinkering with materials before producing the eventual image.
Tools Used
Hardware
- Dell Inspiron 15 7000 Gaming laptop
- Core i7-7700HQ CPU, 2.8GHz, 16GB RAM, GeForce GTX 1050 Ti, 4GByte VRAM.
Software
- Blender 2.79
- GIMP 2.10 for Windows
Modelling
The easiest part, in fact. The larger cluster on top is just a few (27 to be exact) irregular crystal-like low-poly shapes. The only notable trick here is that all of them have been joined into a single object, then smooth-shaded; having all the faces selected I struck the 'i' key (inset polygon). Why? Crystal edges can be very sharp, but they still are not mono-dimensional—there is a width, even if minuscule. Without it a human eye would immediately detect 'fauxness' of larger crystals at a close distance, so I decided to add some width.

As for the smaller crystals, I used Blender's hair system. A stack of five ParticleSystems with Emission Numbers ranging from 250 to 10000, Hair Length ranging from 3.000 to 10.000, emitting from Faces or Volume, with 'Random' and 'Even Distribution' checked. Particles for every other ParticleSystem are rendered as objects ('Render' section). I modelled five smaller crystals to be used as sources for hair rendering - and moved them away from camera.
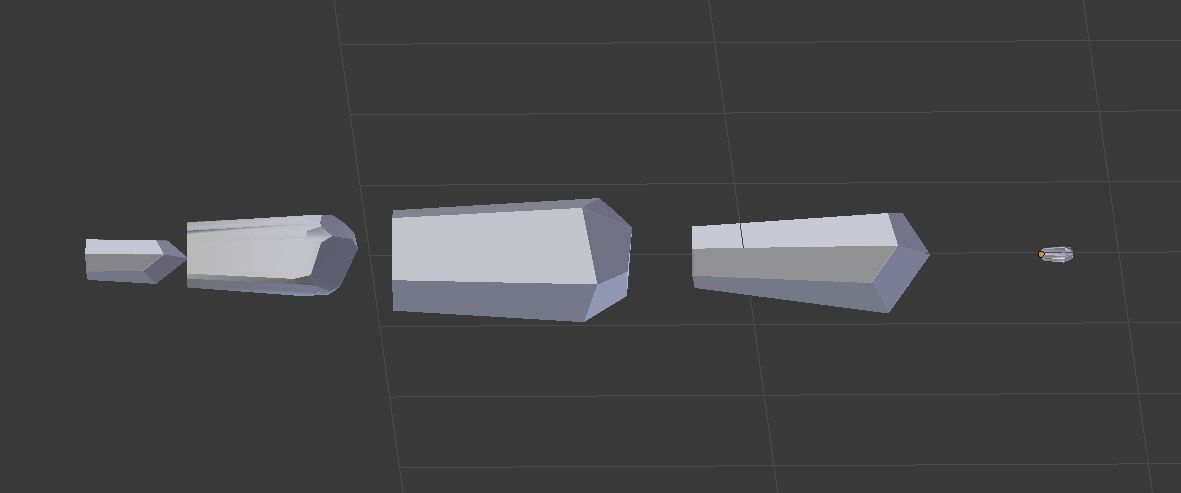
The smaller crystals don't really need added width for edges and smooth shading (although I still had them that way), so one can save on the Faces number, if this matters at all. The trickier part here is to orient the smaller crystals' source models properly: one needs to rotate them at 90° along the Y axis to have them oriented properly when the Hair system is used. Additionally, one needs to check 'Rotation' along with 'Scale' with 'Render' settings (and also check the separate 'Rotation' section; I used it, but only for some Particle Systems). 'Size' and 'Random Size' values have to be kept in check.
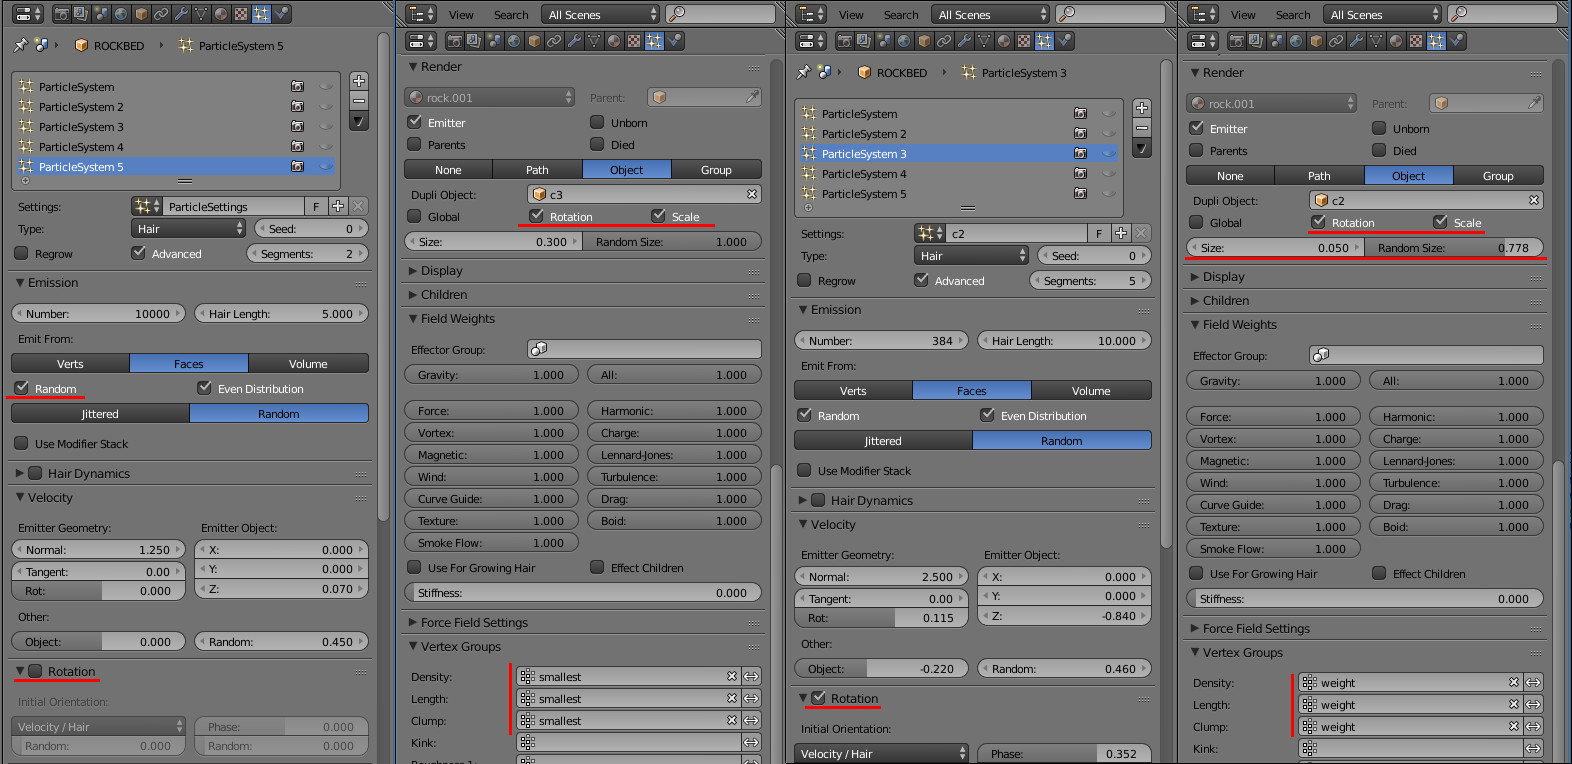
In fact there are multiple 'Random' settings around - at 'Render', at 'Rotation', at 'Velocity'. All of them can be used to fine-tune the orientation of the objects multiplied with Hair. This can be a tad confusing, but eventually helps to achieve the goal.
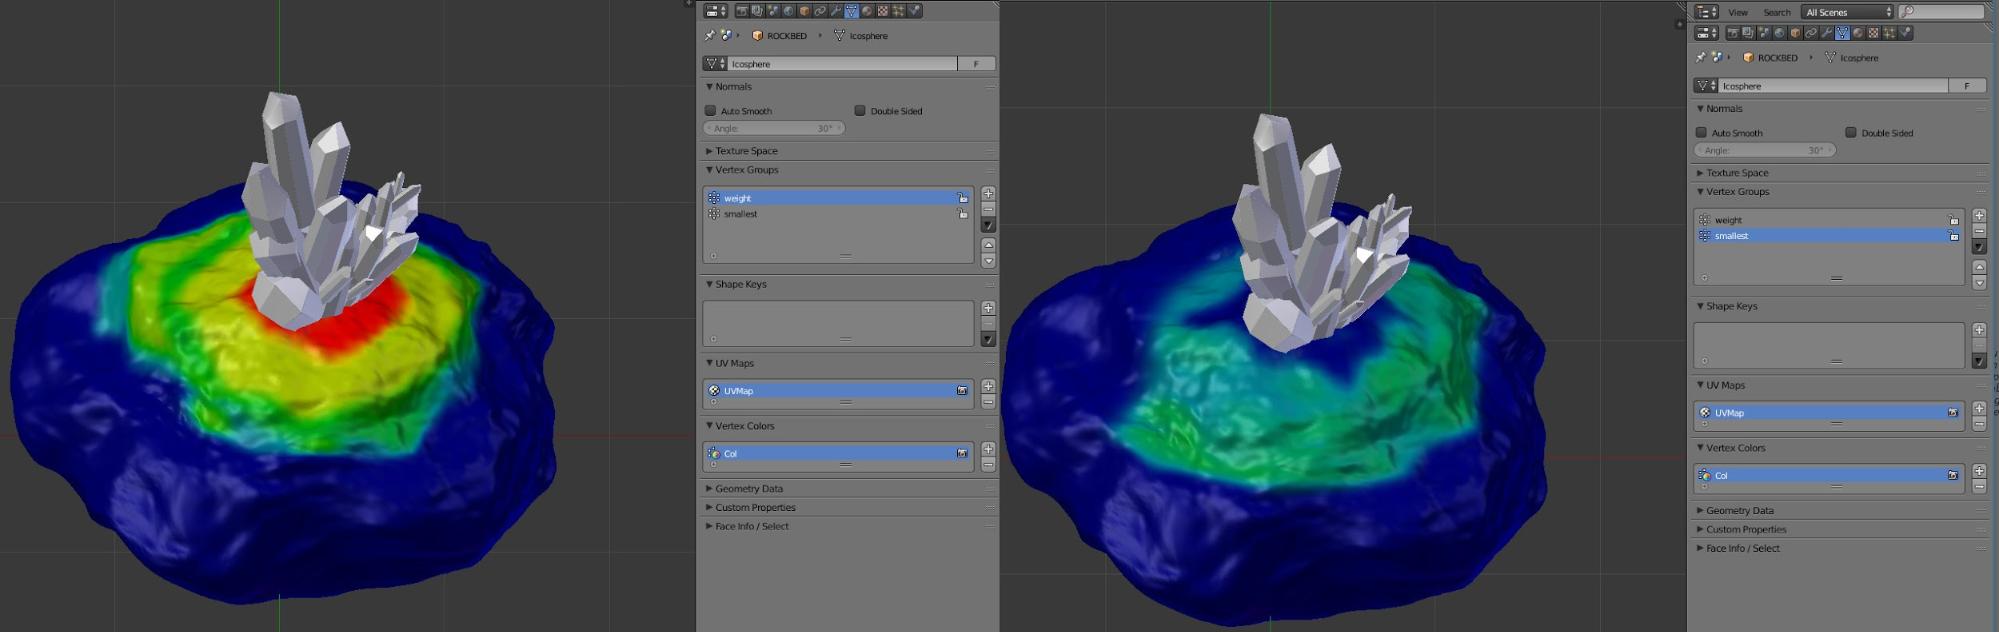
Then goes the distribution trick. As usual, I've been using Weight painting in order to control both Density, Length and Clump values (see Vertex Groups). The idea was that the larger crystals would be densely packed around the central cluster, whereas the smaller ones would be distributed increasingly sparsely away from the centre. So there is a thick red spot on the top of the 'rock bed' going yellow, green and cyan further to the edges. Eventually I've added yet another group (see the screenshots) for more exact distribution of the smallest crystals.
The crystals were UV-unwrapped using Smart UV Project with default settings.
Rockbed was a mere Icosphere warped with Sculpting (with Multires modifier and two Catmull-Clark subdivisions), so that it looked 'rock-like'. I tried to use a procedural approach: Cycles' Experimental feature set allows for 'true' Displacement using material nodes; but I failed to get anything reasonable myself. And when I tried to use the Procedural Rock Generator I ran into a different problem. It appears that the particle system disregards the material ('true' displacement) or just goes ahead of it; this led to smaller crystals hovering over the rockbed - the latter was 'displaced', whereas the particle system still read the original surface.
So I reverted to hand-sculpting the thing.
Materials and Texturing
Now here comes the trickiest part.
Crystals material
At first it seems logical to use the Glass shader for crystals, but it is notoriously noisy and prone to fireflies. One has to set Sampling values heavens-high, and wait for many hours for the image to get cooked. Besides, test renders with lower sampling settings won't produce any veracious results. Besides the resulting 'glass' tends to be very dark.
So I've 'ripped the other guys' work'. A few years ago a distinguished gentleman going by the name Gleb Alexandrov dropped an absolutely terrific tutorial on 'faking' a piece of ice (ab)using a few neat features of Cycles. The tutorial is still available here.
In the video he still uses Glass shader, but below in the page linked there is an interesting set of nodes allowing you to fake light scattering within a translucent object using Translucent BSDF and a Geometry/Backfacing Node.
So I slavishly copied this nodework and... failed to achieve the necessary results. Much later I discovered that I had misplaced some nodes - Translucent BSDF with Value node must go to a different socket. So it is almost surprising that I have achieved anything at all.
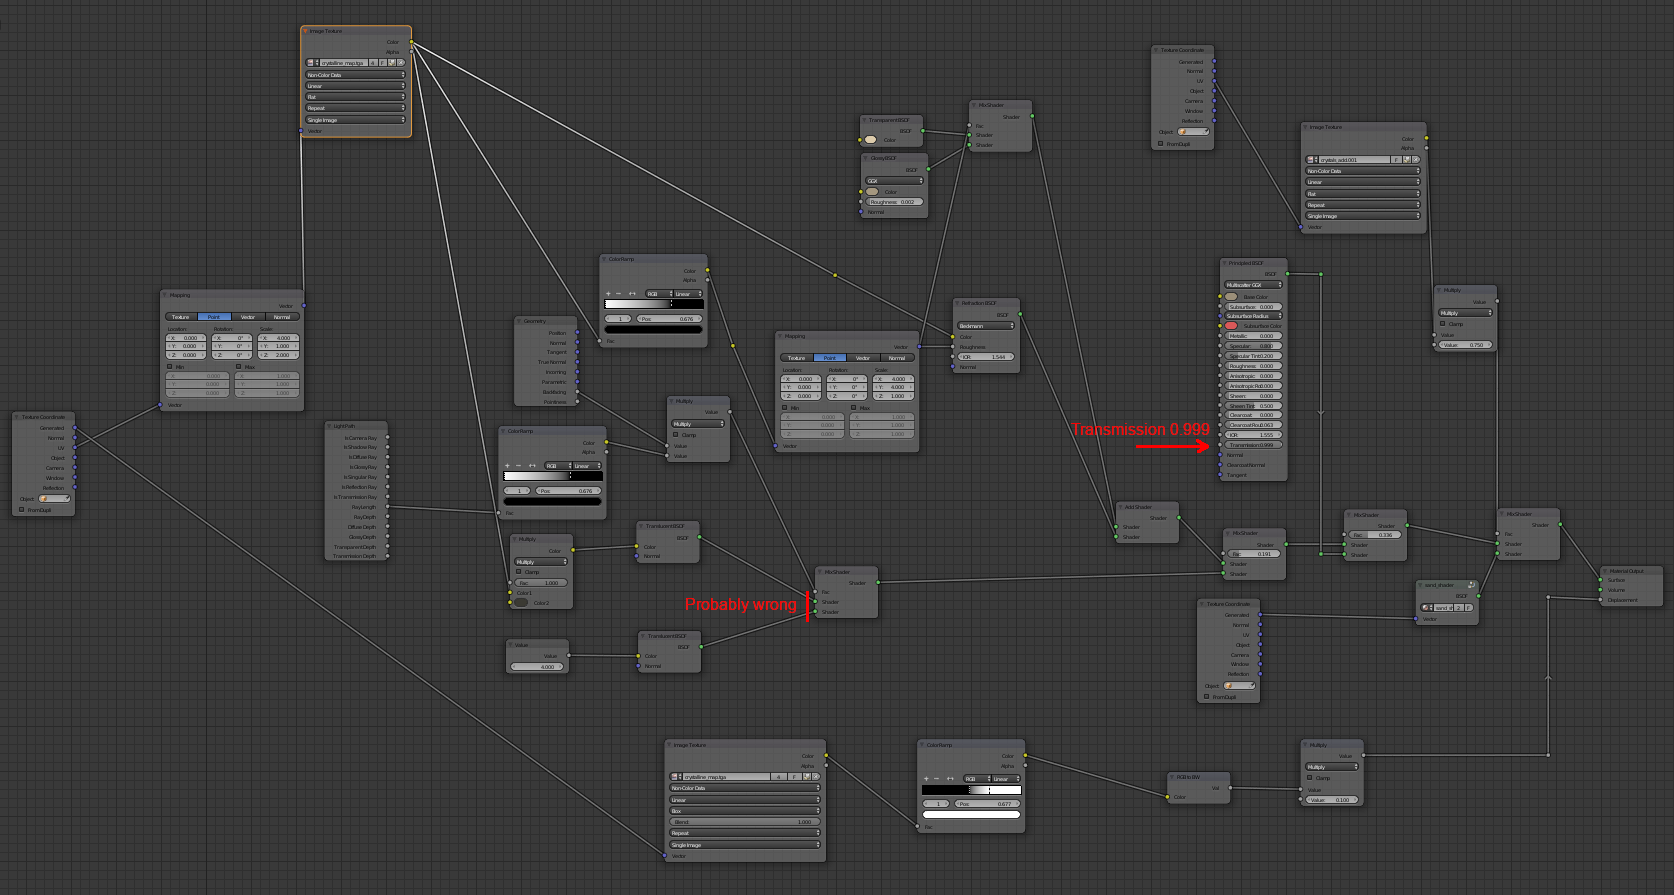
Eventually I finished up with some mad noodlework mixing together Translucent, Transparent, Glossy and Refraction BSDF, along with Principled BSDF only used for color and with a Transmission setting at 0.999 and different variations of yellow and beige colors here and there.
It worked somehow. It wouldn't do, though, without a texture that I used to control roughness and other variables, including transparency: 'Crystalline map'.
A few months prior I got my hands on 3D-Coat, and while studying its materials I spotted a very interesting texture used for simulating metals. Although it was definitely a noise map, it had distinct 'crystalline' properties.
While this kind of a texture is definitely achievable using Blender/Cycles' procedural maps, I wanted to go the shorter way, and used GIMP to create something similar.
The approximate algorithm was the following:
- Filters - Render - Noise - Plasma (with added Turbulence)
- Colors - Desaturate (not sure which setting I used, but it's not too important)
- Filters - Artistic - Cubism (Tile size increased)
- Edit - Fade Cubism (Grain Merge mode, Opacity 75; Overlay mode with 100 opacity works too)
- Filters - Artistic - GIMPressionist (Crosshatch or Embroidery)
- Filters - Map - Tile Seamless (so that you have a tiling image).
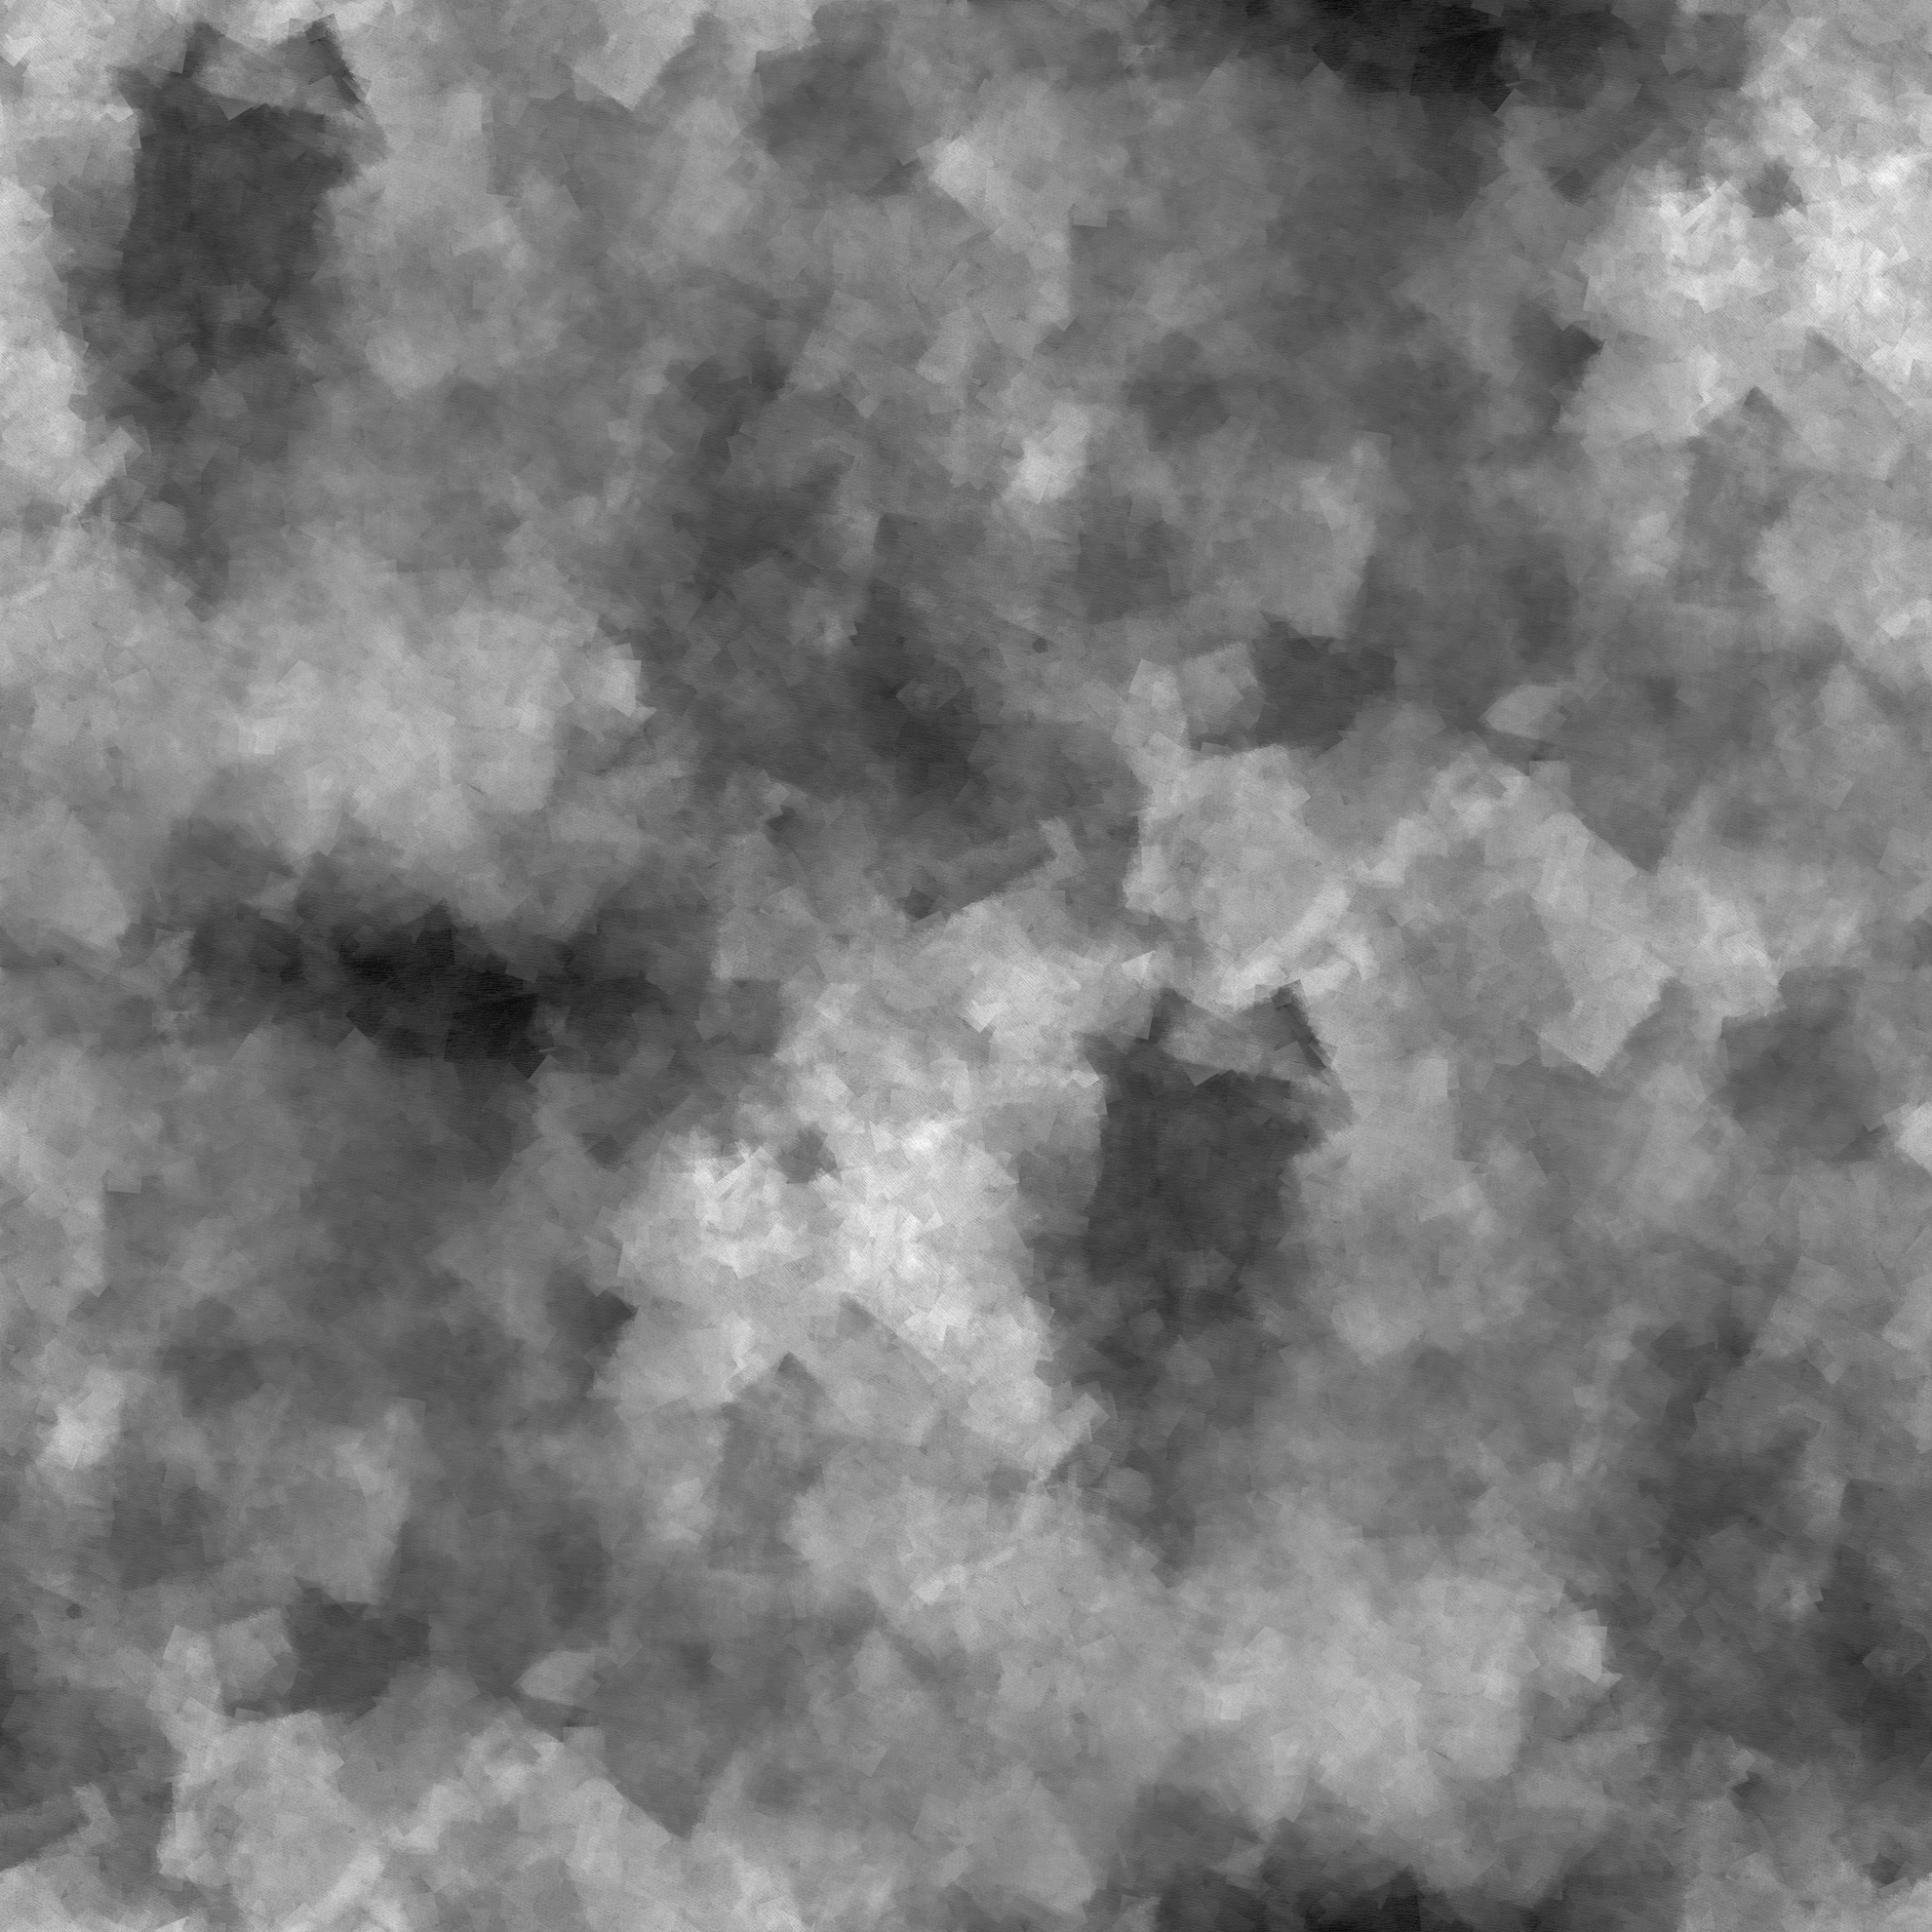
The resulting image
For whatever will be controlled with this texture, i.e. roughness, translucency, etc., white areas are max, and black are zeros. The more diversity, the better the result.
The crystalline map was used for simulating some petty irregularities and flaws on the crystals' surfaces themselves.
Rockbed material
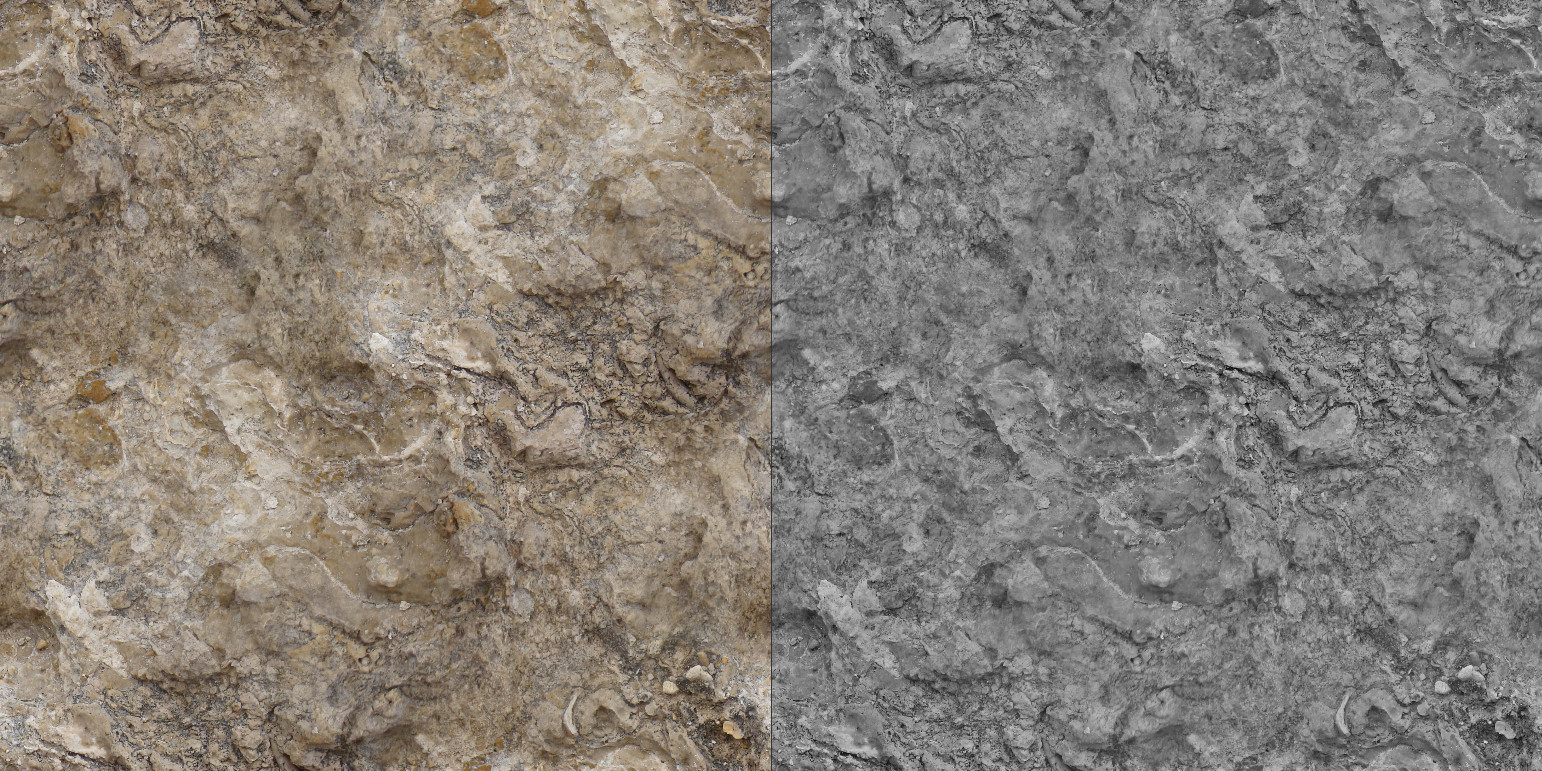
Again, the basis here is a humble photo image, not some fancy procedural texture (I failed to achieve any reasonable results procedurally).
I have photographed a few rocky surfaces in the Mediterranean (Cyprus, Turkey) and Black Sea regions (Crimea in 2011) on grey days, getting some texture-ready images. I took two pictures of rock from Turkey, and used GIMP to make it tileable; then I used a high-pass filter to produce a displacement map (well, it's rather a bump map, not a real displacement thing), which was mixed with procedural displacement using a noise texture. The raster displacement image was also plugged into Specularity input filtered with ColorRamp node.
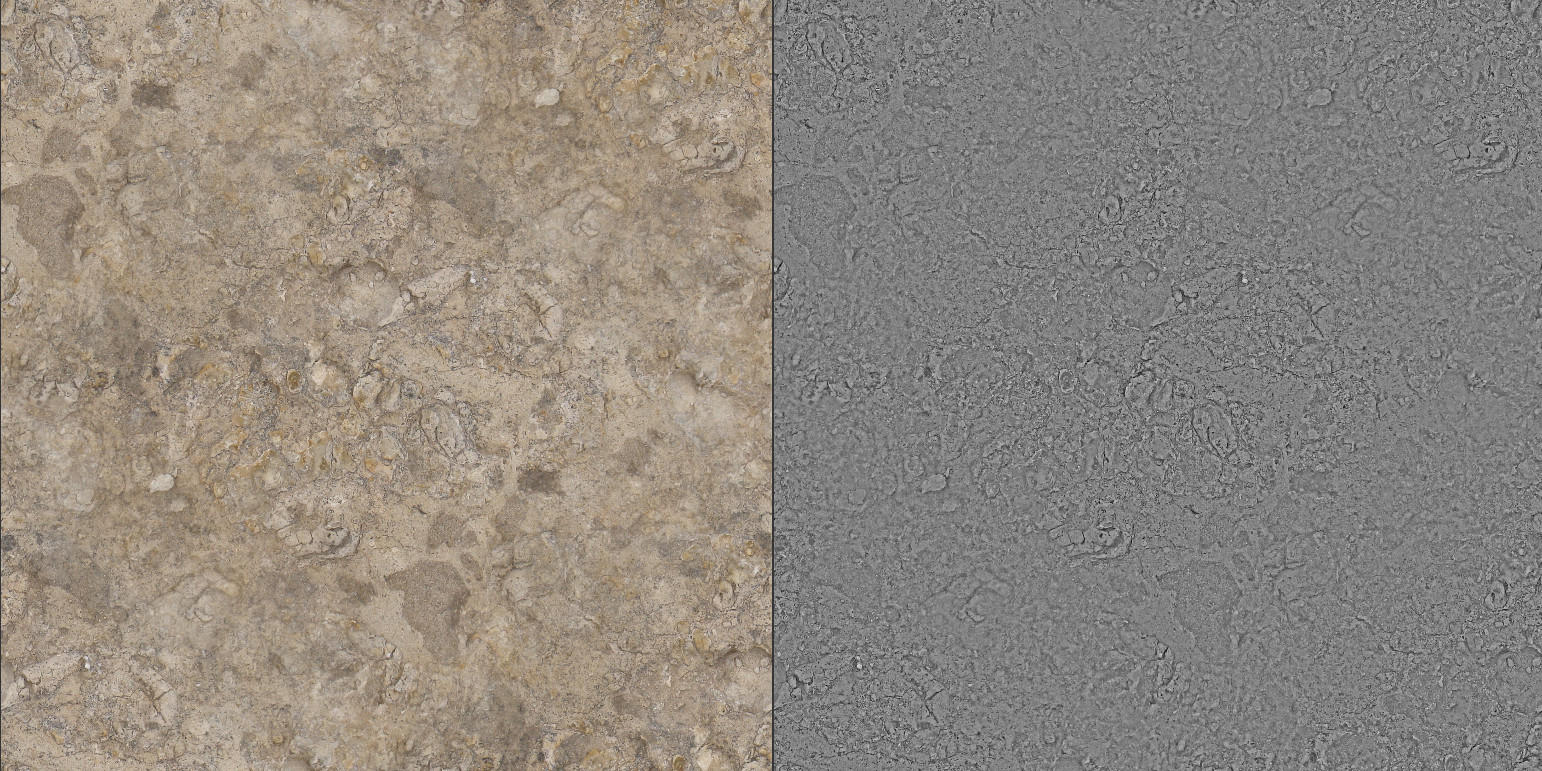
As a finishing touch, there was also a 'sand' layer added: the surface of the bedrock under the crystals would look better if covered with sand. The sand was produced using yet another texture from the same set and Principled shader.
Vertex painting was used as a factor for distributing the sand:

It took me an extra hour and a half to re-render the image with sand added.
One extra thing: I've handpainted the areas where the crystals' surfaces adjoin for the sake of AO simulating, and used this texture to get crystals themselves sanded a bit too. The effect isn't too pronounced, though.
Lighting and Rendering
I decided not to use any HDRI maps; a solid dark blue-grey background was just what I needed. The final colour, in fact, emerged during post-processing.
The light sources are planes with Emission shaders.
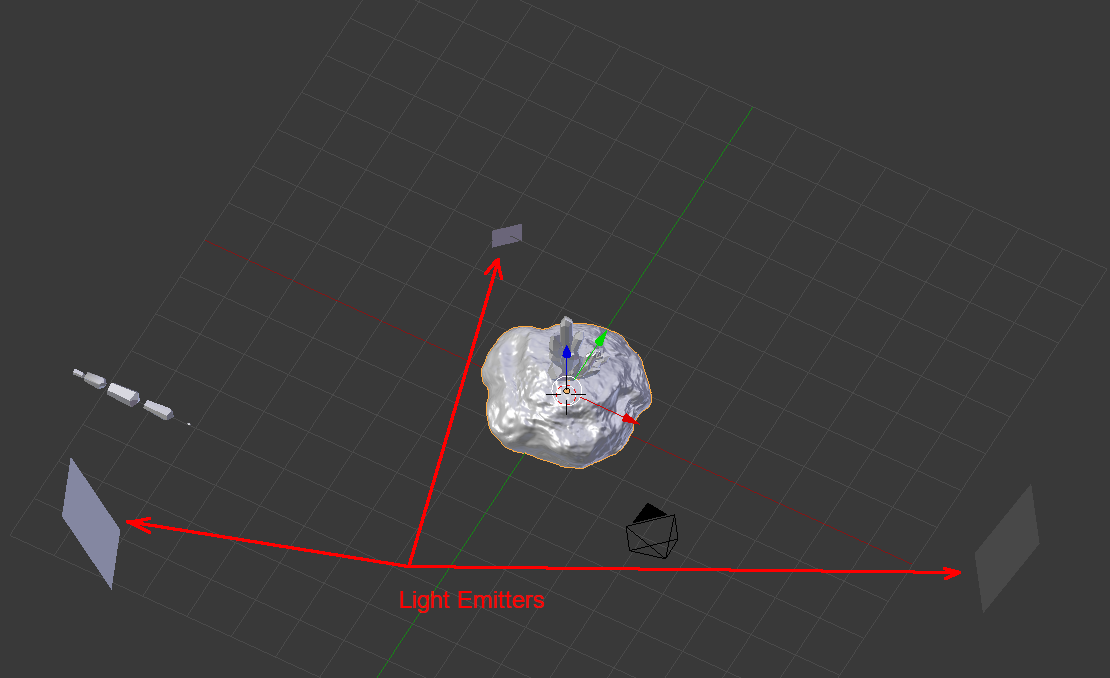
The left one has Blackbody with temperature 5500 degrees and Constant Strengths set at 4.000 (Smooth 16.000).
The right one has a sky-blue color, Constant strength set at 1.000 and Smooth at 0.200.
Then there is the third emitter, a smaller plane set behind the crystals just opposite the camera, producing some strong backlighting. The color is light yellow, Strength is 5.000, no Light Falloff node is used.
With composition guides enabled, I positioned the camera so that points of importance would coincide with crossings.
Render settings: GPU/CUDA; 1024 samples, Clamp Direct 0, Clamp Indirect 3.00 (to kill some fireflies), Light Sampling Threshold 0.01, Sobol pattern.
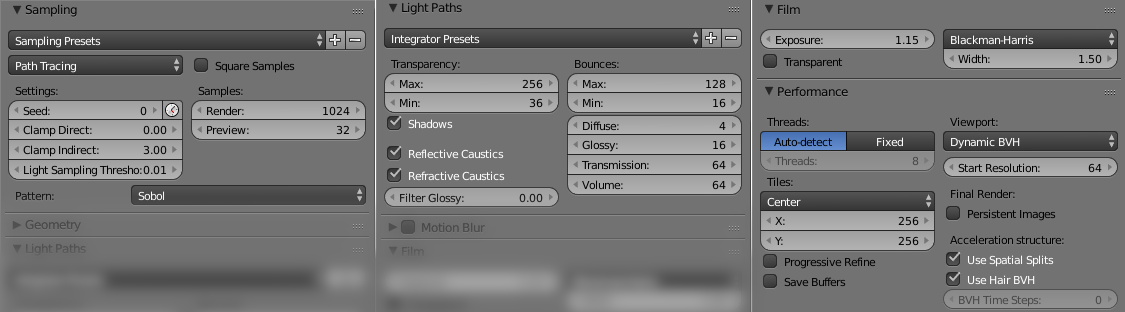
I did some fiddling with Light Paths in order to ensure the necessary depths of transparency: Max Transparency was set to 256, Max Bounces to 128, Transmission and Volume were set to 64.
I also increased Film Exposure to 1.15 to make the image slightly brighter, since Clamp Indirect setting has a dulling effect.
What really helped was Denoising. I used default settings, although decreasing the radius and Strength could have saved me some details, I think.
Anyway, denoising helped to achieve that 'milky' look of the crystals.
Rendering took about 1.5 hour.
Post-Processing
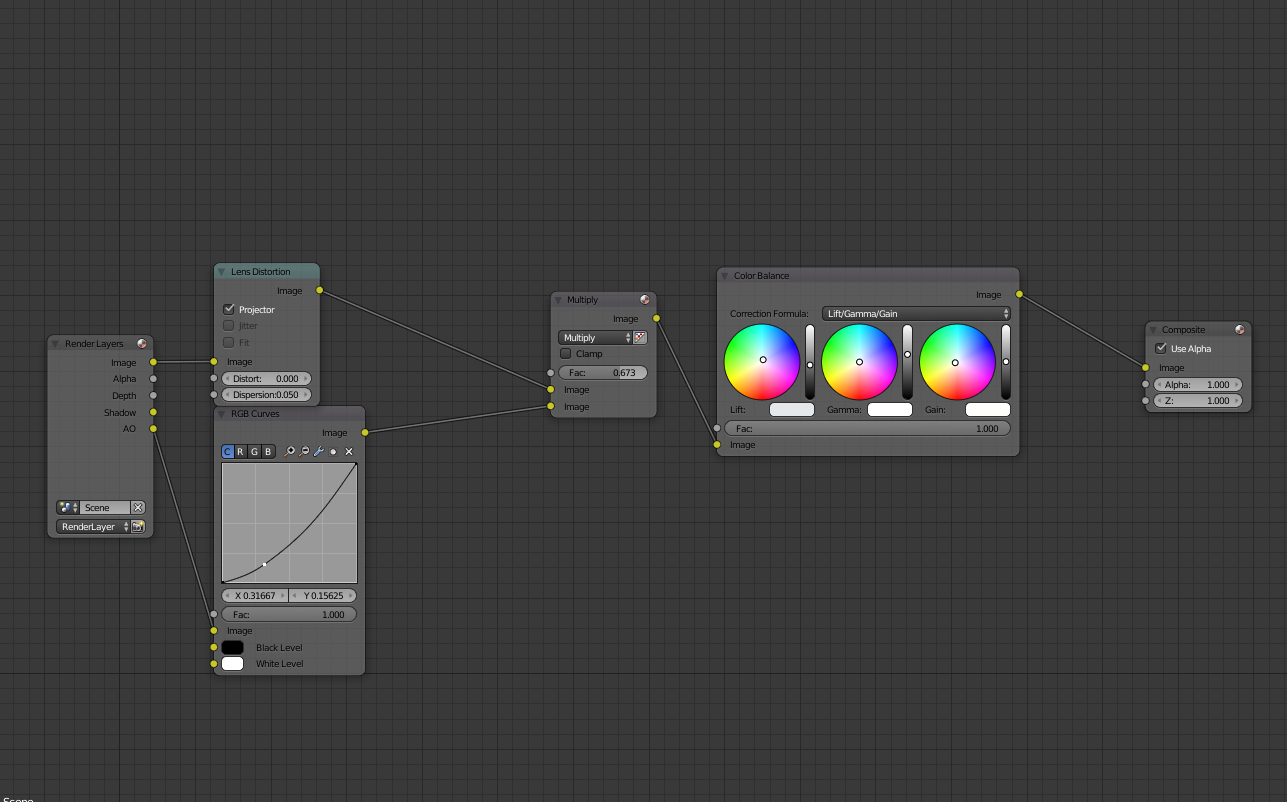
I only used the obligatory Lens Distortion and Color Balance nodes, bringing up some color dispersion and increasing Gamma (i.e. midtones), and mixed AO pass with lens-distorted image using Multiply (at 0.673) in order to make the image more pronounced. I don’t quite remember, but it seems that no extra tweaking in GIMP was necessary.
What Has Been Underachieved and What Could Have Been Done Better
First of all, I've got a gut feeling that the crystal material can and must be made in a more smart, straightforward and, ultimately, professional manner. I have yet to prove it, though.
Whereas Gleb Alexandrov suggests adding a few objects inside the piece of ice or crystals in order to create internal content, Ivaylo Gogov seems to have achieved this without using any extra objects. I tried to use Volume nodes but got no good results. Perhaps I will try again. In my image, what looks like crystals' inside content is part reflections of the neighbouring crystals, and part variations of transparency/translucency achieved with the image texture.
Principled BSDF can help produce a surprisingly nice glass/quartz-like material with almost maxed-out transmission.
I'm positive that all the image textures I used could have been created procedurally, without using any photographs or extra tools. But one must be very good at math and know exactly what every procedural texture in Cycles can be used for.
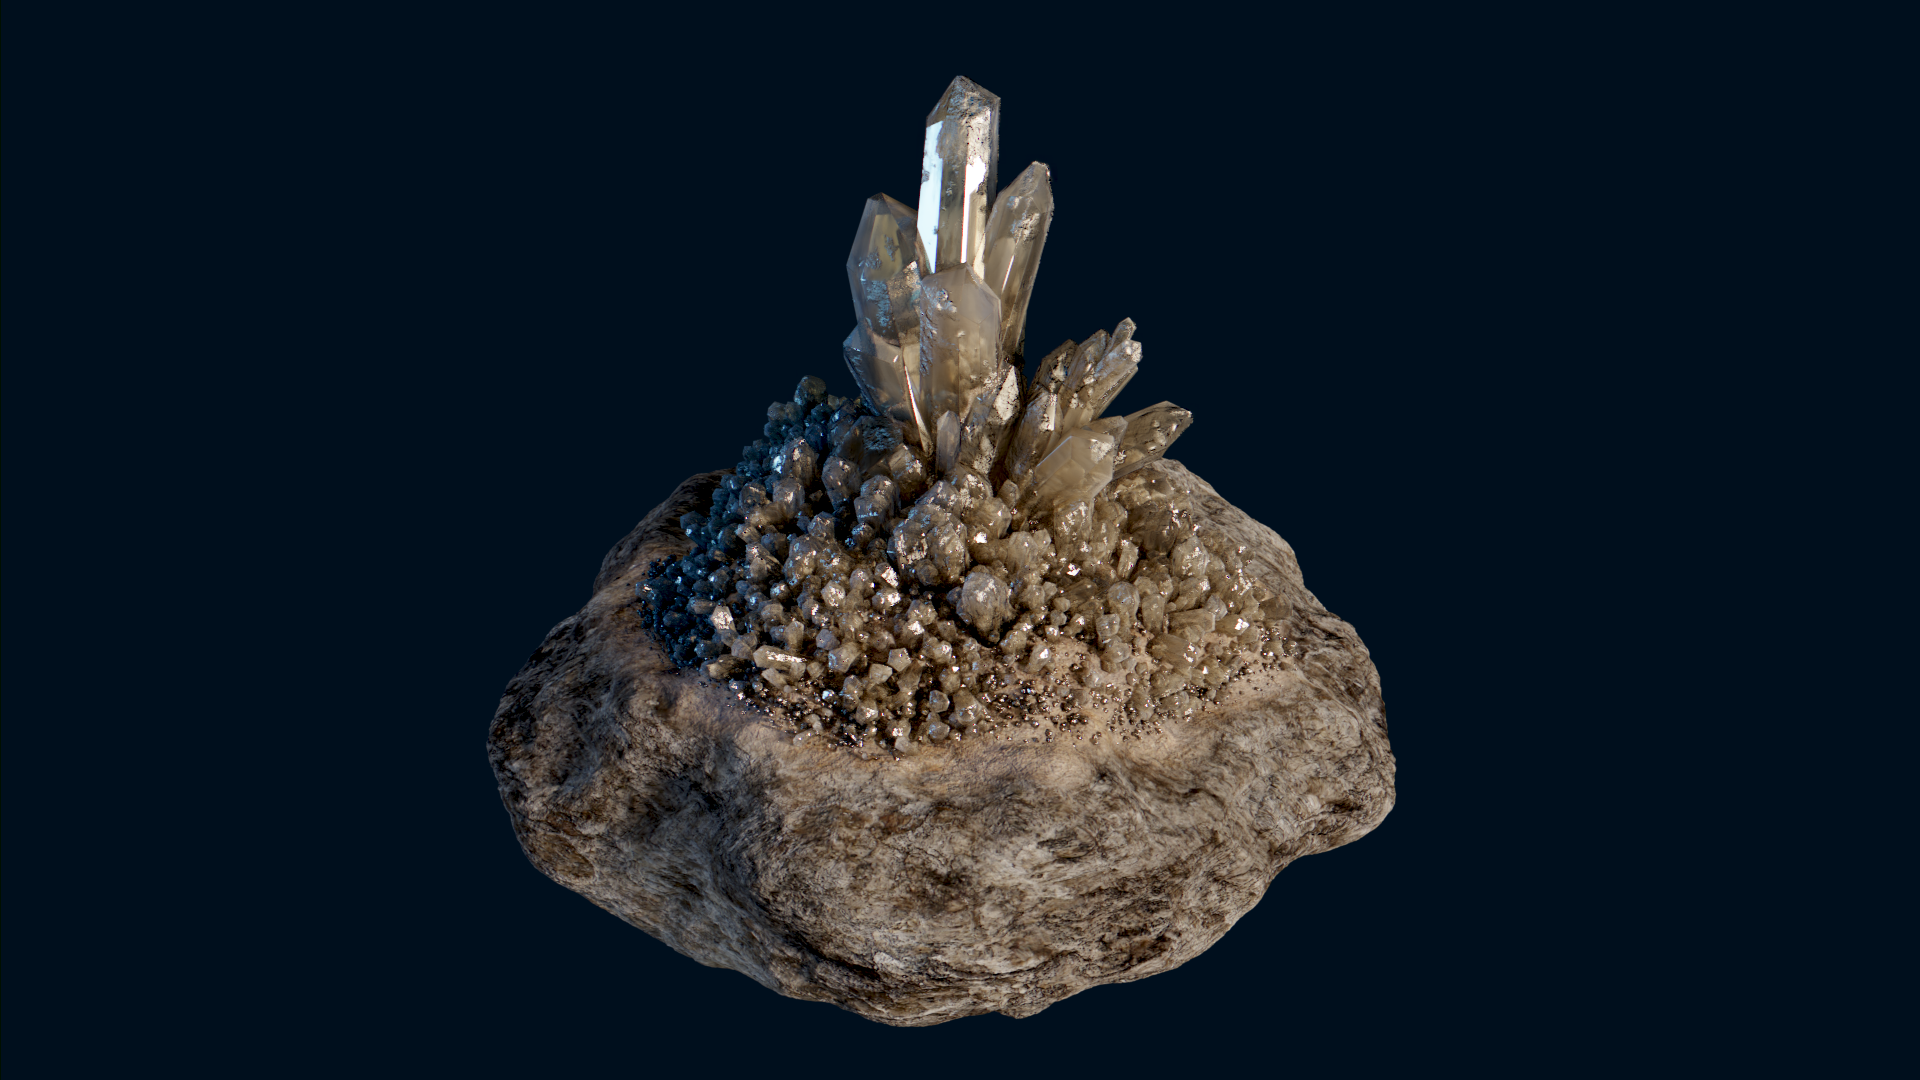
So, for now, that’s the resulting image:
About the Author
 Yuri Ilyin, reporter, a musician and a CG hobbyist from Moscow, Russia
2 Comments
Fantastic creation! I love it.
I tried so many times to make a realistic crystal material and always failed, so I have up! I'll try your material and try it out! Hopefully it will work this time!