

About Me
My name is Artem Slakva. I was born and live in Ukraine. After graduation, I entered the National Mining University, the last year of which was the discipline "Modern Methods of Multimedia Creation". The choice of the teacher fell on the wonderful editor of three-dimensional graphics, Blender.
During the period of passing the discipline there was an acute shortage of materials on this editor, especially in Russian. Almost everything had to be mined on foreign sites, which were also much less common than now.
At the end of the university, Blender was put aside for about a year, which was dedicated to improving and developing the acquired skills in the field of web technologies and learning programming languages. But in early 2013, an obsessive idea about creating my site on Blender arose, in order to correct the acute lack of materials that I had experienced the hard way two years ago.
So on May 13, 2013, the Blender3D website appeared, which to this day fulfills its goal.
How to Recreate the Shaman House
The inspiration for this series of lessons was the concept SEPHIROTH ★ ART.
The creation of this scene is divided into three parts: in the first we will focus on modeling most of the elements of the scene, their layout and prepare everything for further work. In the second part, we will create the final shape of all our objects in the scene in sculpt mode. For completeness, light and light post-processing will be added at the end. In the end we will create all the textures and materials, and perform the final render.
Part 1: Modeling
It is much easier to create such scenes when the reference or concept is open nearby. In the first part we will focus on the block construction of all the main elements for their subsequent sculpting.
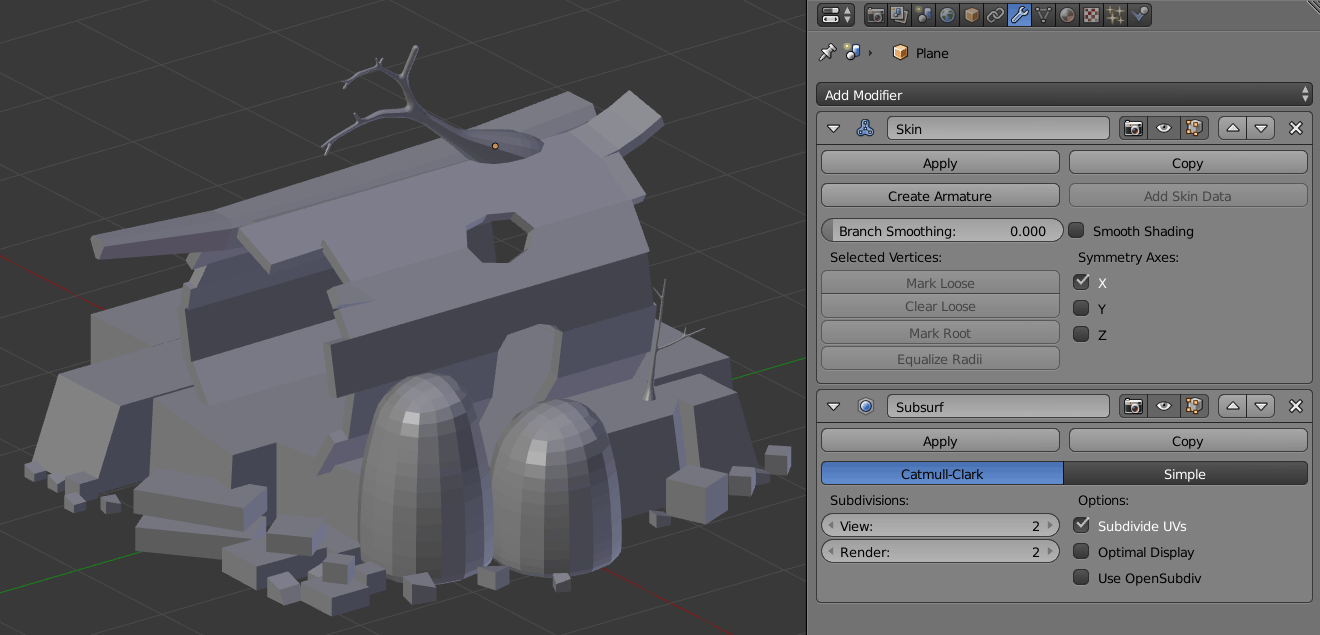
- First we create several cubes and use them to determine the shapes and sizes of the main stones, after which we add a cylinder with 16 vertices, which will act as a house.
- We continue to add small pebbles / cubes, and also create two main ones that will act as runes. So that they are not too angular, assign a Subdivision Surface modifier to them.
- Next, using the knife tool (K), we create the cuts we need without worrying about the topology (we will correct it later), and also divide the tops of the cylinder (V) and extend its individual edges so that the house itself is not so perfect.
- Even more stones to God of stones and create a new stick on the top of the house, on which we will later hang a dream catcher who will protect our shaman from evil spirits.

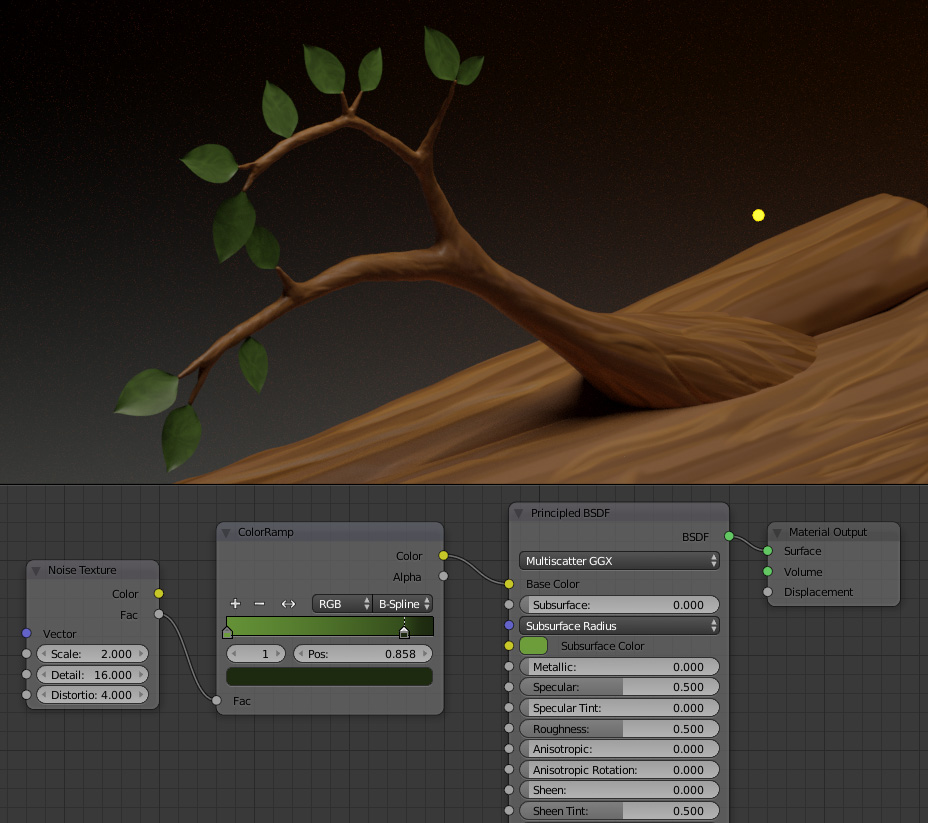
Trees are very easy to create with the Skin modifier. To do this, you need only one vertex, from which you can later create the shape we need using simple extrusion (E). The Subdivision Surface modifier will subdivide the created geometry and the result will be quite close to the final one.
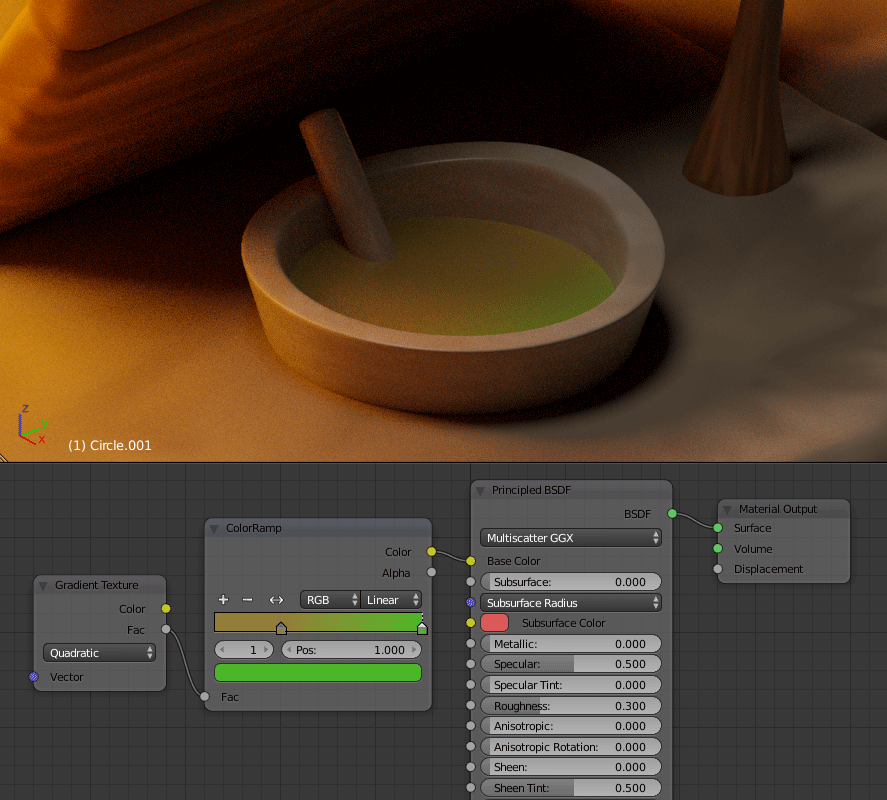
After the trees we will create a plate in which the shaman cooks his potions and that same dream catcher.
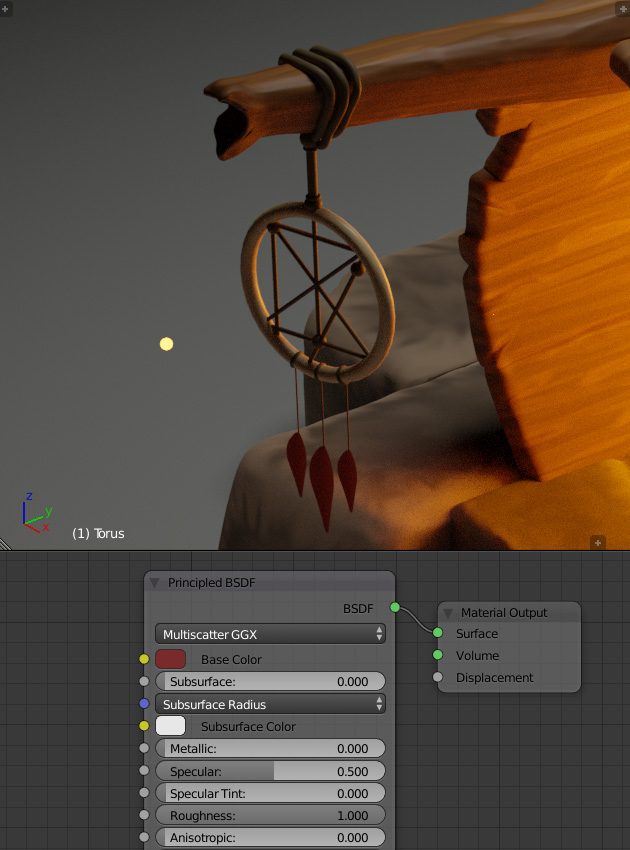
The dream catcher was created from 3 primitives: torus, cylinder and ICO-sphere. No modifiers are needed here. You can tie it to a stick using Bezier curves or simply extruding a cylinder several times.
By the way, the Subdivision Surface modifier was applied to the plate.

The next step is to create vegetation. A plane with the Mirror modifier (and Subdivision Surface) and a small editing of the vertices will give us a simple leaf shape. Place the center of this leaf at his bottom, which makes it easy to scale and rotate. After that we place these objects in the places we need (you can duplicate with Alt + D, to save memory).

At this stage, not all elements are created, but a promising a picture is already looming, so you can move on to sculpt and create details.
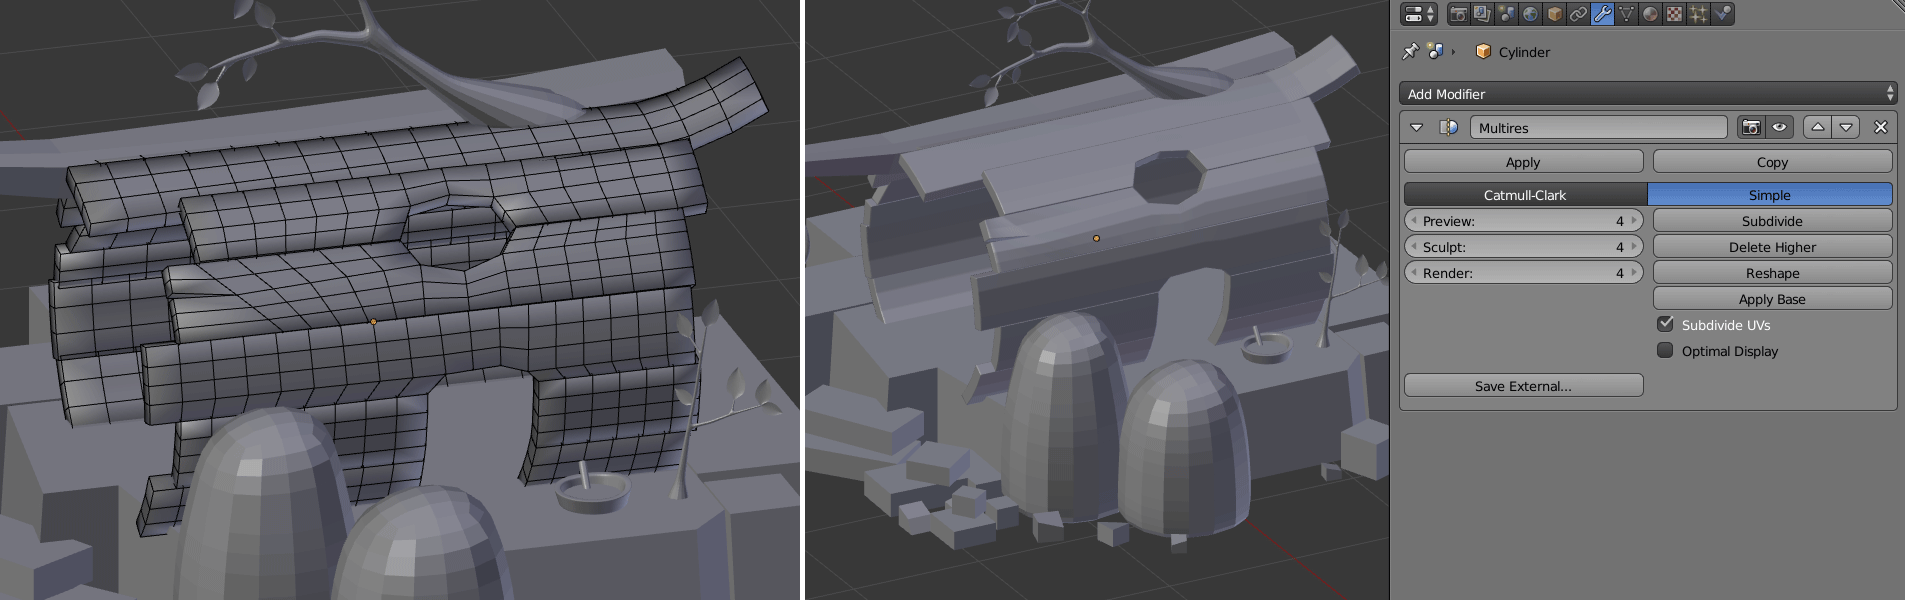
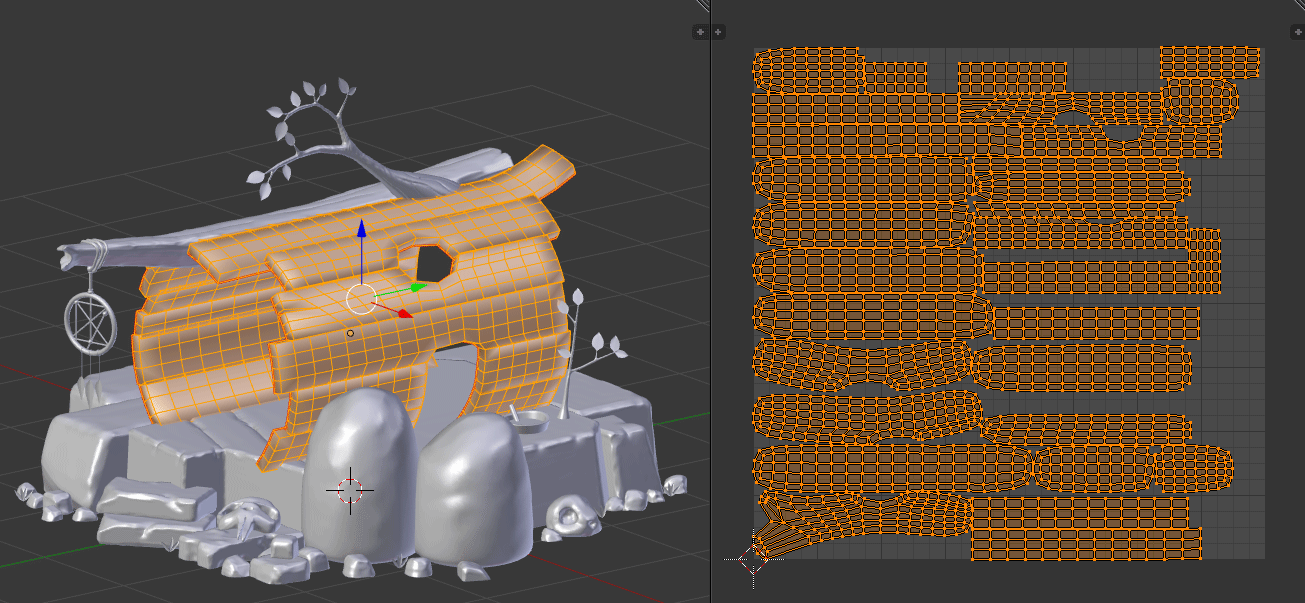
We will sculpt using the Multiresolution modifier, so it is advisable to create a topology consisting of 4 squares, and not what we did with the knife tool. This can be done with the same knife. Cut all the polygons, and add a large number of additional cuts (Ctrl + R), so that the topology density is as in the image below, as well as the most uniform (if possible).
Part 2: Sculpting and Lighting
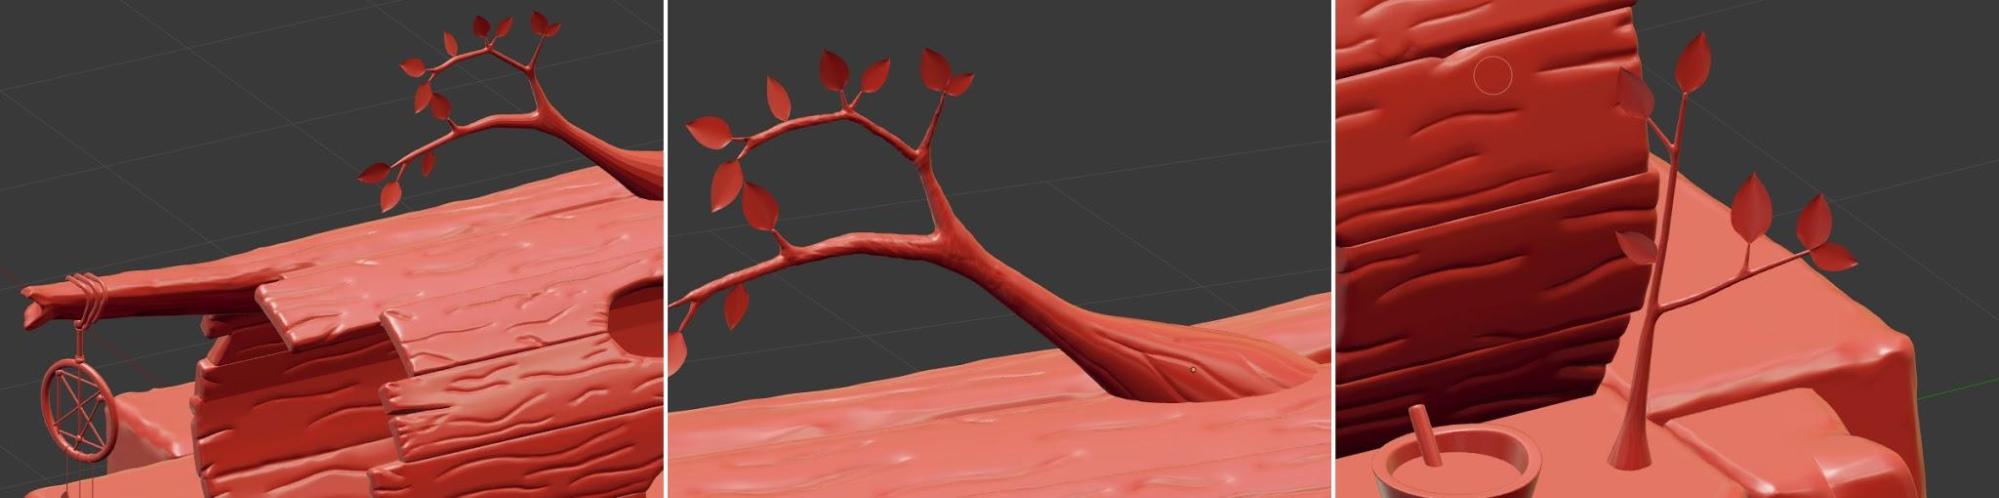
Let's start directly from the house. All sharp corners are smoothed with Flatten and Smooth brushes. Cuts are created with Crease and Pinch brushes. It is enough to sculpt only what will be visible to the camera. You can spend time on objects hidden from the camera only if you want to practice (which is, in principle, very cool).

When finished with the outer part of the house, do the same on the inner visible part of it (the first image).
Next, go to the stones. As in the case of boards, you need to create a uniform dense geometry and hang the Multiresolution modifier on it. Then all the same brushes Flatten and Smooth, as well as the Clay Strips brush, in case you need to add “clay”. Cutouts on the stones can be created with the same tassels as on the tree.

After the stones we return to the wooden meshes and you already know what to do with them. They are sculpted in the same way as the house. On thin branches, you can get away with with Clay Strips and Smooth brushes, because the details on them will not be particularly visible.
At this stage, you can take a break from sculpting and adjust the lighting for our scene.
For the world, set black. Above the house, place the Spot lamp with the settings as in the image below.
Inside the house place the UV-sphere, which will act as a source of light.
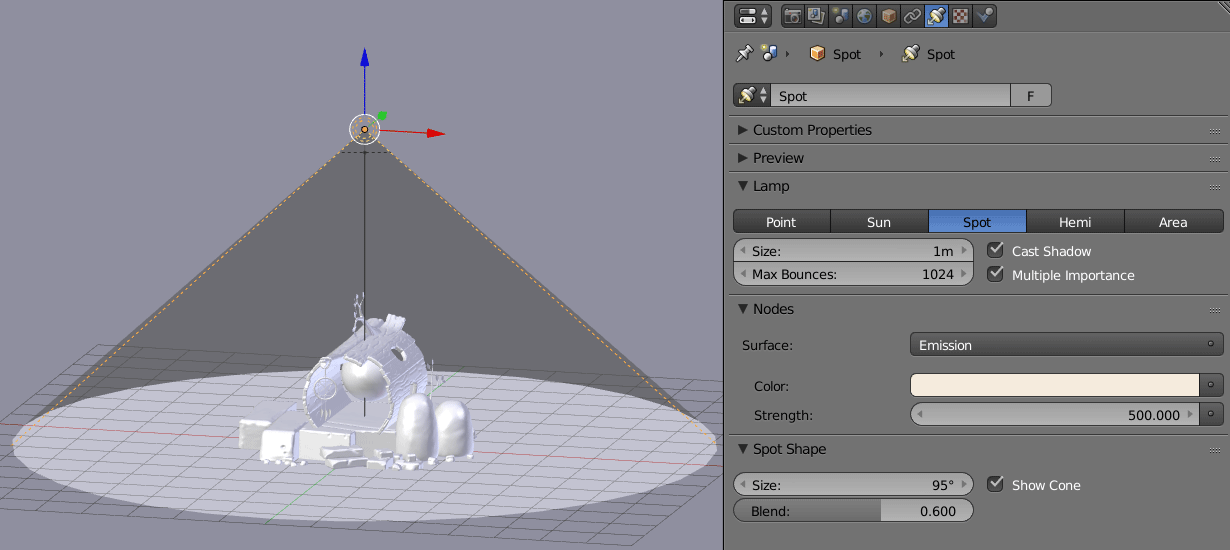
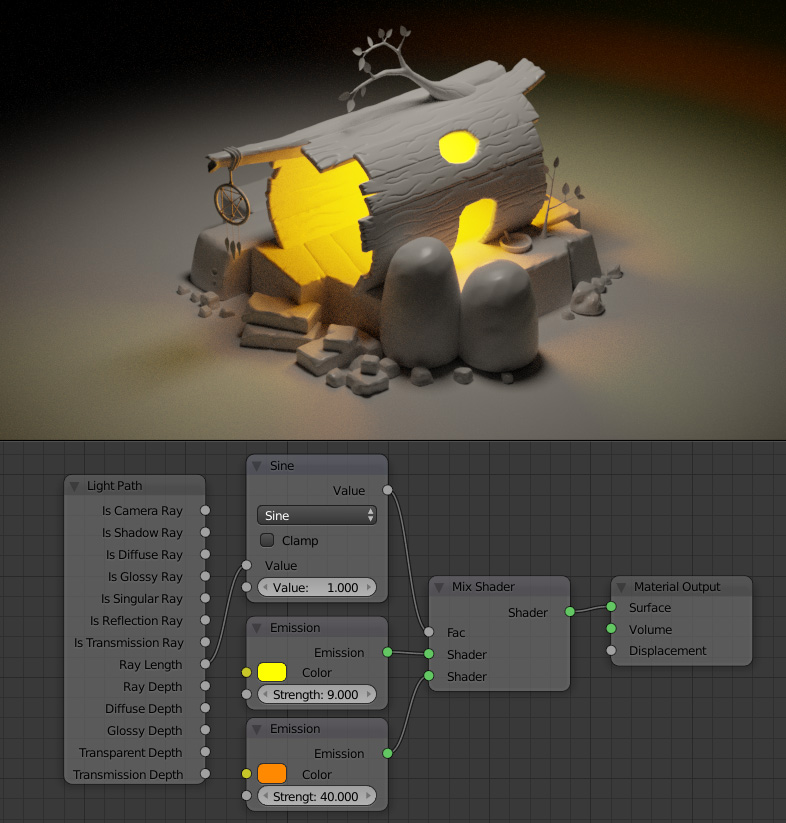
Below you can see the setting of the nodes, with which you can change the color of light at a distance. This is all great and wonderful, but in this case it’s all meaningless :)
Therefore, regard this simply as a slight deviation from the lesson and deepening into the Cycles render, and in the end you can simply leave the Emission shader with an orange color and a power of 25.
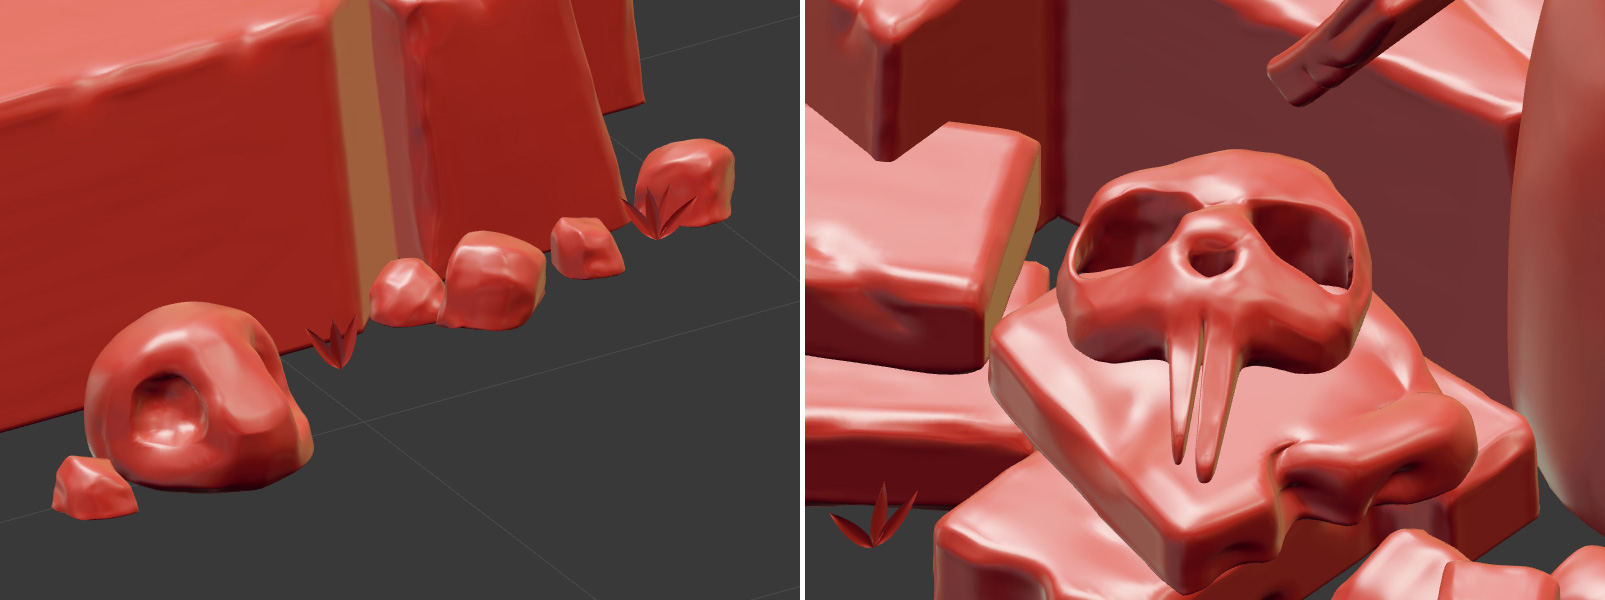
Having finished with the light, let us return to the sculpture again and create the skulls. The first one can be created from any stone, and for the second one it is necessary to initially model the base mesh and afterwards proceed to the sculpting.
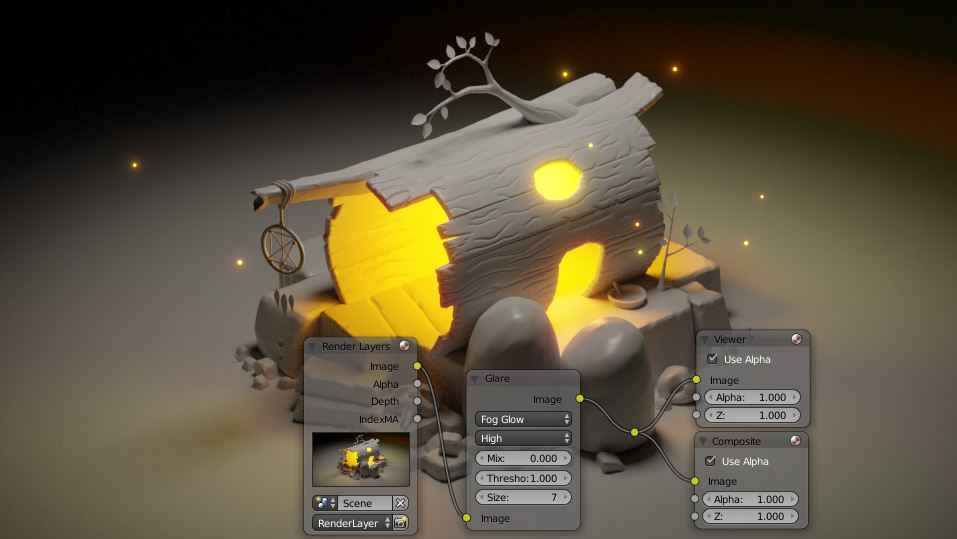
Add some ICO spheres to the scene and place them randomly in front of the camera. These areas will act as fireflies. To diversify their material, create for them the following bunch of nodes.

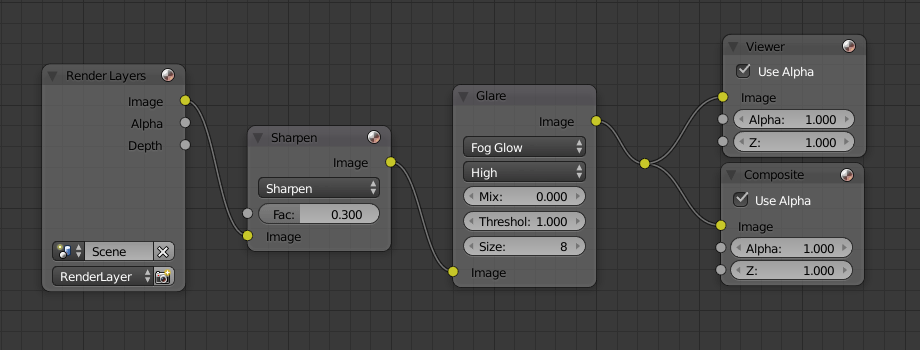
Perform a trial render and adjust the glow for all bright areas of the image using the Glare post-processing node.
Below you can see the final view of all the objects in the scene. Go through all the elements, correct the form, if necessary, and bring the scene to a completed state. As if it were the end and no texturing would follow.

Part 3: Textures, Materials, and Rendering
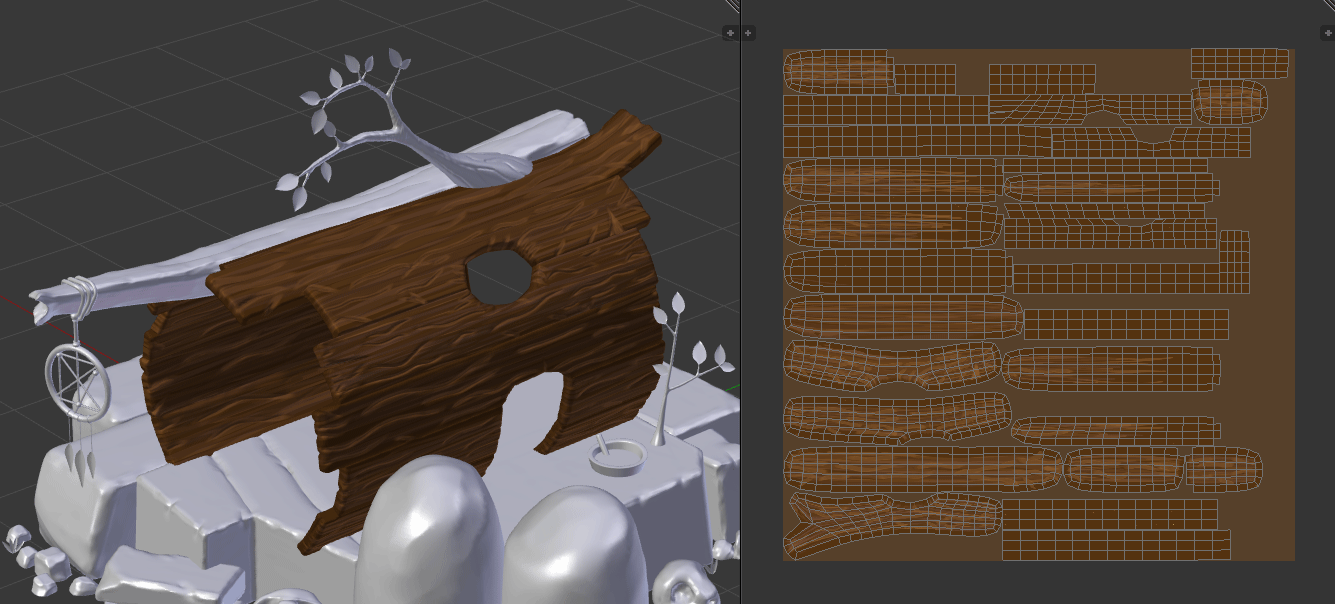
Let's start with the texture of the tree of our house. To do this, we need to scan all the boards, create a new image (2K or 4K), and decorate it in Texture Paint mode.
When creating a sweep, create stitches in places invisible from the camera, or you can try to be lazy and pick up excellent settings for the Smart UV Project option. Rectangular objects unfolded with its help are not too bad.
Drawing :) In the text version, trying to teach drawing is a rather ungrateful task, but I’ll say that three colors will be enough and you don’t need to create a large palette.
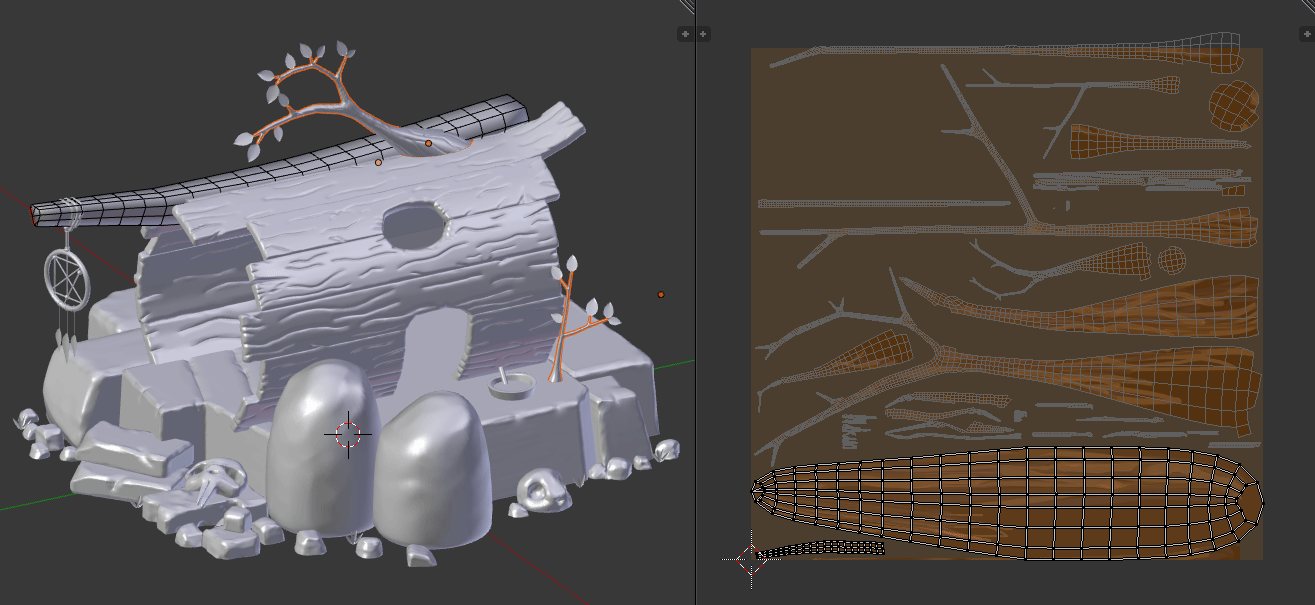
When the main part is ready, create a new scan for the stick on the roof of our house, and also scan two trees.
Unwrap all 3 objects on one texture (for these elements, 2K will be more than enough). To see the sweeps of other objects, while working with one of them, check the Draw Other Objects option in the UV editor and select all those objects whose sweeps you want to see.
In the case where you unfolded the stick manually, and used the Smart UV Project option for trees, each object received approximately 30% of the texture space. It would be more reasonable to distribute it in accordance with the space they occupy in the render. 50% for a board, 35% for a big tree and only 15% for a small one.
When finished with the tree, go to the stones. Here everything is exactly the same, only we will draw a stone, not a tree.
I also recommend doing a sweep of small stones through the Smart UV Project, rather than wasting time on it manually. Texture 2K or 4K.

We draw :) As with a tree, three colors will be more than enough, and with a brush Smear we grease all sharp corners and obvious brush strokes.
After creating the textures, we connect them to the Principled BSDF shader and adjust the roughness to taste.
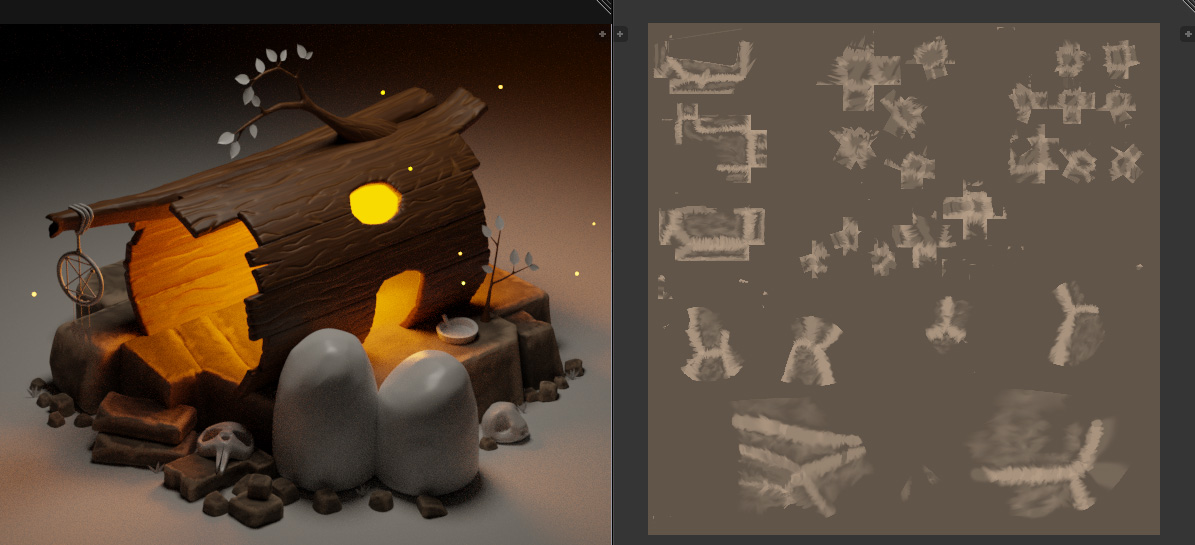
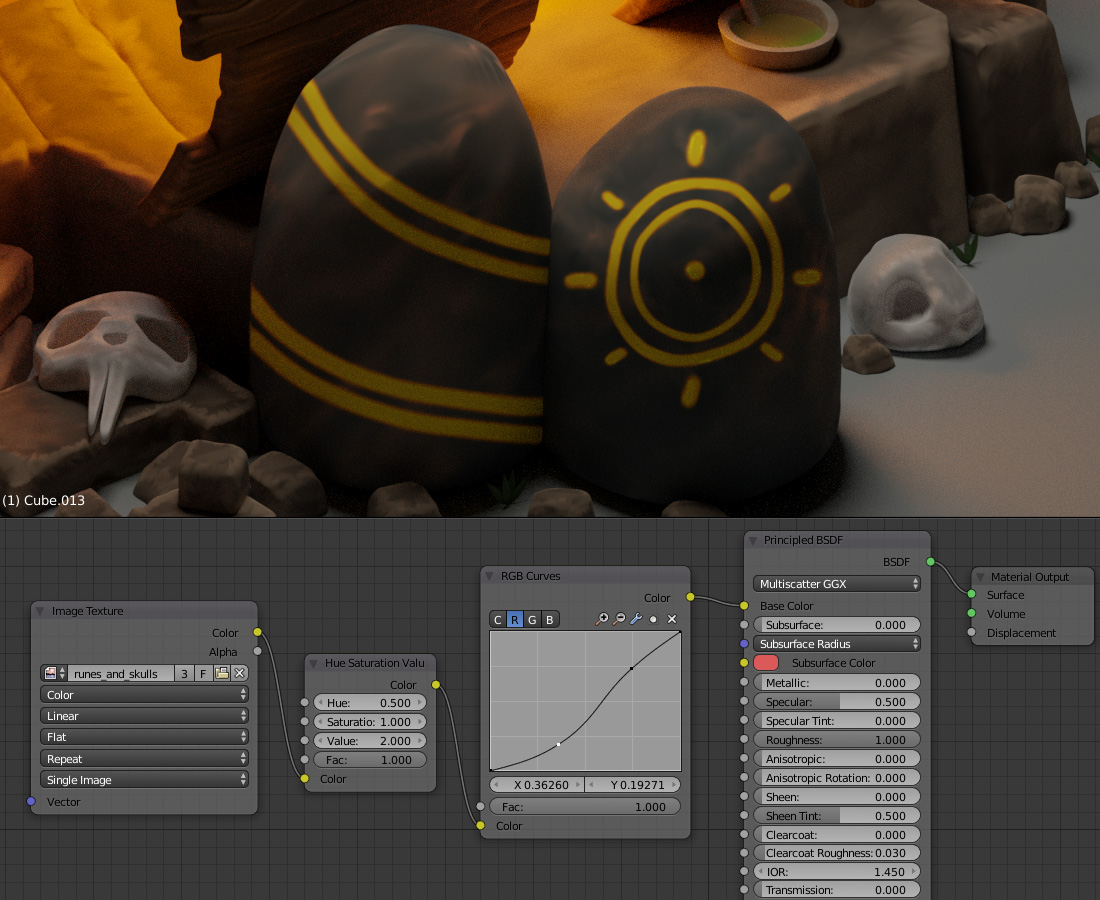
After the stones we will deal with runes and skulls. For them, the texture of more than 2K is not worth creating. Rune stones are unwrapped manually, the skull can be done through the Smart UV Project.
The skulls are decorated like the stones, only the colors are different. Drawings on runes are easy to create using the Smooth Stroke option.
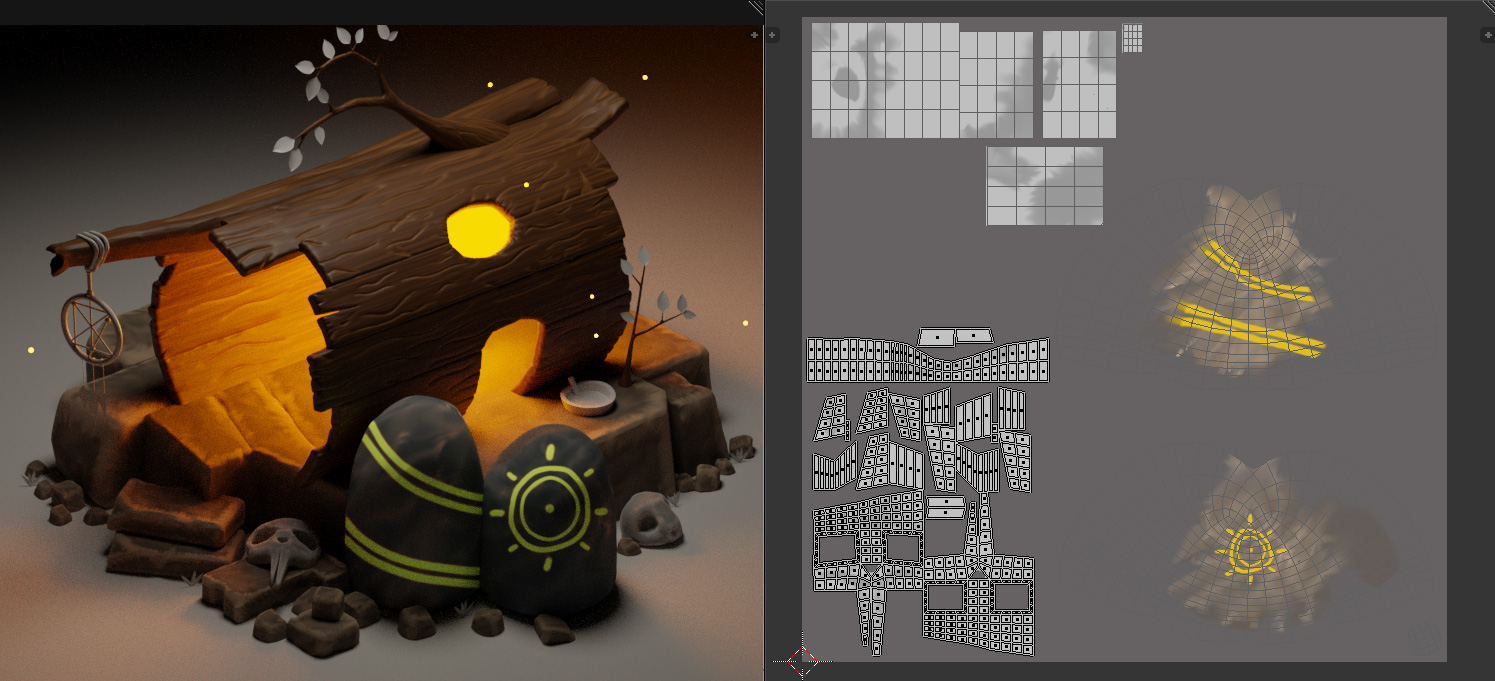
In total, we've got 4 textures (I have two 4K each and two 2K each), and for the rest we will restrict ourselves to procedural materials.
Below you see a simple bundle for all the vegetation in the scene.
For the plate with a potion, the material is the same as for the leaves (only the other colors), and for the potion itself in the image below.
The dreamcatcher does not use textures at all. It has 3 materials, and they all differ only in color: burgundy for feathers, brown for the ring and dark brown for everything else, including the rope.
After setting up all the materials, it is worthwhile to bring them all to a compatible state. This can be done with the help of nodes from the Color group, as well as other methods, if necessary.
Below you can see how the color of the runes changed. The curve was adjusted for all channels of the node RGB Curves. Approximately the same thing happened with the texture of the tree (it lit up a bit).
In post-processing, in addition to the glow, you can add sharpness to the image using the Filter node (in Sharpen mode).
Rendering will require at least 2000 samples, and I recommend setting the Clamp Indirect parameter to 1 or slightly higher, so that the render is not so noisy.
Also on completion, you can make a light color correction in the Color Management menu. I changed the Look parameter from Base Contrast to Medium Low Contrast, which allowed us to lighten our dark scene a bit.
This series of lessons is over! I hope you liked it and you raised your skill to a new level.
About the Author
 Artem Slakva, 3D Artist