
Behind the Scenes: After the Rain
Hi, my name is Torsten. I’m a freelancer from Berlin, Germany. I spent most of life using Cinema 4D, but discovered Blender two years ago for a web-project where we needed to run a 3D software on a webserver and to control it via PHP, but that’s another story….
I was initially overwhelmed by the massive amount of features that Blender offered but conquered it step-by-step with the help of a fantastic community. Doing personal projects like this image helps me grow so much more than I did in 22 years of using other programs.
Idea
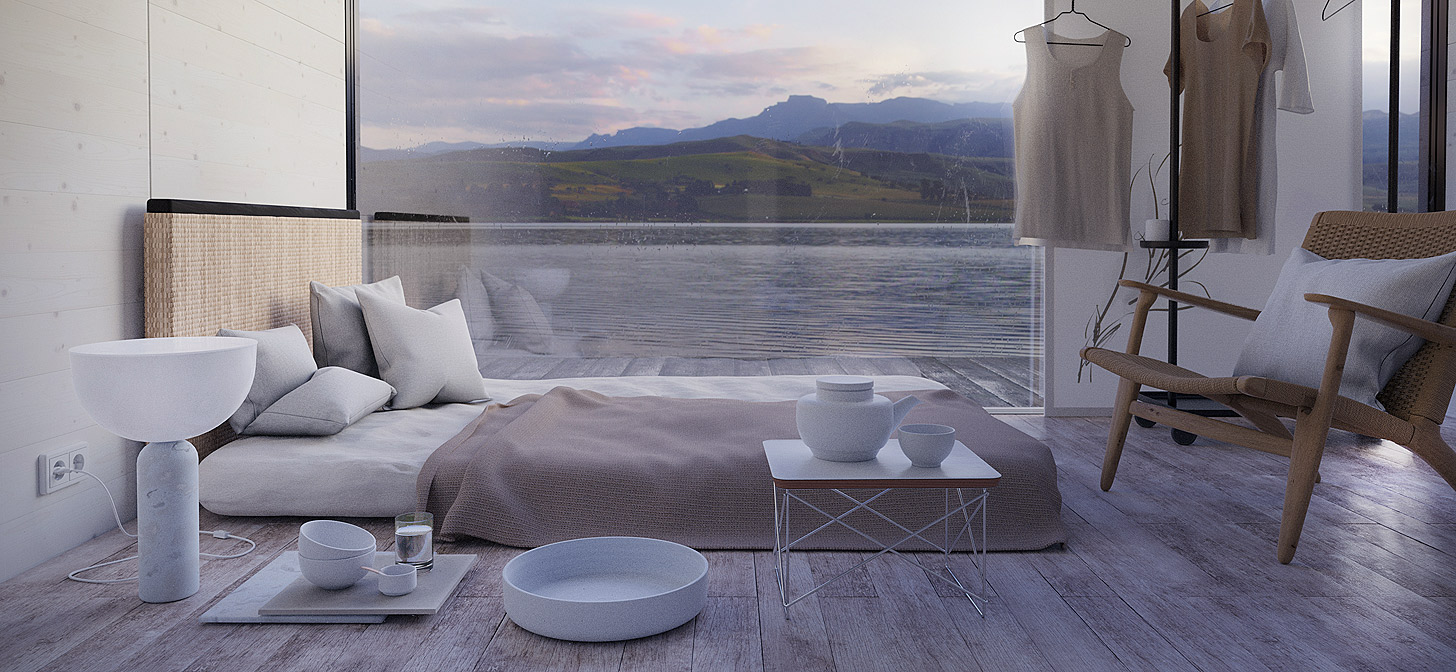
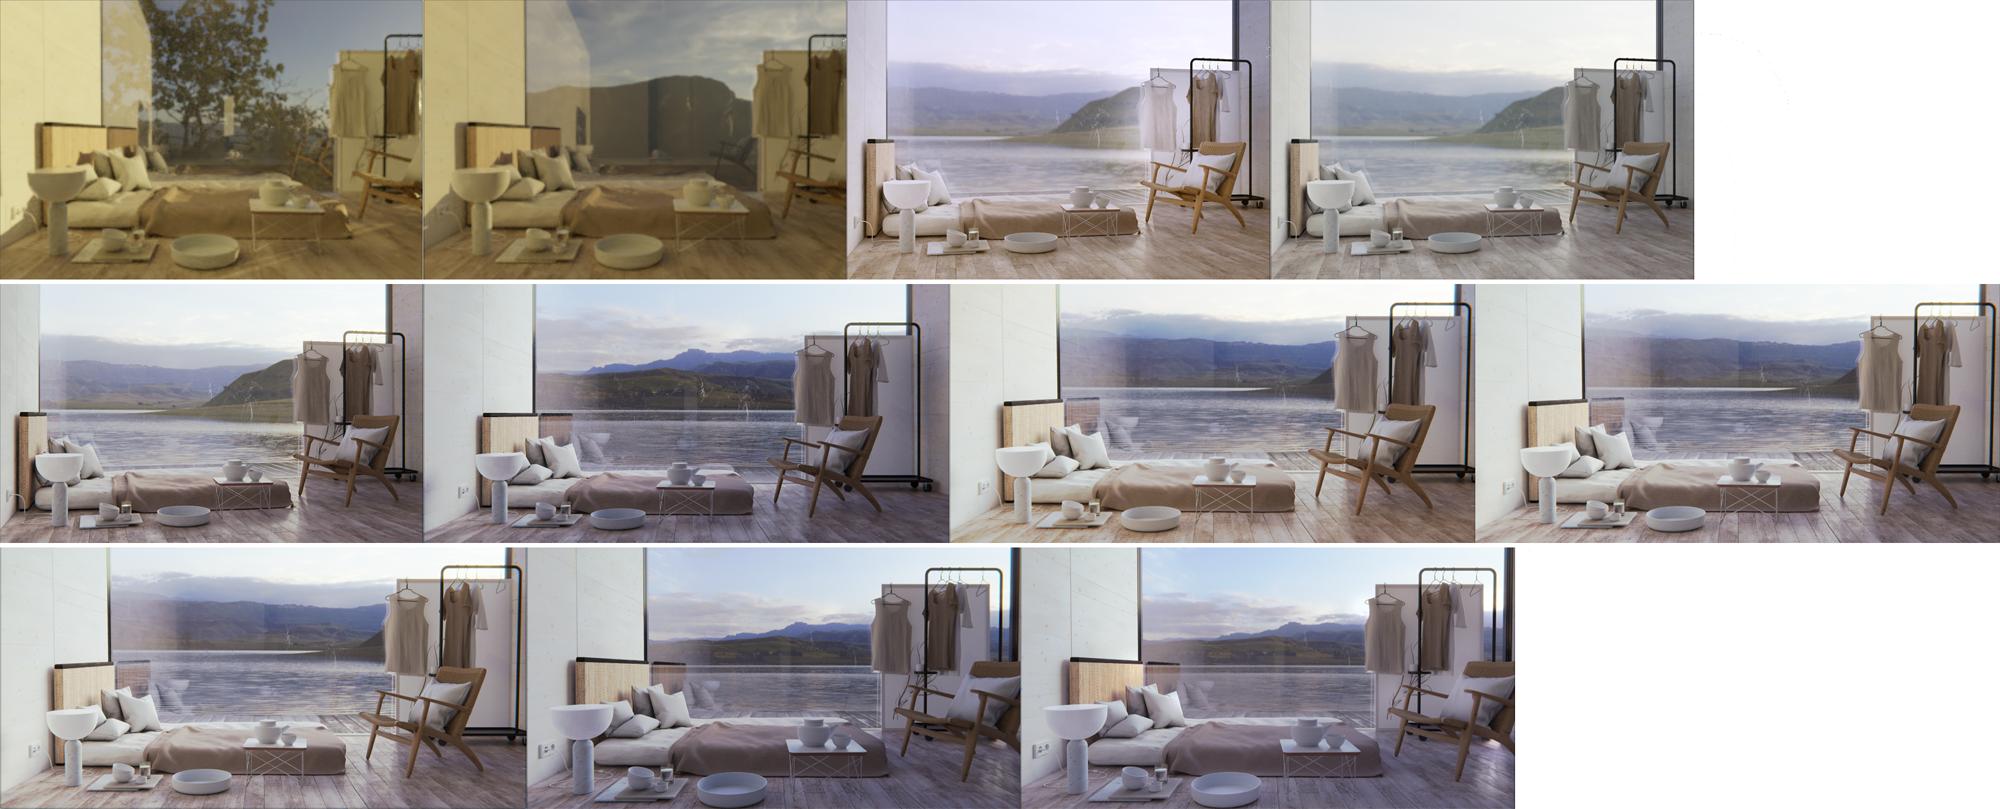
My inspiration for “After the rain” comes from my interest in tiny-house architecture and minimalism. We are planning to build our own house and during my research I came across a photo of a modern wooden house that is basically one big room with an all-wood floor, 2 walls, a ceiling and one bottom-to-top seamless window at the end. The furniture is from another photo by a Swedish designer couple that practises minimalism. I combined both and made my personal changes. This scene took me about 4-5 days to make, most of which was spent watching Cycles render test images. CPU rendering is no fun…
Process
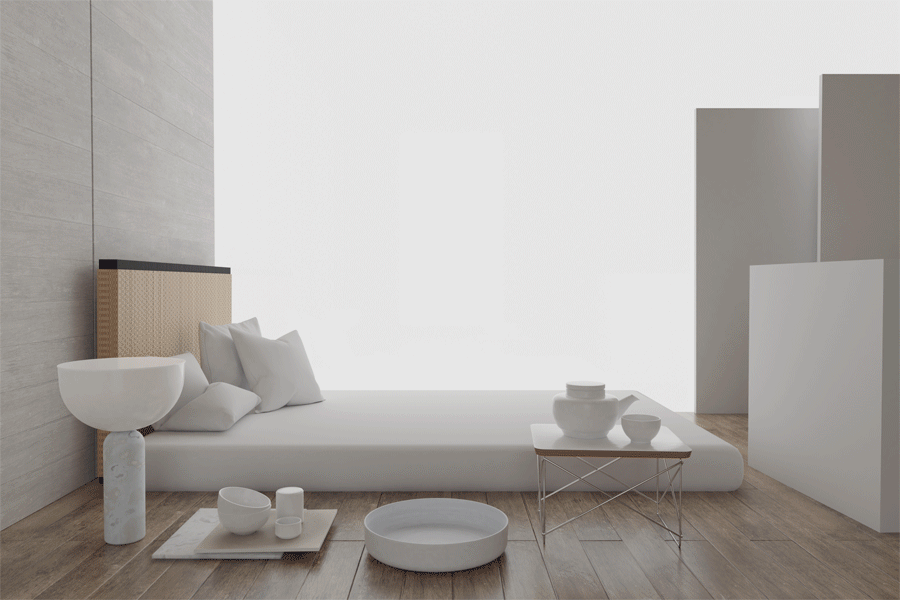
1.Matching the source material to your scene.
Nearly everything I know about Blender is from Youtube-channels such as Blender Guru, Gleb Alexandrow or CG Cookie. Andrew / Blender Guru did a tutorial on how to recreate a room from a photo that describes all the steps.
I wanted it to be as perfect as possible, so that took a while. It helps if you already know the dimensions of certain objects and luckily there are two pieces of designer furniture in the scene, an Eames coffee table and the CH25 chair from Hans J. Wegner. I placed cubes with the correct size in the scene as placeholders and was able to recreate all the other objects and configure the camera position. Little trick: sometimes photos still have the EXIF data which gives you information about the camera model and focus setting.
2. Making assets
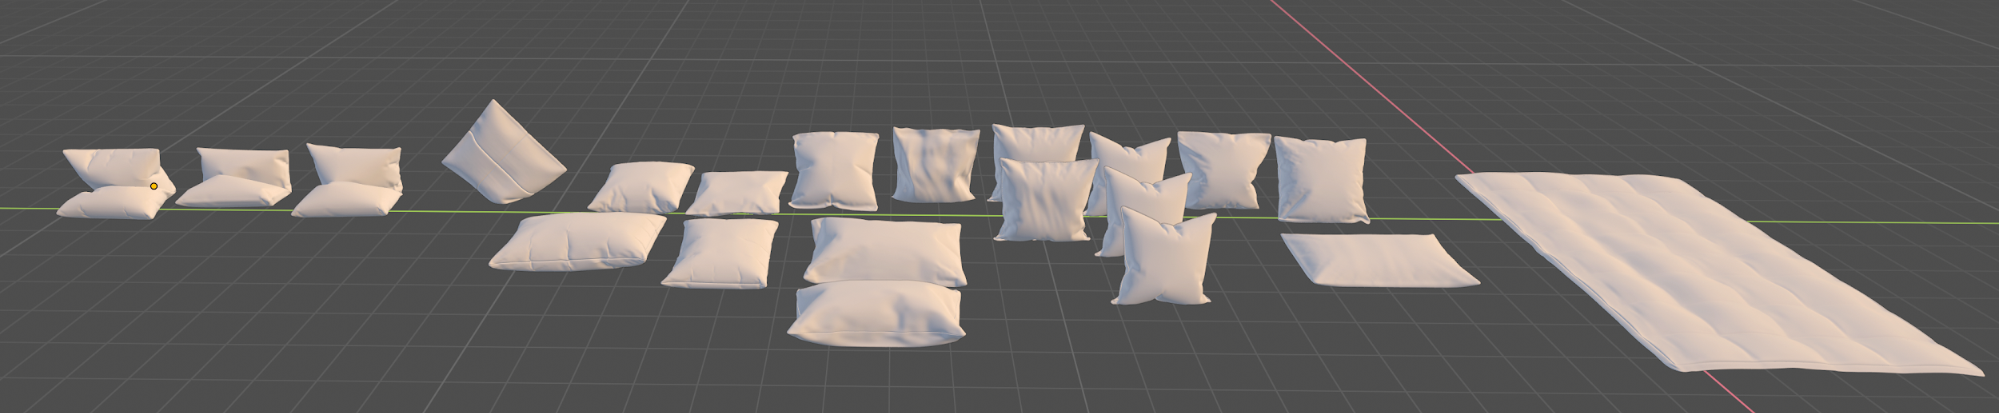
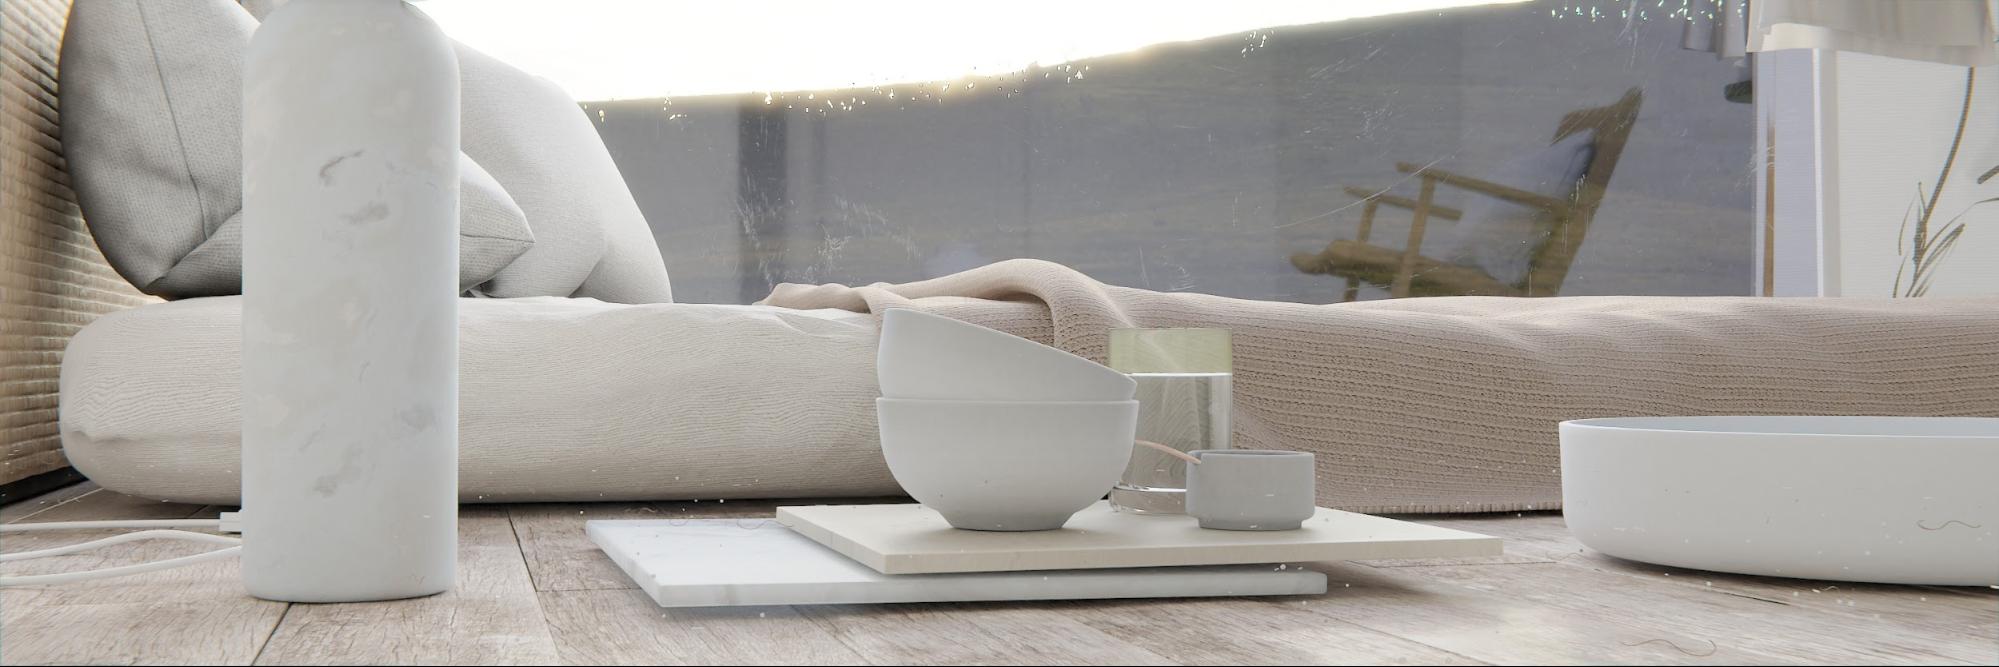
Although most designer furniture already exists as a 3d model, I prefer to do it myself so I can learn more from the process. I always use the mirror and subdivision modifier for symmetrical objects and cylinders with the bevel modifier for the rest. Most objects are either cubic, planes or cylinders. Additionally, this scene required a lot of cloth simulation. I created a collection of pillows to choose from, which I call “the pillow-factory” :) Pillows are created from flat cubes with a few subdivisions but still a very simple mesh, force fields on the inside of the pillow and only the tiniest gravitational force. Then I added a subdivision modifier to smooth things out a bit.

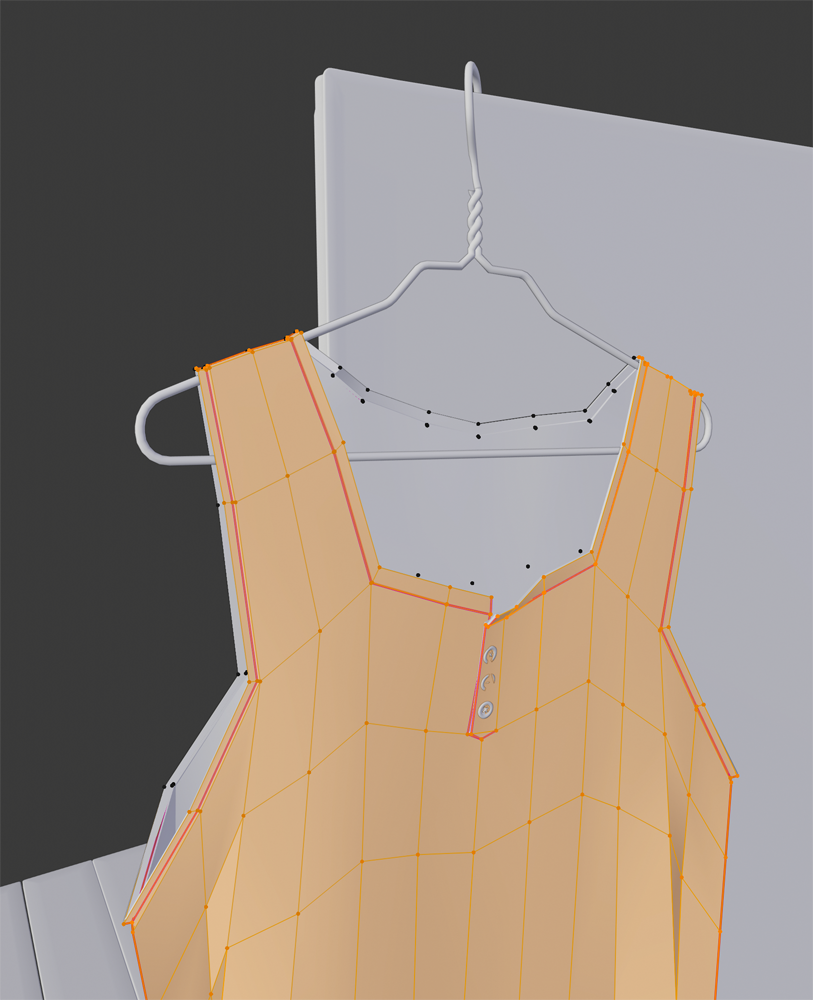
The clothing was done using very basic meshes, pinning the parts that touch the hanger and using a cube with collision as a stand-in for the canvas behind the shirt.
Cloth simulation quickly becomes erratic when there are too many vertices.
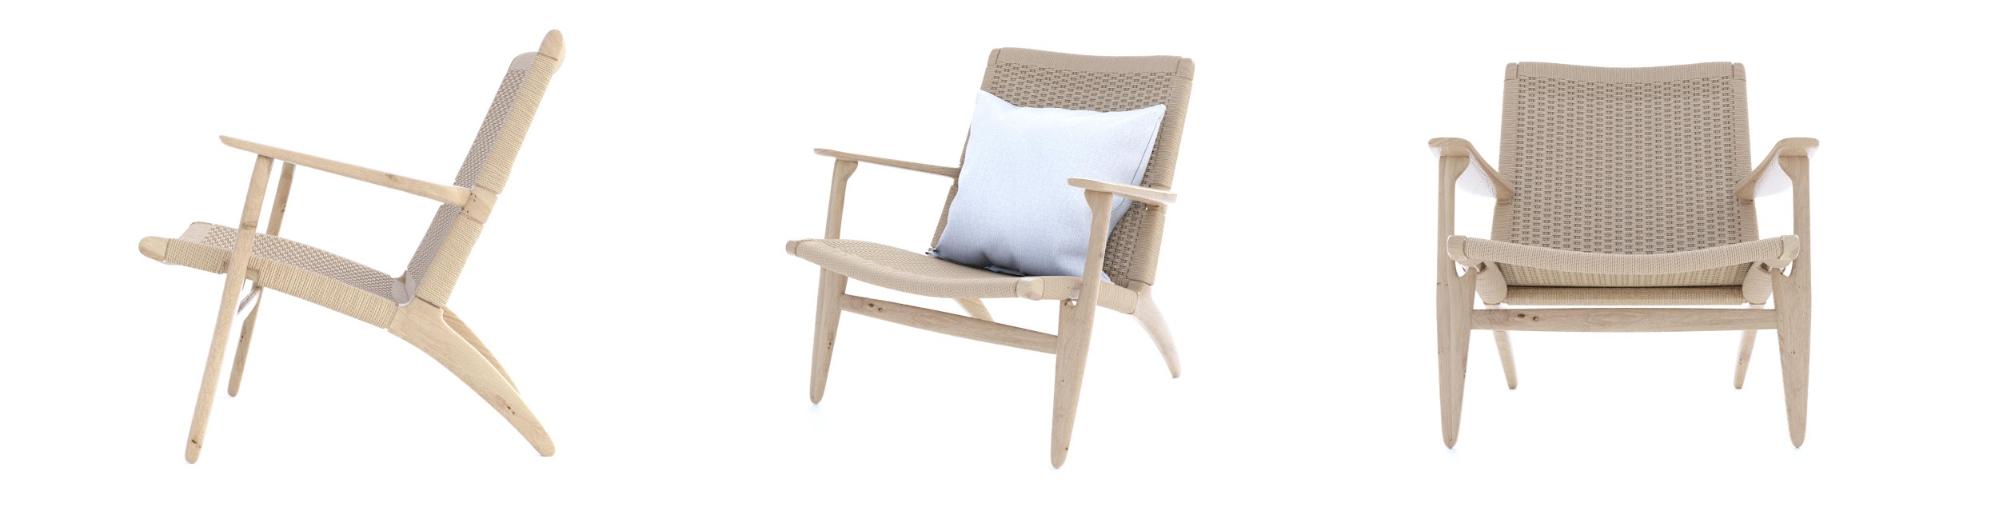
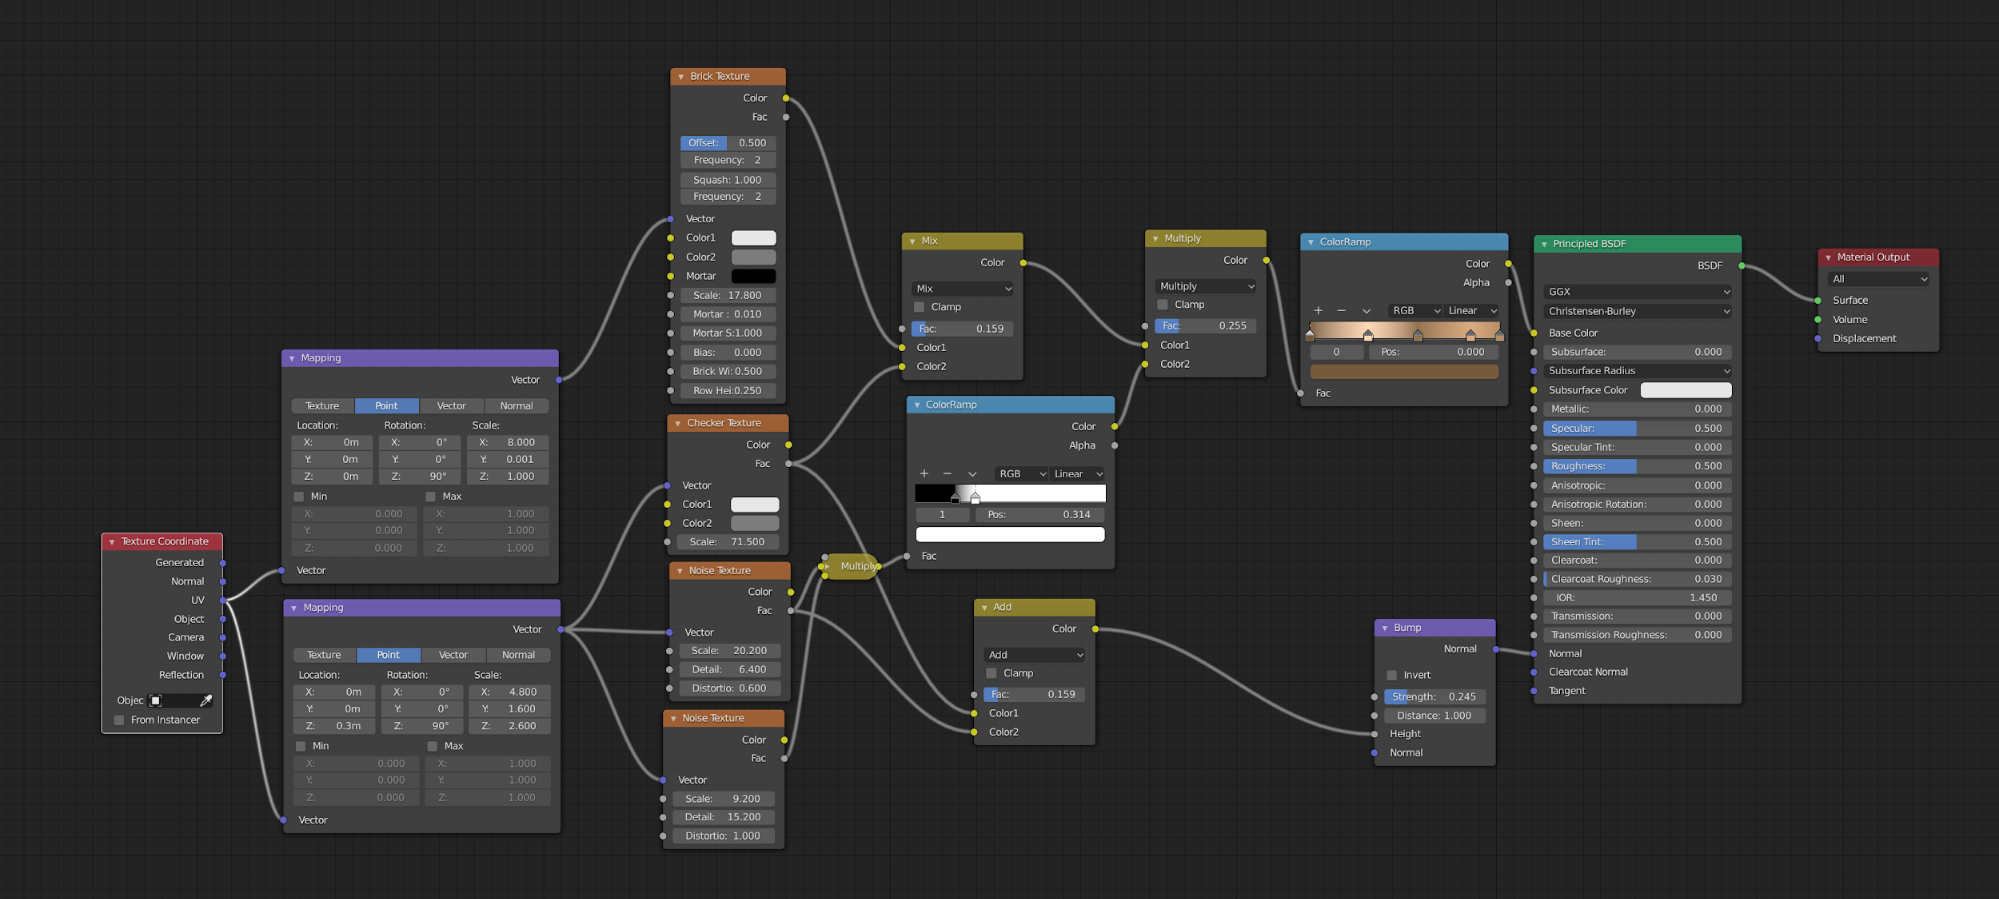
The chair has woven parts that I wouldn’t dare to actually model. I chose the easy way out and used maps instead.

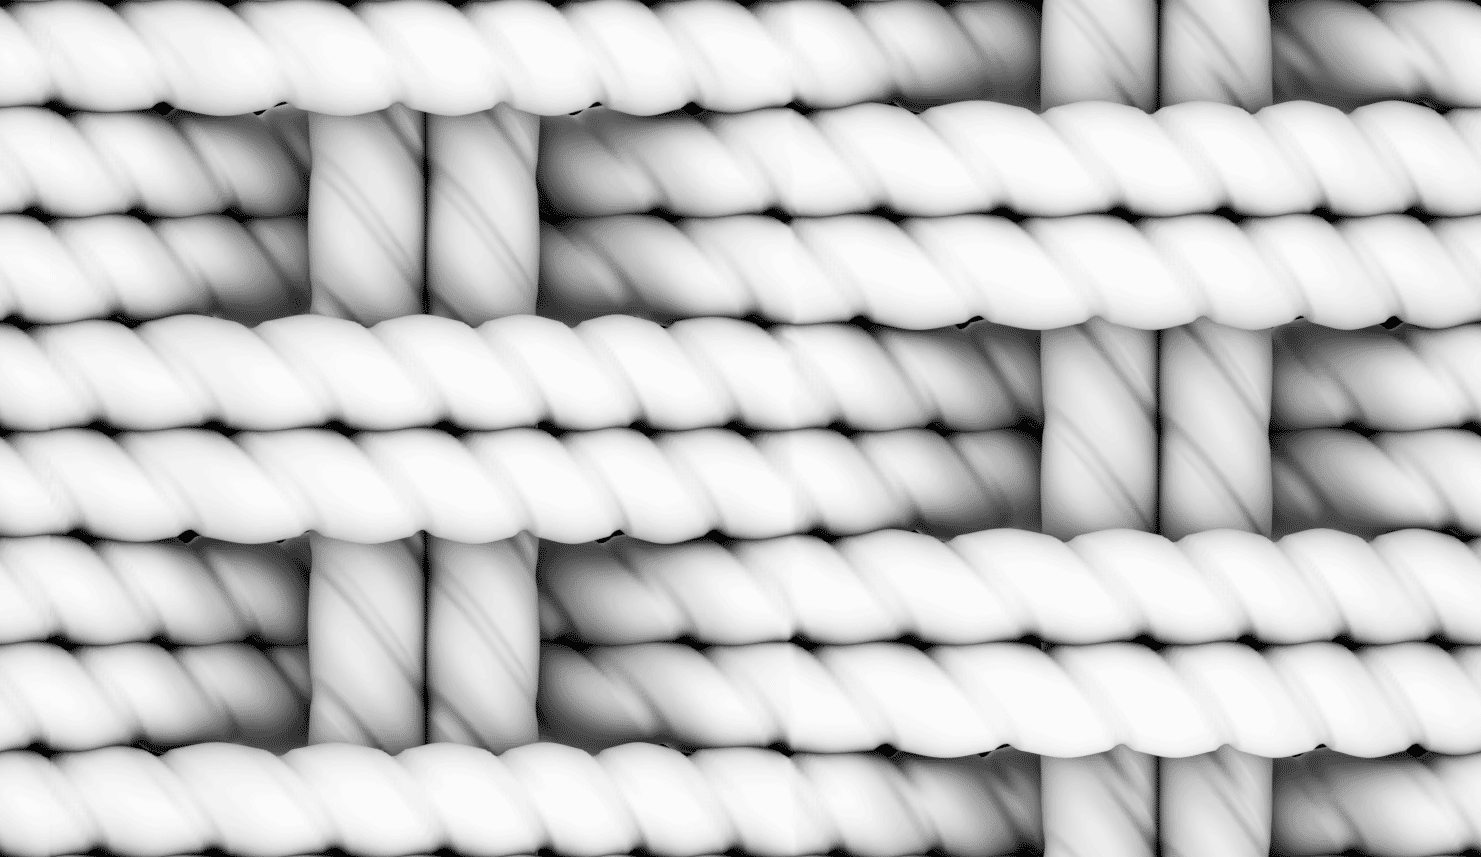

From this simple mesh with displacement I created AO maps, height maps and transparency.
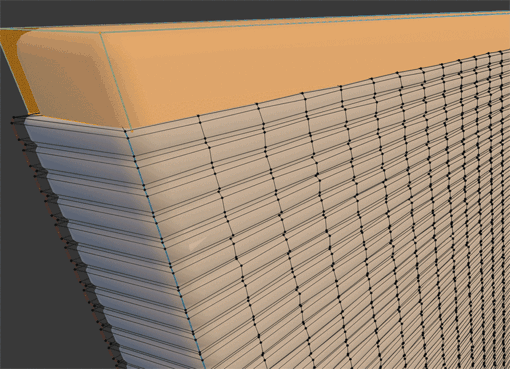
The headboard of the bed has more woven parts, which I solved with procedural maps. It works from a distance, which was all I needed.
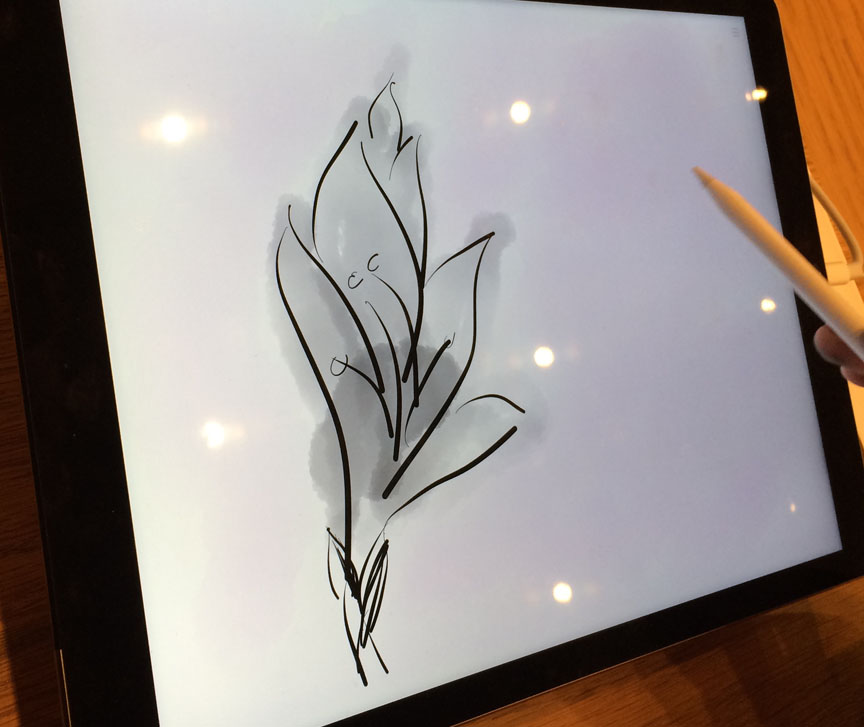
I also needed some kind of artwork in the background to make the scene less dull. Luckily my very talented wife just scribbled something on an iPad in the Apple store a few months ago. I extracted the drawing and placed it on a slightly translucent canvas.
3. Final touches and post production
The HDRI from HDRIhaven.com sets the basic color mood for the scene and all the lighting, but there is always room for color correction. After several iterations I settled for “cloudy-cold-blue-sunset-after-rain” which is my favorite time of the day.
The window is double-glazed with different maps on the inside and outside. Inside I used the wiping-residue map from Poliigon and outside a noise texture for raindrops. They may not be that obvious, but if you look closely you can see them. There are also about 50.000 particles of dirt and hair everywhere, which you also can’t really see. But you would miss them if they were not there. It just makes the scene look less sterile. Fog glow and lens dispersion was added in Blender compositor. Some color correction was done in Photoshop and for the final image I did not use noise reduction.
About the Author
 Torsten Dudai, freelancing programmer, designer, allrounder-problem-solver, living and working in Berlin. Started with Cinema 4D back in 1994 on an Amiga 1200, but switched to Blender 2 years ago and never looked back! My commercial work is mostly product visualisation, which you can find here. I’m also co-organizer of the Berlin Blender Meetup: if you’re in Berlin and interested in Blender, you’re welcome to join.


I realy like this image, its give peace in mind, and your image is telling a story. Overall a very nice image Torsten.
ser gut. I see things that are not so good also, but I will comment on that only if you want to :-)
Thanks Erik, sure I like feedback.
there is not any big “errors”, and it could be personal preference. If you look at the plates or I am not sure what they er called, but they seem to be hoovering in the air a little. and the duvet could be much more wrinkled.
Hi,
I used a reference image for the plates, they seem to be constructed to appear that way, “weightless”.
The duvet… yes, you’re right, I did not spend as much time on that as I could have. But there is always a time when I just have to finish something and get back to (paid) work. It’s a decision to call an image “finished”.
These renders always look good and you just have to do this and adjust this to acheive them, as a real pro amateur to Blender I would have thought the details of the render would be more interesting to publish. I dont think I’ve seen a bad render in Blender just like to do the same
Explain this about Light This
thanks
You mean the lighting? I used only a HDRI image and the light it produces, no additional light sources. In Photoshop I color corrected the hue and intensity a little bit.