
About
My name is Daniel Bystedt and I’m working as head of modeling and lead creature artist at Goodbye Kansas Studios in Stockholm, Sweden. I have been in contact with the developers of Blender for a bit and helped out with some demos for Blender 2.8 and EEVEE.
I studied CG here in Stockholm back in 2007-2009 and after that I was working a lot with commercial related CG for a lot of years until I ended up at Goodbye Kansas Studios. I have also been helping Pixologic with beta testing of new ZBrush releases since ZBrush4R5, doing a bit of tutorial work for 3D World, 3D Artist and some other publishers. After working a lot with Maya I started learning Blender since the render engine Cycles looked very easy to work with. I ended up falling in love with Blender and now I use it a lot both at work and when doing personal art.
Inspiration
I have been testing the new render engine EEVEE a lot since the development of Blender 2.8 started so I wanted to do a new EEVEE related project. I initially just wanted to do a simple character, but then I thought it would be fun to put the character in an environment, rig the character, do some animation… well the project just bloated basically. But that’s the fun with doing personal projects. You can explore and you don’t have to have a set deadline, unlike when doing professional work.
I mostly get inspired by other people's artwork. I really enjoy 2D artwork, since there are usually so many storytelling elements in there. I also find it very inspiring to look at art photography and get inspiration from outside of the CG community.
Character
The character “Claire” was sculpted in ZBrush and textured with Substance Designer and Substance Painter. I also created some textures of scratches for the environment in Substance Designer.
Character - Substance Designer setup
I’m always interested in creating faster workflows when it comes to detailing, which can take quite some time when it’s done manually in ZBrush. I put together a skin material for the detailed wrinkles in Substance Designer that I mapped onto the character in Substance Painter using triplanar projection mostly.
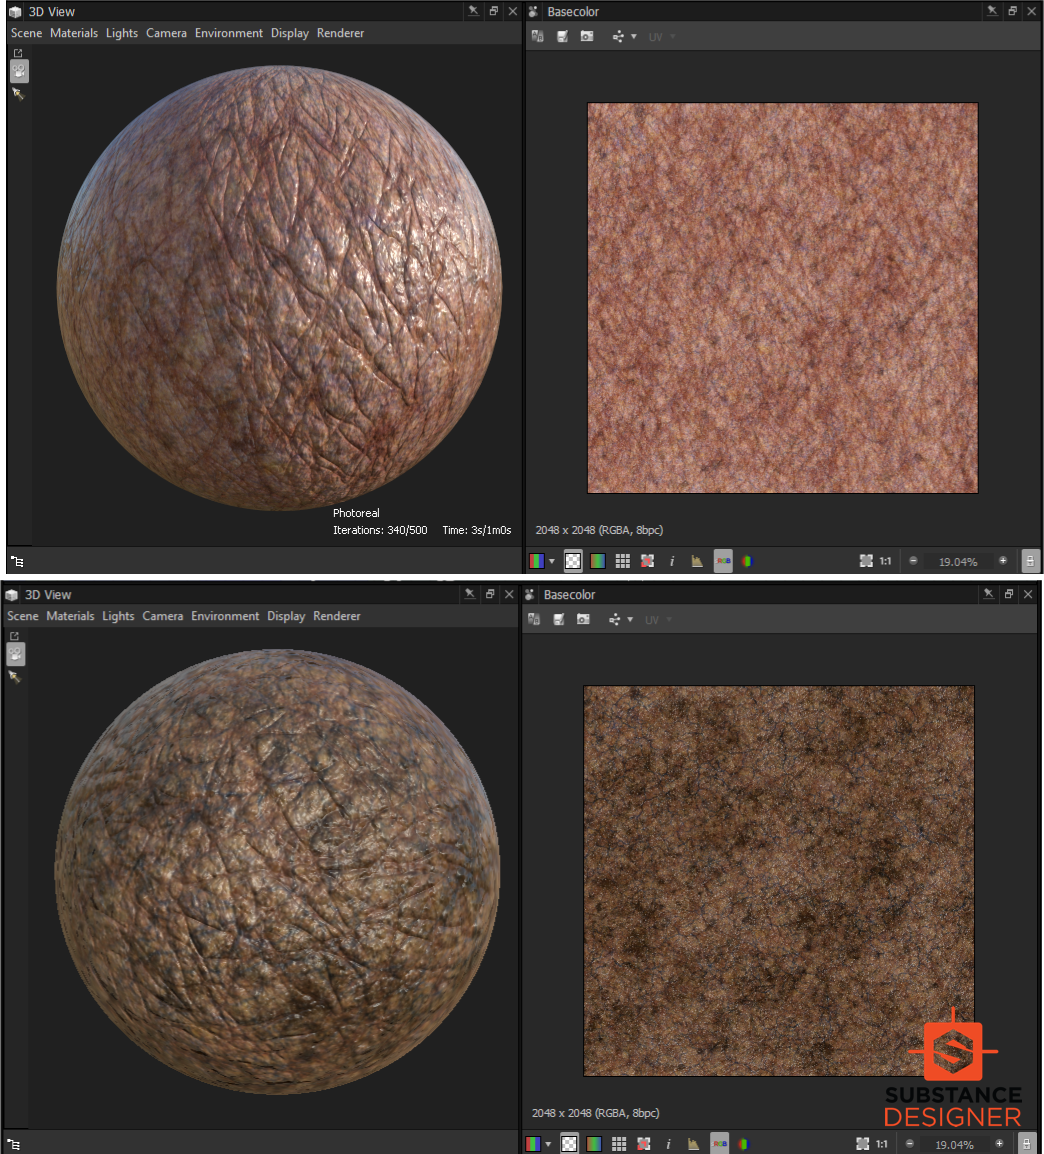
By setting up the skin in Substance Designer I can use it in the future to create new and interesting variations and also combine with other Substance Designer graphs. Above is an example of two different looks
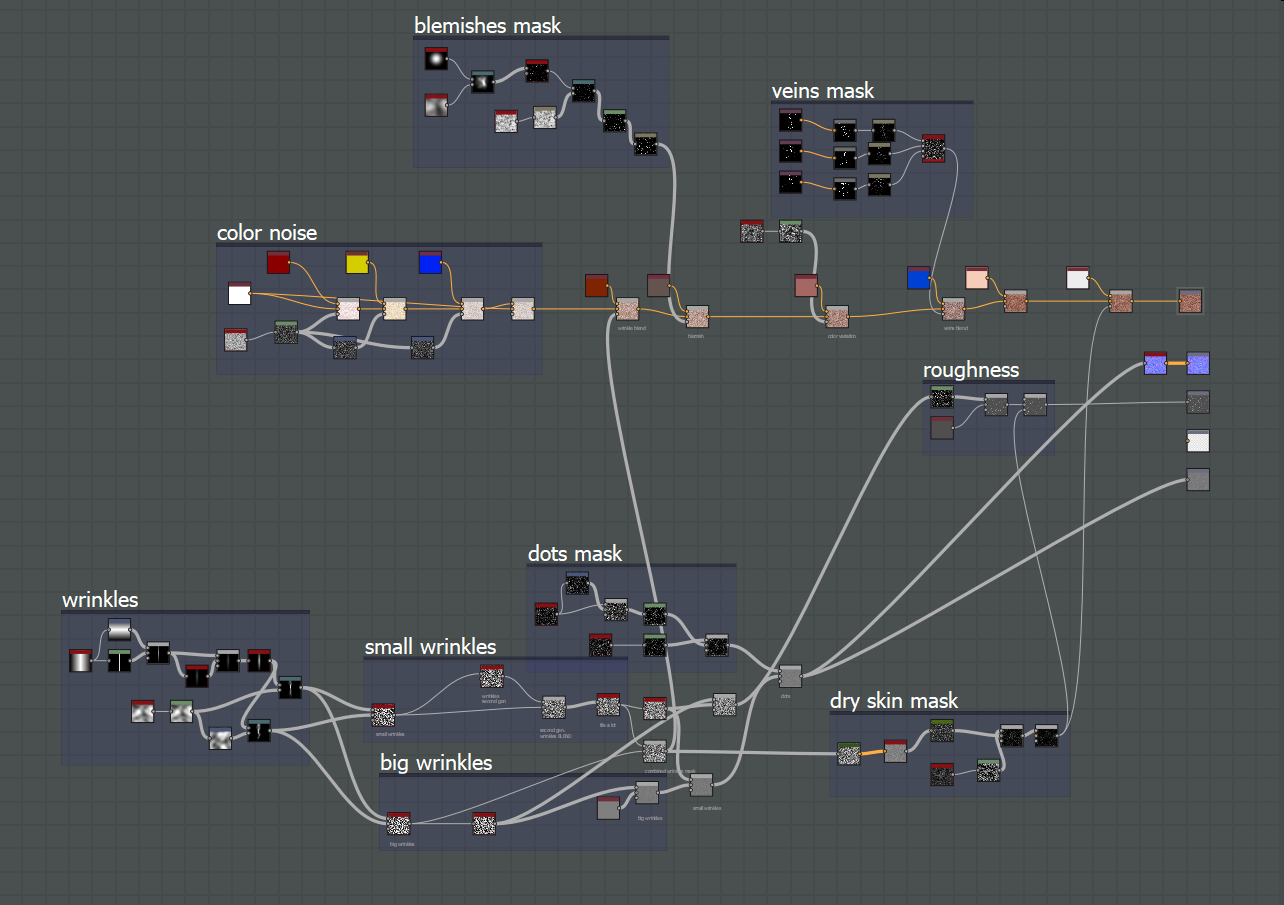
Here is an overview of the node graph in Substance Designer. It is not very complex, but it’s a great workflow to start naming the separate parts of your graphs with frames in order to not get lost the next time you open up the file.
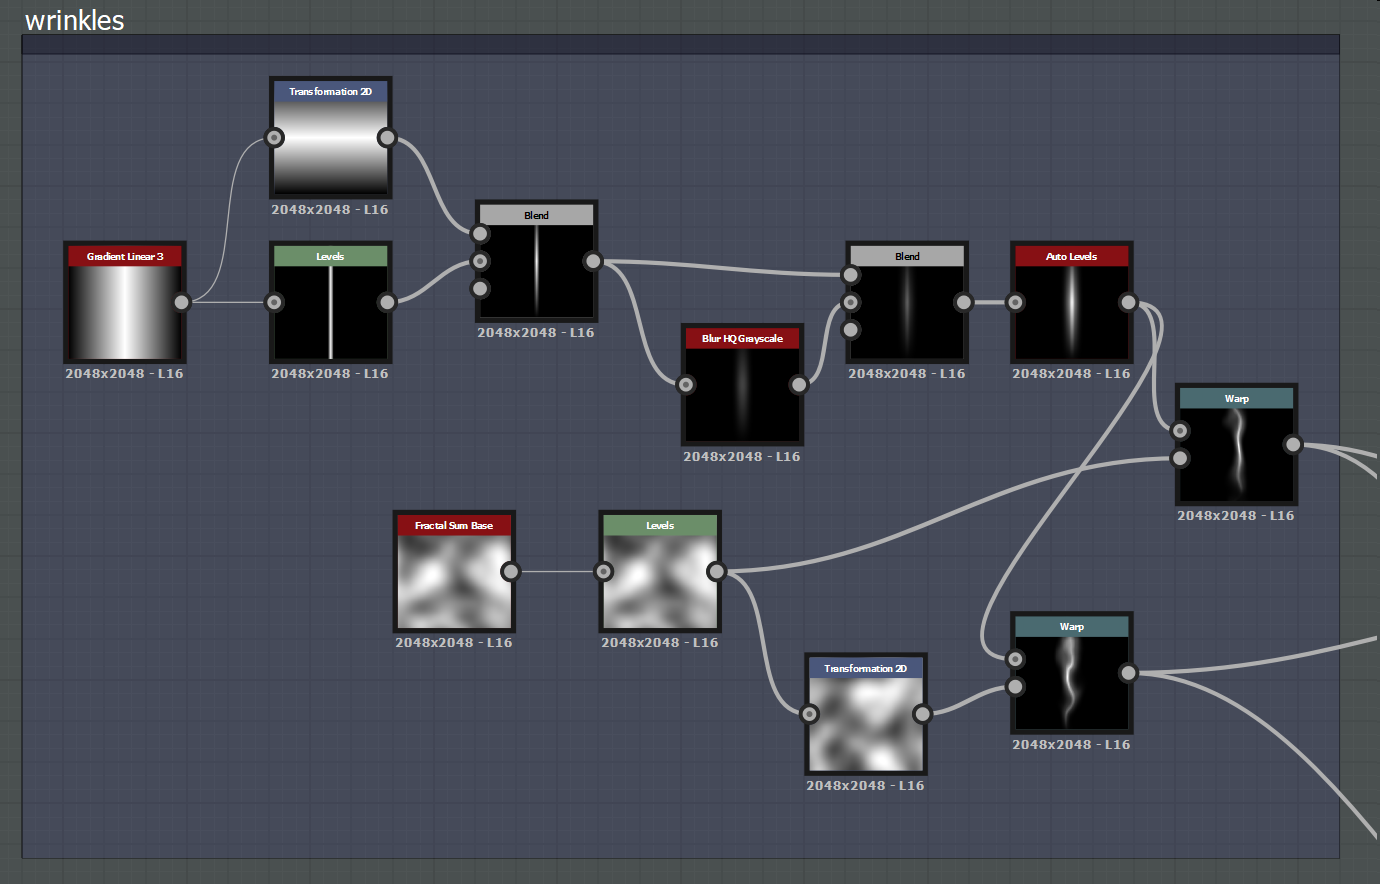
Here is a closer look at the two basic shapes of the wrinkles. It is just a line that is warped, basically. This basic shape is fully procedural.
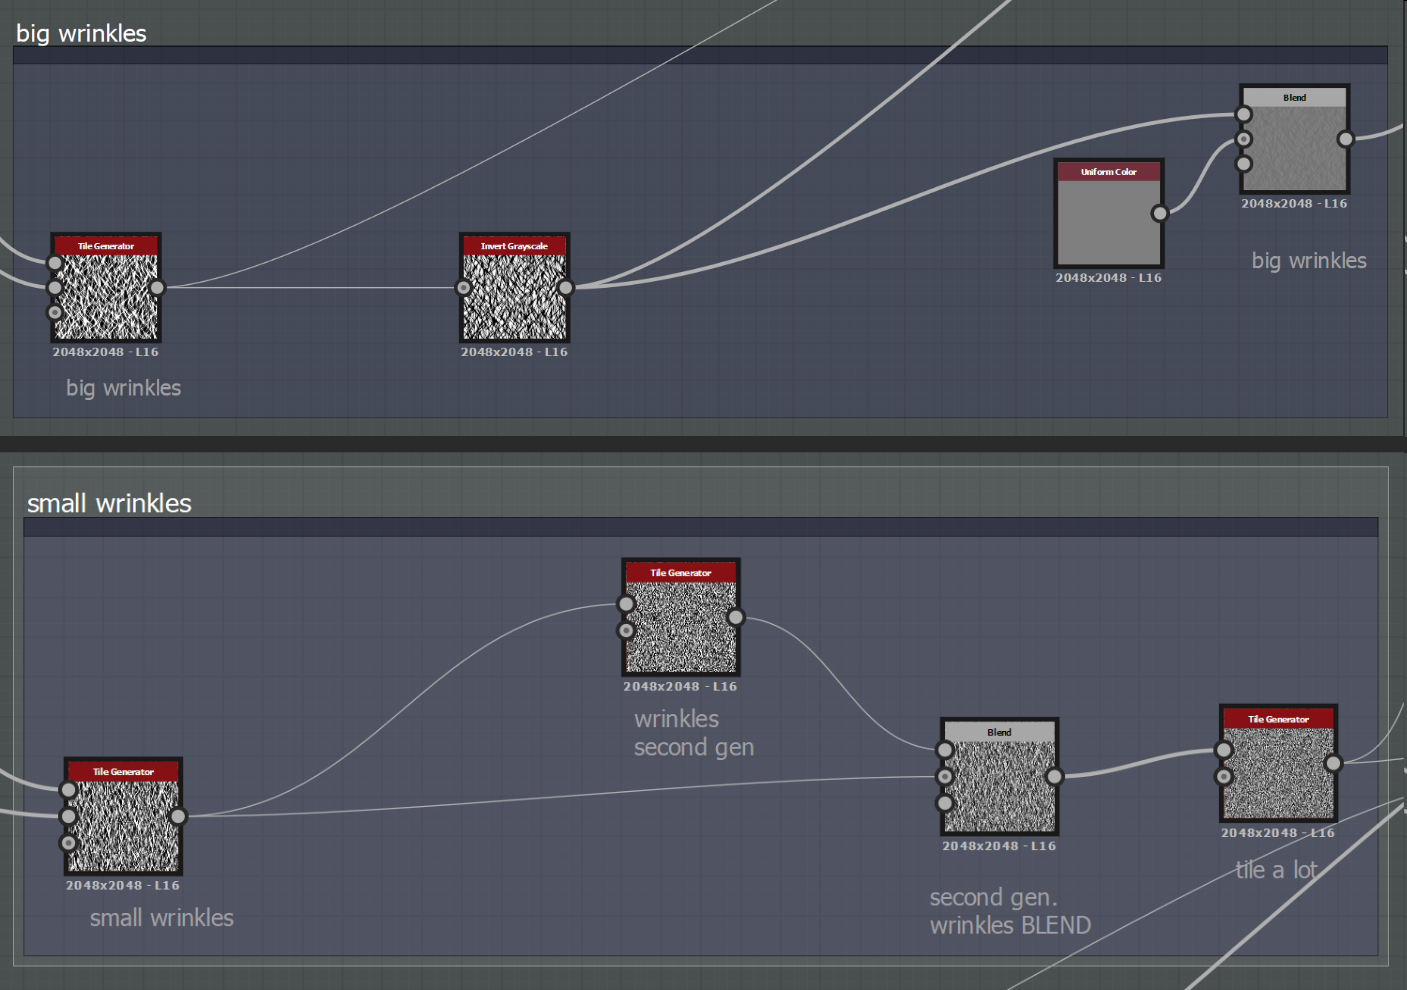
Here is a closer look at the big wrinkles and small wrinkles. They are both using the same basic shape, scattered a bunch of times. The big wrinkles are using just one tile generator node, but the small wrinkles are using two tile generators with different scales.

Here is a closer look at my veins mask setup. These are just affecting the color of the material. It is important to note that I have chosen to use painted bitmaps here instead of a procedural setup for the basic vein shapes. For me personally, I think it’s important to understand when you can just use bitmaps instead of setting up a complex procedural network. Painting some simple shapes can be done in no time at all, but creating a procedural node setup for creating the same shape in Substance Designer can take a lot of time. I usually approach things by thinking “simple and fast is good in the long run” and that usually helps me with finishing things in a reasonable timeframe.
Environment
When creating the environment, it was Blender all the way. Since Blender was still in development I used some bits of Blender 2.79 and some 2.8. Most of the hard surface assets were modeled using the amazing addons Box Cutter, Hard Ops and MESHmachine (they can all be found on Blender Market) in Blender 2.79, since all addons are not yet updated for Blender 2.8.
Lookdev with realtime ambient occlusion mask
In my Goodnight Claire breakdown video I use realtime ambient occlusion to achieve some dirt and rust depending on the object’s shape. Let’s have a closer look and see how I achieved that.
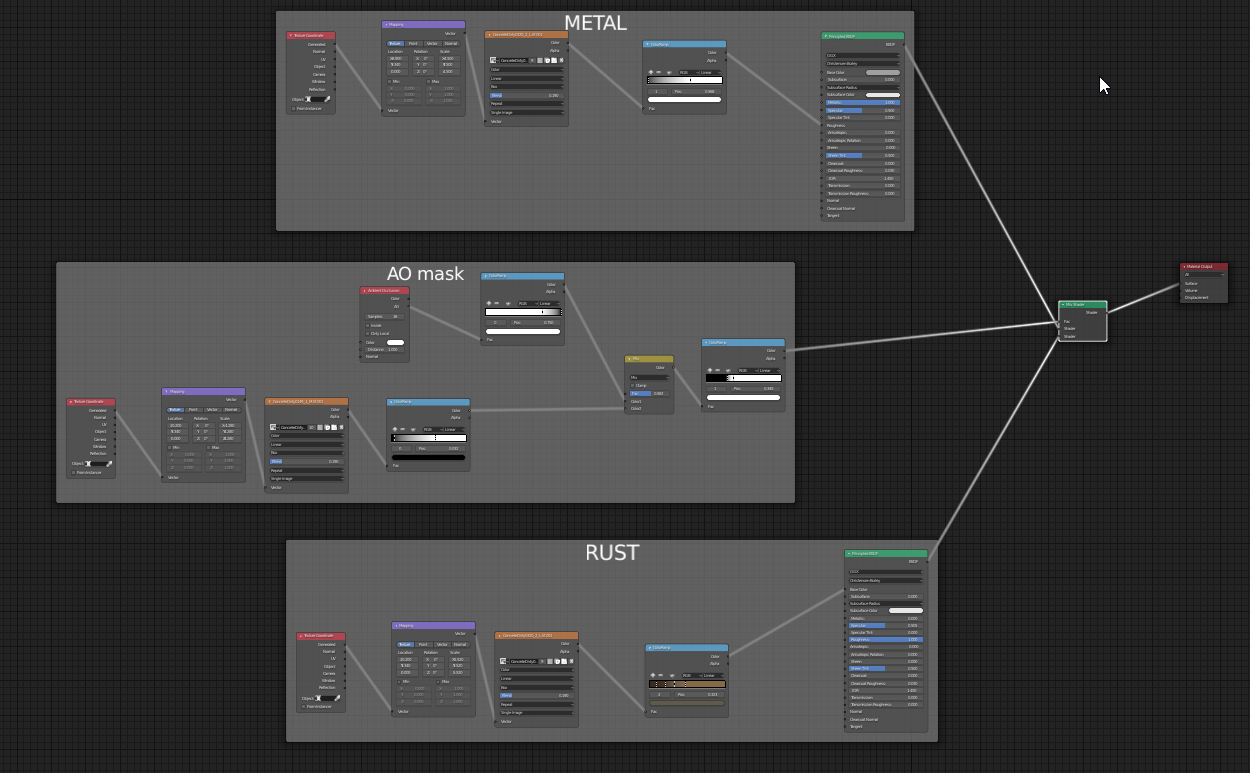
Here is an overview of the material setup. The AO mask blends the METAL and RUST material together in a MIX SHADER that is piped into the MATERIAL OUTPUT. Every texture is mapped with triplanar (or box projection as it is called in Blender) and no hand painting has been done whatsoever.
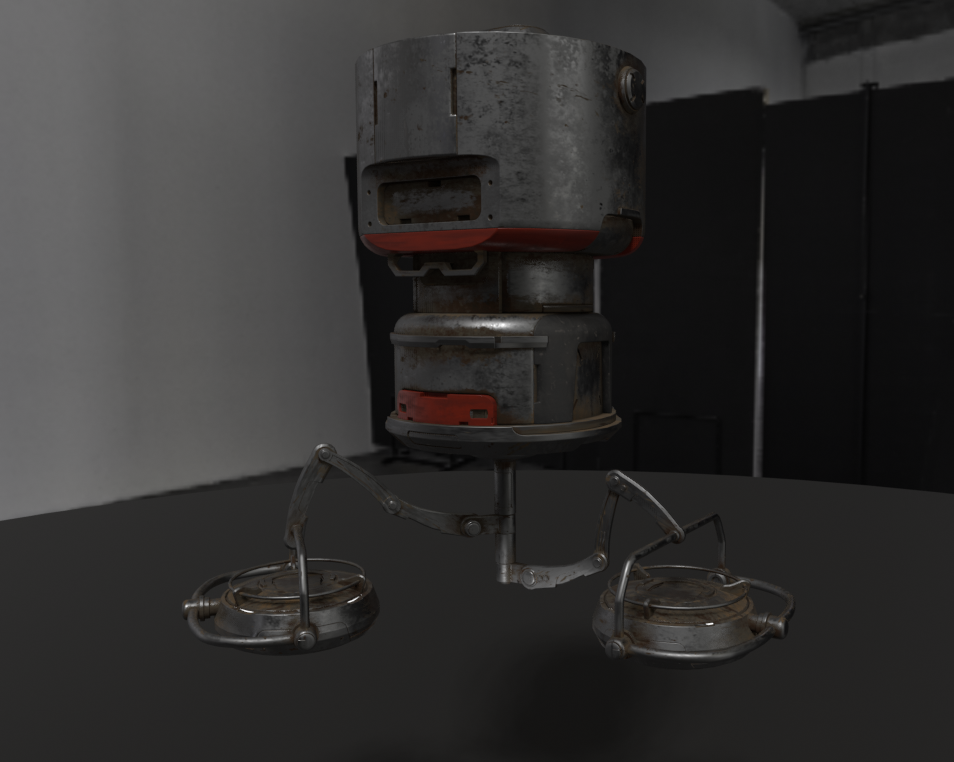
Here is the final shading in the breakdown video.

This part of the AO mask is the most fundamental. The ambient occlusion node works properly in cycles, but EEVEE can currently not use the full functionality of it (inside, only local, etc.), since EEVEE is relying on real time rendering. This basic setup needs to be broken up a bit in order to get a natural look.
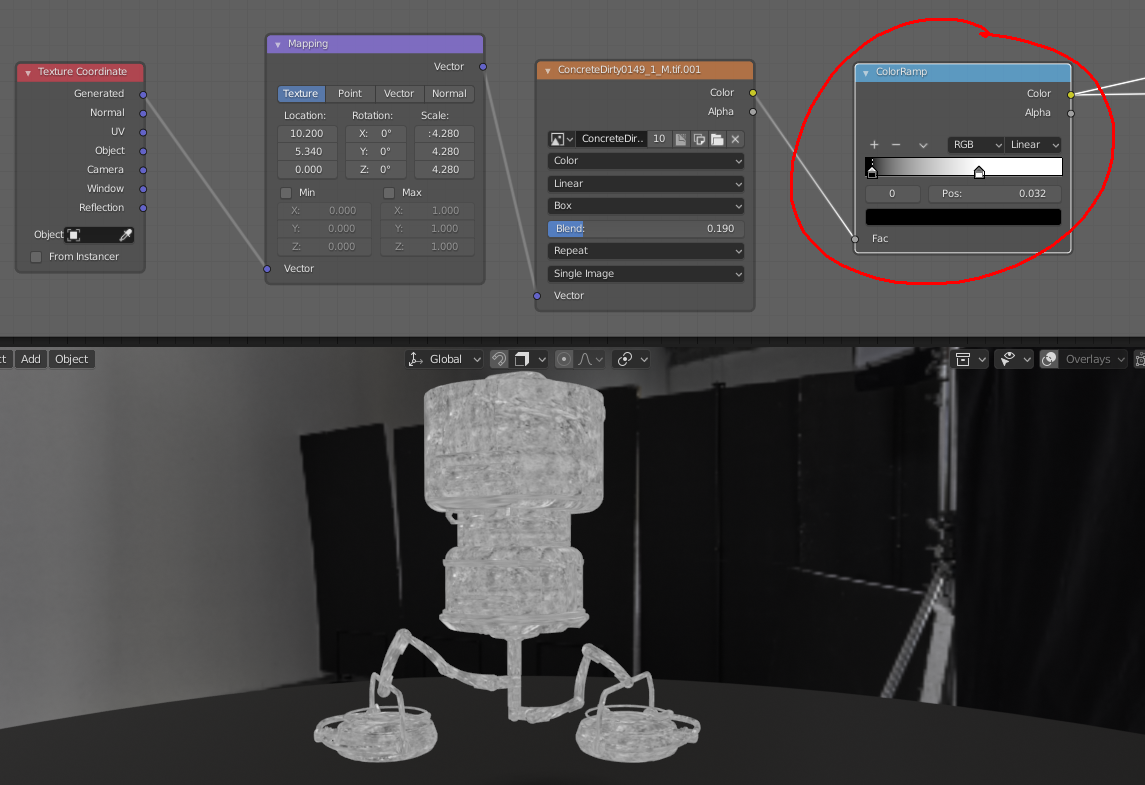
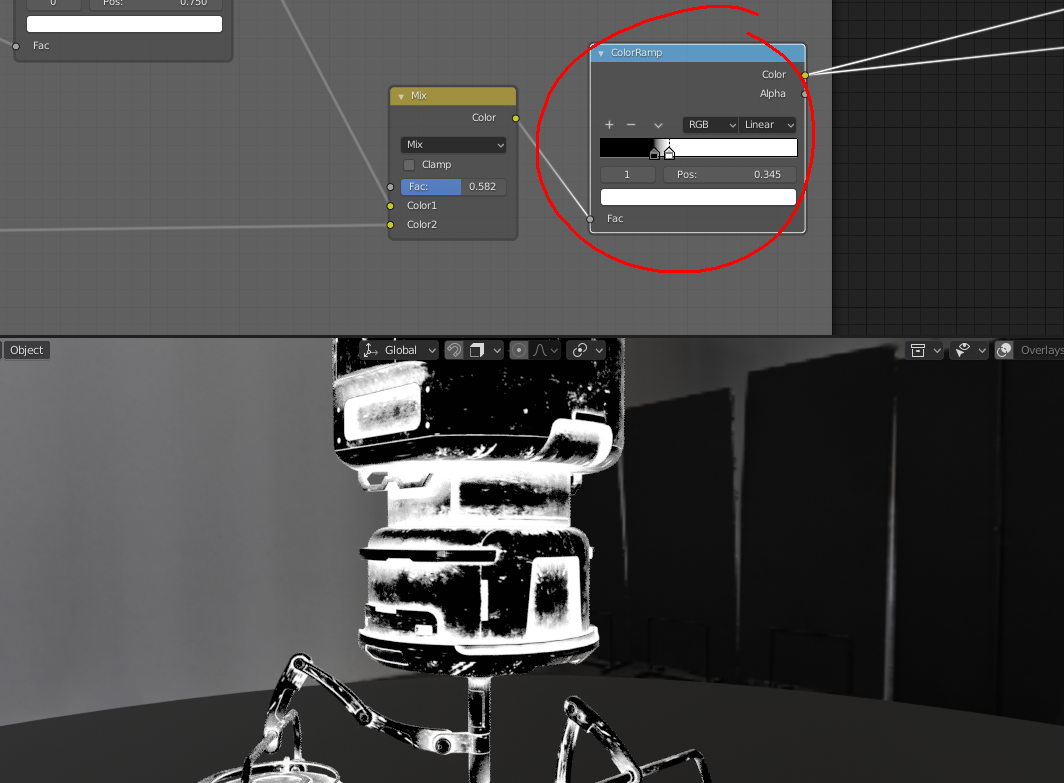
This part of the AO mask is just mapping on a texture with box projection and changing the black and white values with a color ramp. We will blend this texture with the ambient occlusion in order to break it up a bit.
In this part I have blended together the ambient occlusion with the texture in order to break it up more and also give the final mask some more contrast. This is the final output of the AO mask.
Simulation
I did some simulation on the tongues of the character using a low poly mesh that was driving the render mesh with a mesh deform modifier.
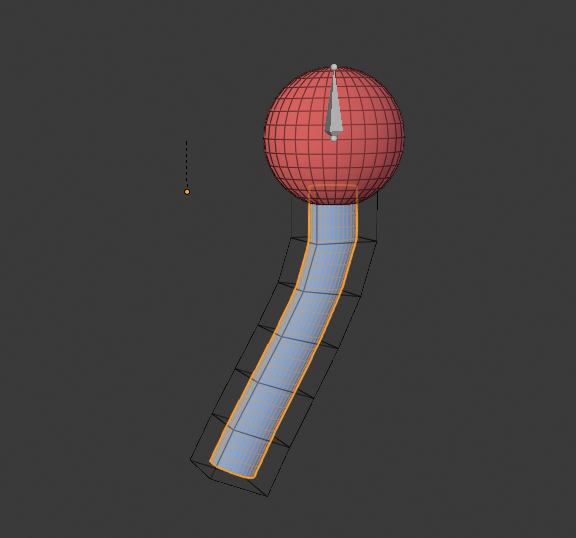
Here is a diagnostic scene whose purpose is to clearly describe the workflow of creating this simulation setup.
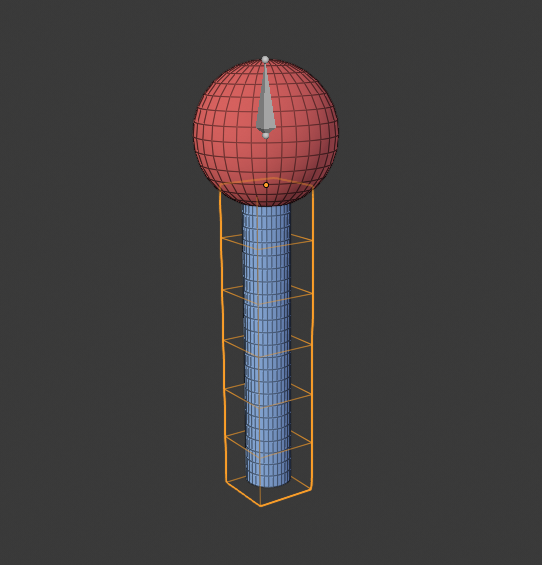
Create objects
- Create a sphere (here representing the head)
- Create a high resolution cylinder (representing the tongue) with extra horizontal edge loops by using the loop cut tool. This will later be deformed by the low resolution mesh
- Create a low resolution mesh by adding a plane and extruding it. Also add horizontal edge loops with the loop cut tool. This mesh will later be simulated. It should surround the high resolution cylinder
- Add an armature
Skin objects to the armature
- Parent and skin the sphere to the armature by selecting the sphere and then the armature. Choose object > parent > armature deform > with automatic weights
- Parent and skin the low resolution mesh to the armature by selecting the low resolution mesh and then the armature. Choose object > parent > armature deform > with automatic weights
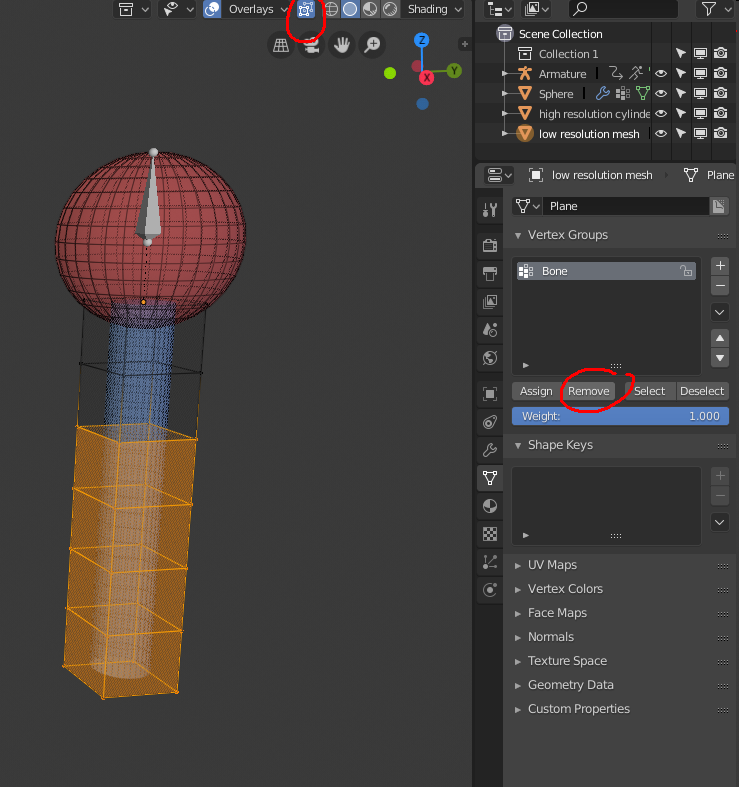
- Select the vertices on the low resolution mesh that should be simulated and remove from the skinned vertex group “Bone”. Activate X-ray next to “overlays” in the top of the image in order to select through the mesh.
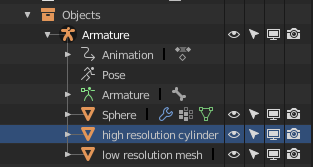
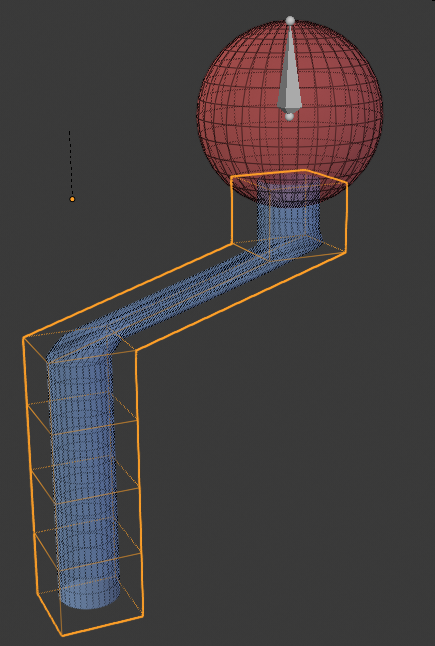
- Also parent the high resolution cylinder to the armature. You should now have a hierarchy that looks like this:
Animate the armatures bone and set up simulation
- Select the armature and go into pose mode by pressing TAB.
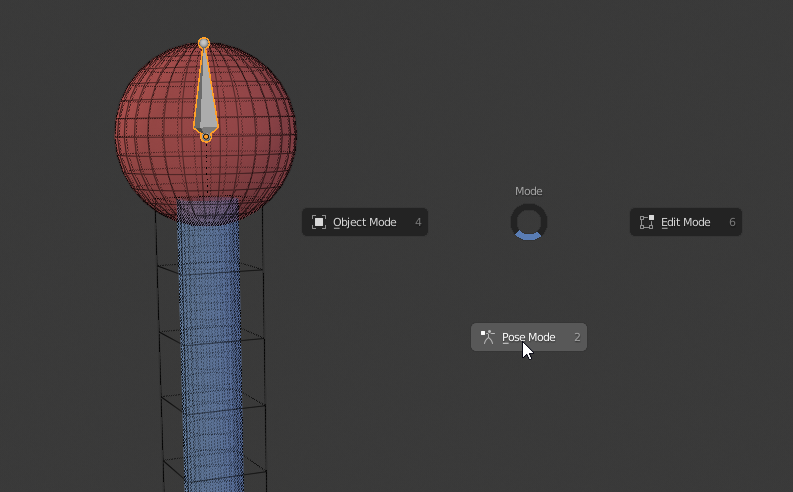
- Insert a keyframe of type “LocRot” (eg location and rotation) on frame 1 by pressing hotkey “I” or right clicking and choosing “insert keyframe”. Move to a different frame, move the bone and set a new keyframe. This should produce a similar result like this:
- Add a cloth modifier to the low resolution mesh
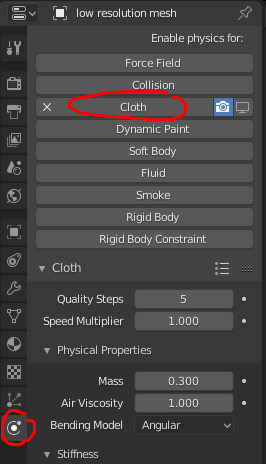
- Make sure to set the “Pin Group” to the same group that is skinned (e.g., “Bone”)

- Select the high resolution cylinder and add a surface deform modifier
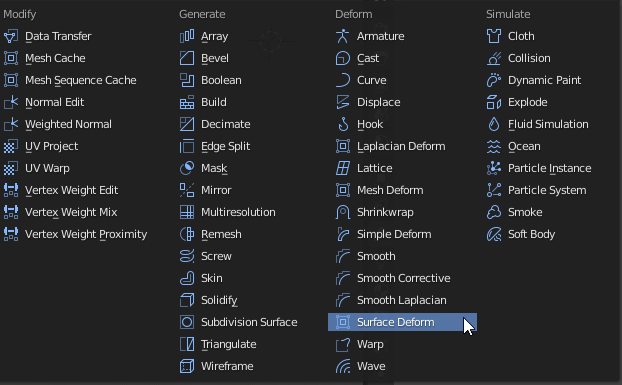
- Set the low resolution mesh as “Target” in the surface deform modifier and press “Bind”

- The high resolution cylinder should now deform to the surface of the low resolution mesh when you play the timeline. You can also add a corrective smooth modifier to the high resolution cylinder in order to make the deformation a bit smoother. If you encounter any “weird” behaviour, you can go in and out of edit mode in order to “refresh the mesh.”
Conclusion
It is hard to cover each and every step of the creative process, but I hope that this tutorial article has been helpful in some way to get a better understanding of Blender 2.8 and parts of the creation of “Goodnight Claire”. It’s a very exciting time to be using Blender and the new realtime renderer EEVEE really opens up a lot of creative possibilities for us artists.
About the Author
 Daniel Bystedt, Head of modeling at Goodbye Kansas Studios, Stockholm.
4 Comments
Thanks Daniel, your video was not only one of the best tech demos I've ever seen on the internet, it was also one of the saddest videos I've ever seen on the internet! I've literally only watched it the once, and can't actually bring myself to watch it again! It's just too sad! I feel like I don't need to watch it again as I think it will stay with me forever!
I think you're absolutely right though - you don't learn to use Blender, you fall in love with it!
Incredible work Daniel! Any chance you can share your thoughts about how the creature 'Claire' is in this situation and what she is asking the computer ? :)
What a cool post! Much appreciated taking the time to do this interview. I guess a lot of people were pulling on you when you dropped that CLAIR bomb ;)
Well done!!!
This is absolutely gorgeous!!