
Behind the Scenes: Awesome as I Want to Be
Scott Sewells ‘Awesome as I Want to Be’ is, well, awesome :) He really nailed the visual style and animation. Let’s see how he did it.
Hi everyone, I’m Scott Sewell. I first started learning 3d art back in 2009, right about when Blender 2.50 alpha was released. Since then, I’ve worked as a contractor on various game projects as an asset creator & programmer. Currently, I’m studying computer engineering at university, with the goal of developing animation tools after I graduate. While that keeps me quite busy, I enjoy undertaking the occasional project to keep up with Blender’s new features. Anyways, I was invited to share the development of my latest project with you guys, and I hope you’ll learn a thing or two.
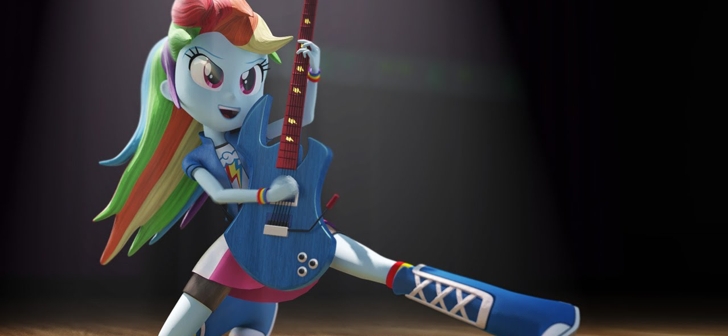
Back in November, when I started the project, there was a proposed merger between Hasbro and DreamWorks, so I thought it would be fun to make a Hoax image showing a 3d version of one of Harbro’s characters from Equestria Girls. After a weekend of work, I finished the image and it was a success. Eventually, people found out I was behind the image, and then requested I make the other characters in the main cast. Because I really enjoyed the art style, I undertook that request, with the result shown below.

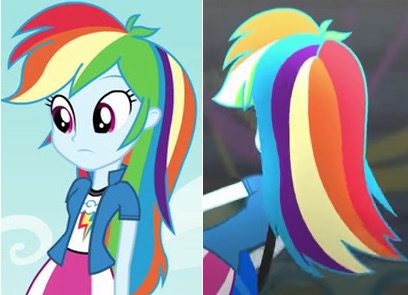
While not very technically difficult, translating the original designs into a 3d environment is an interesting challenge. This largely results from how 2d animators can adjust certain aspects of the character for different perspectives that don’t make sense in the real world. For example, look at the hair below. The front part has the same silhouette from the front and the back view. This helps to make the character as recognizable as possible, but it makes my task very difficult. I have to work primarily off of only one perspective, and re-imagine the other inconsistent angles, while keeping the character as true to the original design as possible. As well, the character’s face use different eyebrows and more for the various expressions, and that is something that translates poorly to 3d characters.
As well, choosing a good style for the characters was important. In the end, I settled for flat colors like the source material, but accented with subtle bump mapping to add detail to the hair, cloth, and other various materials. Without the details, the characters felt too plain in a 3d world. To emulate the outline of the characters, I used mixed in glossy shades with a low fresnel value to define the edges.
To make the hair bump follow the hair’s contours, I first made the hair mesh edge loops follow the desired hair’s flow and then separated the different colours with seams. After, I unwrapped it using the “follow active quads” option, which if the last selected quad on the mesh has a rectangular UV results in a nice, grid like unwrap. After, I just had to orient the resulting UV along the axis the noise texture was stretched along to get a nice hair effect.
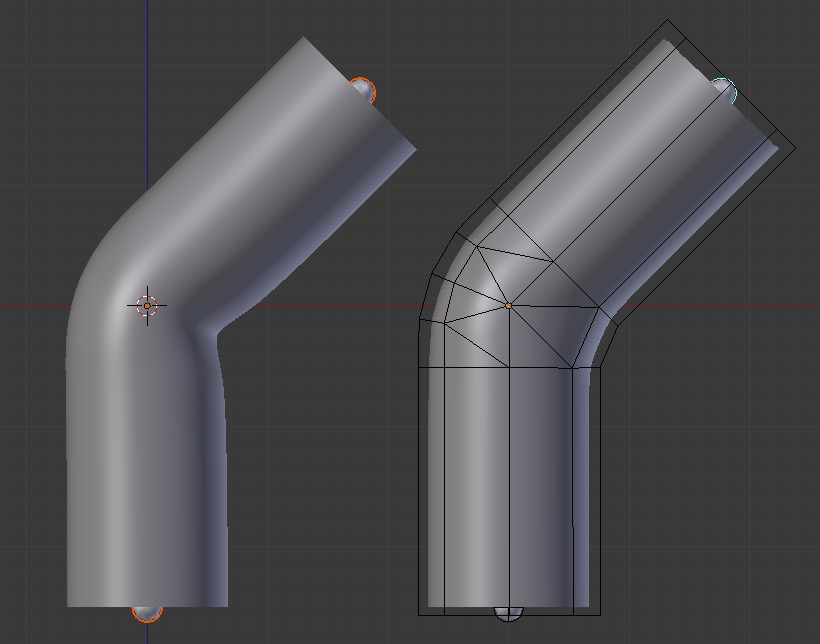
The rigging was fairly straightforward, but I feel there is one thing worth saying. Mesh cages are an extremely powerful and under-used tool. In particular, they are fantastic for rigging characters. It lets you control a character that even has many clothing and such using a single, simplified mesh that is quick to weight paint. Furthermore, they deform almost every mesh I’ve thrown at them better then weight paints, so I don’t even need to make corrective shape keys. Below is an example of an elbow let’s say. Both cylinders are the same mesh, but the right one is deformed using a mesh cage to deform rather than the armature directly. Notice the pinching on the left mesh, while the right one has lost less volume.
After I had made the characters and rigged them, I decided I may as well animate them. In the end I settled on the song “Awesome As I Want to Be” from the movie Equestria Girls – Rainbow Rocks, mainly because the varied facial expressions and actions looked like tons of fun to animate. Below is the clip I worked off of:
https://www.youtube.com/watch?v=zbnplJji7X4
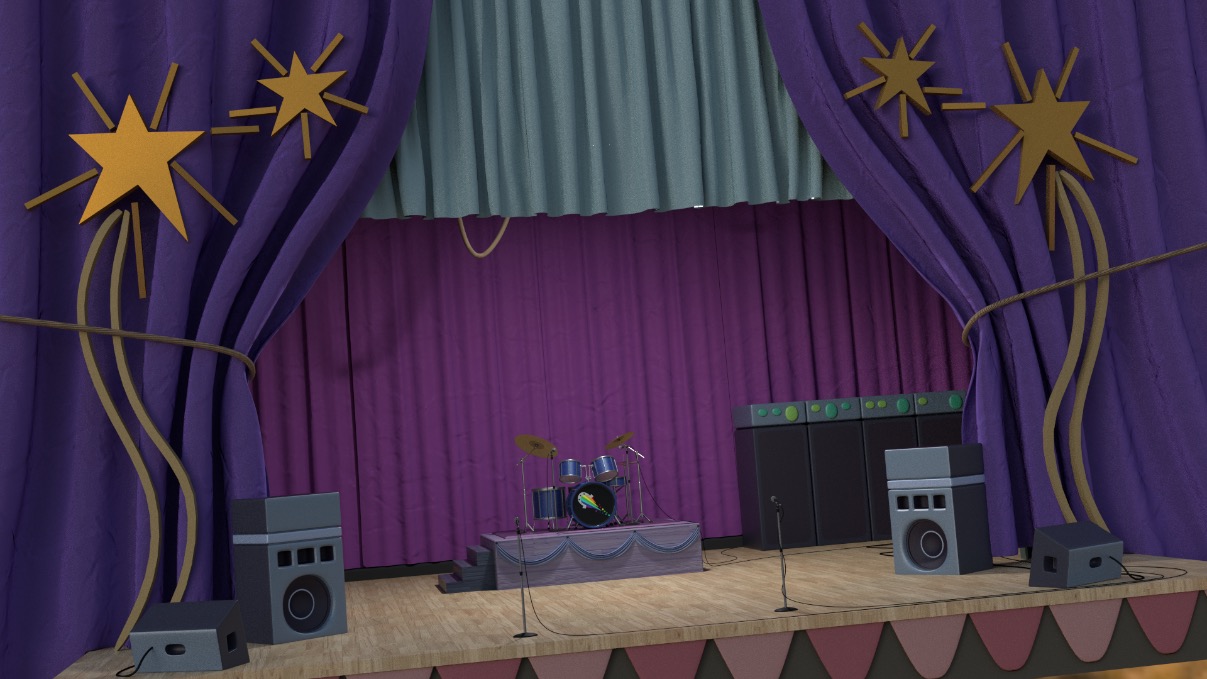
First I set up the stage scene, which was fairly straightforward.
For the animation process I used a straight ahead animation technique. This means that I keyframed most of the animation by the time I reached the end of a shot, as opposed to blocking it in first with major poses. While this method is difficult to achieve good timing with, it suited my needs since I was matching the original film’s timing.
The animation process took me about three months to finish in my free time, even though the final scene is only about 45 seconds long. That was partly due to my relative inexperience, as this was my actual first animation aside from cyclic loops for game characters, and the fact the hair was not simulated but animated by hand instead. Getting the hair finished typically consumed half of the time for a shot, so if I had the chance to do this again, I’d add physics to the rig.
Starting this project, I had no idea how I was going to do the rendering. The spot lights for the characters needed volumetric effects, and the average frame took around 45 minutes on my GTX 760m without volumetric lights. Given the project was 1103 frames long, that totals around 35 straight days of rendering non-stop. The light volume problem was solved using blender render which has the halo option for spot lamps, and that produced great results.

The render times still proved to be a problem however. I tried to optimize the scene as much as possible, but there is only so much that can be done. In the end however, I managed to finish rendering in 5 days by asking for volunteers to help render the animation, and 20 people stepped up to help, a number of them having multiple powerful GPUs. To organize the effort I used a spreadsheet where people were assigned certain frames to render from shots I uploaded after finishing the lighting and cloth baking.
After I had rendered out all of the frames, I composited them together in After Effects. I wanted to give that program a shot as I have heard a lot about it, and I was quite impressed with it. Other than the fact it took up most of my ram resulting in numerous crashes, the workflow was fast and effective. You can see the final result of my work below.
Overall, I have to say my experience animating with blender was great, and I didn’t even leverage all of the tools like library linking that might have made my jog easier. In fact, I am surprised I don’t see very many character animations made with Blender given how effective of a tool it is. Finally, if you have further interest in this project, you can find all the assets here:
Thanks for your time!


Love it!
thats really nice of you to share all of that. really well animated. blender internal is still a great fast renderer for this type of video.
I like it more than the original ! :-D
Very, very well done !
I agree. It feels better executed in 3D than even the original 2D.
More love!
Scott Sewell. Studying computer engineering in school. Proves to be a Disney-quality animator on the side.
Really nice 3D transition indeed!
I am doing a project which has some similarities. Especially I have a character whose eyes are just painted onto the surface but need to be animated, just like yours.
Might I ask how you did that here?
My approach is a plane just a tiny bit above the object, which I animate with shape keys. However, I do not like this gap between the eyes and the face, which might be visible on close ups and also do not conceptionally make too much sense.
Thanks for your answer, I am really interested!
Wow. Very well done :)