
Review: Creature Modeling for Production

Terry Wallwork reviews Kent Tramell’s ‘Creature Modeling for Production’.
Terry writes:It’s been a busy week for me with another Blender Training video review in the offing.
This time it’s by Kent Trammel, he goes through the process of modeling a creature that would be used in a real world studio production environment.
Those of you that followed his Realistic Portrait modeling tutorial on Blender Cookie will know how good he is with Blender. If you need even more proof check out his own website http://www.ktrammell.com . So he really knows his stuff. So time to set stardards high and see how his training video stacks up.
Product Specifications:
Name : Creature Modeling For Production
Author : Kent Trammell
Price : $48 (on 15th Jan 2013)
Runtime: 13 Hours (roughly)
Format Downloadable VideoStarting with the basics first, I reviewed the downloadable video version of his training material. I was able to download the content very quickly and reliably. So if you have a good broadband connection you should not have any problems downloading the material. For those that do not have a good connection, you have the option of download a DVD version. The DVD has the same content as the downloadable version.
Once you have obtained the files you are left with:
A collection of videos in mp4 format
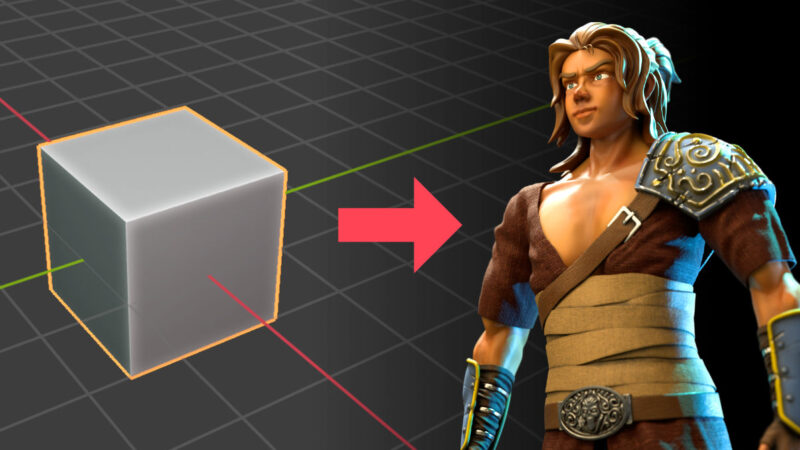
A reference image that is used to model the creature from
All the blend files at different stages of the creatures productionThe videos are very well encoded and very clear. I had no problems seeing what was happening while watching the videos. There is no web browser interface to play the videos inside your browser, you simply open the video files in whatever video player you happen to have. A media player is not shipped with the resources but you can easily get vlc media player if you want it from the web as that will play videos very well. It also does not ship with a copy of Blender that supports the features he used in the tutorials. This also is not really a big issue as you can easily get a version of Blender from http://builder.blender.org. You will also be able to use Blender version 2.66 when it is finally released as this will have all the feature used in the videos.
Of special note is the reference image that will be used to model the creature from. This an amazing illustration by Aaron Quist, who does amazing illustrations and animations. You should check out his website.
Having familiarized myself with the content I had just downloaded, I worked my way through all the videos. They are organized in to 4 chapters, with multiple parts per chapter. The videos range in length from a few minutes to 40+ minutes. On the whole the videos are not too short and not long. With the videos all being split up into multiple parts, it is easy to access the section of video you are interested in and watch videos piece by piece when time permits, or if you are like me watch them it mostly one sitting.
The first section of videos goes over the usual information about the training material author (Kent Tramell) and Illustrator Aaron Quist. Kent also goes over what will be covered in the training material and he also goes over what will be expected of person working to produce a creature model in a studio production workflow pipeline. Kent explains that this course is not really for a Blender beginner and specifically states that it is aimed more at a Blender Intermediate level user. I would tend to agree with this; A beginning Blender user would have to do a lot of stopping and starting of the videos to be able to follow what was going on, it could be done but it would be hard. Before starting on actual model creation Kent explains how to successfully use reference images for inspiration, and what the usual studio workflow pipeline is for the modeler. He gives multiple useful tips for improving your efficiency in this sort of environment, so you can get your work done as quickly and efficiently as possible.
After the introductions and overview is covered, Kent moves on to setting up the reference image inside of Blender and changing certain default settings in Blender to improve his efficiency. He has all the key presses and mouse clicks he does indicated on screen, so if you are not sure what he is doing at a certain point in a tutorial you can look at the keys and mouse buttons he is pressing to figure it out. This may not be needed for an intermediate level user but it could come in handy. He then explains the process of creating a base model for his creature, which is just rough version of his final creature.
He uses one of Blender’s newer modifiers the Skin Modifier to rough out his starting creature mesh. His explanation and demonstration of what the Skin Modifier can do was on the whole very clear, though you won’t become an expert in all of its features, but Kent was able to show just how efficient it is at creating simple forms quickly. One clever trick he mentioned was using loop cut on edges while in vetex select mode to create a vertex you can slide around. I know we now have a vertex slide operator but I still found this pretty clever.
Having blocked out his creature character we then move on to Chapter 2. In the first part of Chapter 2 we get some more theory in the difference between the the more technical forms of modeling and the more artists forms of sculpting. Kent goes over some of the technical differences. He also covers all the different types of sculpting approaches and tools available in Blender. Specifically Subsurf Modifier, Multi-resolution Modifier, Remesh Modifier and Dynamic Topology. He had clear explanations of the advantages and disadvantage of each different sculpting approach.
Of particular note was his very detailed explanation of Dynamic Topology a brand new feature that will be in Blender version 2.66. This is also important because he uses Dynamic Topology when doing detailed sculpting of his creature mesh. You will be amazed at just how flexible the Dynamic Topology feature is. It’s worth getting this tutorial just to see the Dynamic Topology feature at work. Kent just could not say enough good things about it. This probably the first commercial training material to cover the use of Dynamic Topology inside of Blender. If you are a sculptor you are going to love this series just for the Dynamic Topology alone.
Once all theory and history of all the different sculpting approaches are explained Kent moves on to explaining most of the important sculpting options in the sculpt panel and also explains the major features of the different sculpting brushes. I found this section very informative. His explanation of the different sculpt brush types was very easy to understand. I think they will help anyone coming to Blender sculpting for the first time, to be able to get to grips with sculpting more quickly.
When the above explanatory information is explained Kent uses Dynamic Topology to sculpt that various parts of his creature. He starts with low detail and slowly increases the detail level as he works his way through the video. The end result is a very detailed high poly creature which looks great but now needs retopologizing to make it lower poly, while still keeping most of the important sculpted details.
Retopologizing is covered in Chapter 3, Kent first describes what retopolgizing is and why we use it. He also covers the different approaches to retopologizing that Blender supports, specifically, Face Snapping, Shrink Wrap Modifier and BSurfaces Addon. He gives the pros and cons of each approach and settles on using the Surface Face Snapping method.
Kent covers retopologizing his creature models for a few vidoes in realtime to clearly show how to approach the subject and then switches to timelapsed video showing the rest of the creature being retopo’ed. Chapter 3 was a very large chapter with a number of sections. But well worth making the effort to watch all the way through. Having managed to successuflly retopo most of his model Kent then takes a while to cleanup his model in places that he wasn’t happy with it. This was useful as it shows how to approach fixing and repairing a model when you aren’t completely happy with it.
Chapter 3 was the one and only place where I noticed minor problems. As while Kent was retopo’ing hie model he occasionally had to allow triangles in his model. Even though I don’t think they would have caused any problems I am not sure that in a production environment they would be allowed, especially when the model is fully organic, curvy and likely to be flexed and bent, as a creature like this one would be, and you can’t know ahead of time how the model will be displayed/animated in a large production.
All the sculpting and retopology work is completed by the end of Chapter 3, so Kent moves on to chapter 4.
In Chapter 4 the first thing that is covered is explaining how to get your recently created model signed off in a production environment. So the chapter goes over how to effectivvely display, light and shade simple materials on your model and prepare your model in the best way, such that higher ups will sign off on your model, so that you can call it completed. Of particular interest in this chapter is the section on material shading. Kent goes over the basics of using Blender Cycles Material Node shader system in a clear and efficient way. He make some very effective shader nodes, which would be very useful in presenting models.
And at this point your basically finished from a modeling point of view.
I thought this training material was excellent well worth buying, just be prepared to set aside enough time for it all to sink in. You will love the coverage of Dyanamic Topology sculpting. Even if you don’t work in a studio production environment workflow pipeline I think you will find this training series very useful, I did.
Because this tutorial series is aimed at a professional workflow arena I was more strict on my reviewing guidelines. So it got marked down slightly because of the triangles in the mesh. But other than that, this is an excellent tutorial.
Review Score 90%
This DVD is now available as a Course on http://cgcookie.com – https://cgcookie.com/course/creature-modeling-for-production/


I modelled for years avoiding all triangles, but then I noticed certain areas where quads actually rendered MUCH worse than a triangle would. To me putting in a few triangles is the sign of a mature modeller. The myth that you NEVER use triangles is just meant to scare noobs away from them since every noob abuses them if given the chance. Feel free to disagree, but I wouldn’t mark him down for that.
+1 (+10 even, for that matter)
Regarding quads and nonquads, regarding any general rule-of-thumb, it is necessary to take into account not just *why* a rule exists but *where* what the rule addresses is or is not an issue. Such rules exist to help, not to unduly restrict or paralyze.
As you noted, meshes with all-quads can still pinch badly when subsurfed. On the other hand, subsurf an icosphere which is made of all triangles, and it stays smooth. Even the nGon can be made to deform and shade cleanly when used right. It is all a matter of learning where and when and how.
Triangles are perfectly acceptable when they lead to a cleaner topology for the tools and operators being applied to the base mesh. Someone should not be marked down simply because those are present. If I had a choice between a triangle that preserves uniform edge lengths where it exists in the mesh, and a quad which is put in just for the sake of being a quad, while causing pinching because of the extra vertex, I will take the non-quad every time. It’s a sign of a mature modeler to be able to control your topology without being so enslaved by the general rules that their over-application hinders your design rather than helping it.
I’m so grateful for the review from Terry Wallwork! Couldn’t be happier with a 90% rating given the scrutiny was more strict.
I appreciate the support about the triangles. I’ve been using/allowing them strategically for years at work and completely agree with your comments about their usage. But I probably should have explained that better in the series. Marks off for that is warranted.
Thanks for the post BlenderNation!
The clearest video I have seen showing how topology effects subsurf procedures is from the series by the late great CG Guerilla channel. Also good from them were two videos that explained the strange things that happen with keyframed rotations. Unfortunately all that remains of the channel are some re-posted vids with terrible audio-sync issues.
This looks like such a great DVD. I will buy it soon :-)
(Dare I predict a Citizen Tut or a Quick-Tip over on CGCookie about strategic triangle use in general? Would be great!)
You weren’t kidding. That CG Guerrilla vid about subdiv surfaces is a fantastic explanation.
Perhaps we’ll indeed do one over at CGC! Thanks for the suggestion =)
I know this is kind a old but the topic Triangles vs Quads keeps me fascinated. What is exactly the real reason not to use Triangles? I thought i t was more something like “to make work easier”. This because selecting and working with quads is more tedious since making selection and so is way more difficult.
I wonder why a game engine runs triangles then and not quads. I believe triangles can get a more optimal model vs vertice count, but is that really always the case?
Ohja and ofcourse doing subdivision will cause issues probably a couple more mods as well