
 It's Thanksgiving today in the US and what better way to spend it than using Blender to make a paper turkey!
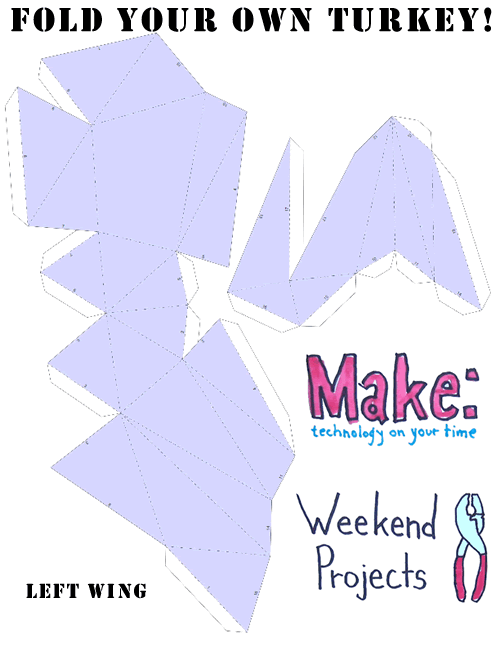
From the tutorial intro:
In this weekend projects video, my dx-arts pal Allison Kudla and I break it down for you by teaching you how to use Blender to decimate a turkey and output it to Pepakura, which will flatten it, add tabs, and get it ready for papercrafting. Big thanks to the folks over at Alibre, who modeled up our our turkey and made an awesome 3D exploding turkey for the PDF. Watch the video to learn how to build one from scratch, print out the instructions if you want to learn how to make your own model out of paper, or you can just print out the plans and fold them on up! This could make a great activity for the family while the meat-based bird is cooking!
I'm sure you can imagine putting together several other types of paper models using Blender and Pepakura - Suzanne anyone?

18 Comments
I love this tutorial! Oh, I'd also like to have a large Blender logo that I can put on my table :-) Anyone interested in making one for me? (.. waits and sees how people will solve the hole in the middle)
Cool idea, I always wondered why nobody ever though of making uv-maps into this kind of stuff - it's basically the same principle :)
On the con side: Why is all this cool software either commercial, for windows or both? Is there some equivalent on the linux/open source side? I want to avoid using wine if there is an alternative.
Werner
Oh, and just to share a nice card-model forum I've found while searching:
http://www.cardmodels.net/forum/index.php?
http://www.cardmodels.net
Werner
And to spam even further - an unfolder script for blender (no flap creation as far as i know though):
http://celeriac.net/unfolder/index.html
Werner
Cool .)))
This is really cool, also i made a blender logo, havent folded it my self yet, but here is the file for Pepakura
http://www.savefile.info/download.php?id=02AA2EE1
Hope the link works!
im definitely gonna try using this at the weekend
:)
Creating origami with Blender! Superb idea!!! :)
Yes very nice idea indeed I'm gonna try that too.
Thanks so much for posting this! I'm really excited about the possibilities this opens up!
A couple things that will help other people:
1.) In the video, she exports the 3D model as a dxf, but a superior file format would be an wavefront obj. file, which will keep your materials/textures, so when you import that into Pepakura, you can print out the pattern with the textures already applied!
2.) When you are folding, pay attention to the folding lines. The lines with a dot-dash-dot pattern are a mountain fold, while the dash-dash-dash lines are a valley fold. The mountain folds are convex, and the valley folds are concave.
I am currently folding a duck that I had modeled several years ago, I'm eager to see how it turns out!
That's the ultimate way for GI-photoreal rendering! Just convert your models to paper and
light and photograph them in the real world ;-)
I absolutely love papercraft, and I was already considering using that python script that unfolds meshes, but this is way cool in that it adds the tabs for you to prevent mistakes. I'll never forget my first paper helicopter... the S-18 http://www.netbabyworld.com/museum/
Am I the only one who can't get UV-mapped textures to work correctly in Pepakura? They render fine in Blender, but when I export the model to Pepakura (through a 3ds file), some faces are mapped fine, others are completely messed up.
I've been hammering at this for two nights, and I finally found the perfect match.
1. Make sure your normals are all pointing the right directions!!
2. Export as a LIGHTWAVE (LWO) file from Blender.
3. Open LWO file in Pepakura.
4. When it asks you about normals, if your faces aren't WHITE then something is wrong.
5. Access [3DModelWindow > Texture Configuration...] You should now see at least one listed texture assignment. I have one called "Pallette."
6. Load up your images as needed and - hey! - it DOESN'T CRASH! :D
Thanks, Bmud!
I found out that it crashes when you try to apply a texture when there are no textures in the list. If I go export a 3ds-file from Blender, I get over that problem, but it doesn't map my uv textures correctly. It doesn't crash, the mapping is just wrong.
If I use an LWO file, I had different problems, but I seem to have gotten over them by exporting each blender object separately. I will need to buy Pepakura to combine them into one Pepakura project later, though.
The last thing I need to do is to flip the V-axis in Pepakura - otherwise my textures are mapped upside down.
But I finally got it to work now too! I had given up hope until your post inspired me to experiment some more.
Hey!
I am so impressed to see everyone implementing this system. Please post images of your paper models somewhere public, that would be great! I teach a class that uses this in an assignment and I would love to have more examples to show them.
Best wishes,
Allison Kudla
Did somebody (Eugene) say SUZANNE?
http://www.osysi.net/files/3d/suzanne_in_paper.jpg
Kay, I found out that this image isn't the right size to print when you view it in the browser and doubley-bad it ends up being way too small for anyone to do suzanne's tiny nose...
Here's the Pepakura file: http://www.osysi.net/files/3d/suzanne_in_paper.pdo
Here's a PDF splitting it up into four pages: http://www.osysi.net/files/3d/suzanne_in_paper.pdf
In case you get lost, here's the same PDF with numbered edges and tabs: http://www.osysi.net/files/3d/suzanne_in_paper_numbered.pdf