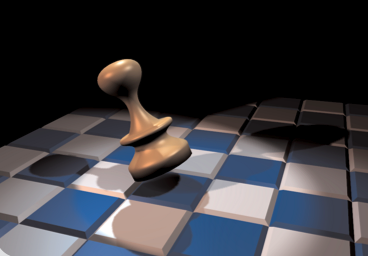
The Result

To finish your animation, set up some lights and set up your camera. Since your camera is just another object like the pawn, you can animate it, too. Try making it rotate slightly from left to right (insert rotation keyframes only). A few degrees is already enough to make your final animation a lot more dynamic.

To render a single frame of your animation, go to the desired frame and press [F12] or click the 'Render' button.

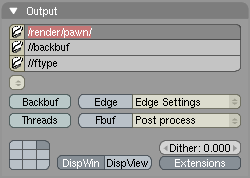
Usually you will want to render an entire animation to disk, either as a series of images or as an AVI file. To set this up, first enter a filename in the filename box. For a series of images (not for AVI files), this name will become the base prefix of the filesnames. For example, entering '/render/pawn' will result in a series of images called 'pawn0001, pawn0002, ...' stored in the directory /render.

Set the correct file format. Selecting 'AVI raw' or 'AVI jpg' here will cause Blender to store your animations not as single images, but as an AVI file. AVI jpg is the most compact way of storing your anima- tions, but it comes with a slight quality loss. Change the 'Sta' (Start) and 'End' values to match your animation. For the current animation, values of 0 and 31 should be entered.
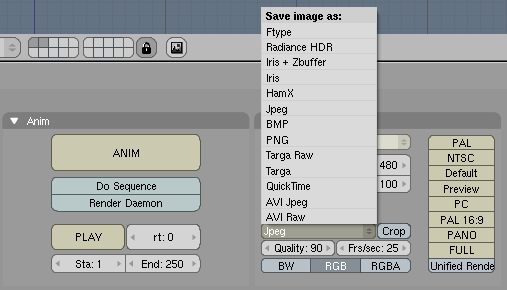
Press the 'Anim' button to render the entire animation.

Play it back from within blender by pressing 'PLAY'. This opens a new window - press [ESC] to stop playing.

A Little Extra

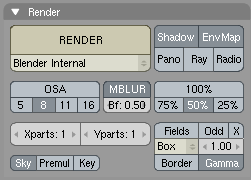
There is an extra rendering option called 'Motion Blur'. Motion Blur simulates the effect of a shutter time - fast moving objects will become a bit blurred. Motion blur takes a lot of time to calculate, but in some cases it really adds to the realism of your scene.

Before rendering, select the button 'MBLUR'. Leave the 'Bf' (Blur Factor) on 1.0; this value represents the shutter time. Ahigher value corresponds to a longer shutter time.

Here is the result of the same image as before, but now motion blurred.

93 Comments

  1. Nice to see those old tuts revamped. They should all kept up to date for an upcomming manual. Only thing I miss is that you should show the new capabilities of Blender too, like vector motion blur.

  2. Hi Toon,

    maybe that's better suited for a new tutorial! This one is only about keyframe basics, the motion blur was a little 'bonus' ;-)

    Cheers,

    Bart

  3. hi,
    Isn't there a way to do the chessboard by bscript?
    Chess are often used for programmation example, so why don't do the same with blender? :)

    thx

  4. I love this tutorial. I'm afraid I'm a tad past it though. This site has grown so much and provides GREAT resources that It's my new home page :D

  5. Great Tutorial...
    It helped me alot with some of the Blender Animation Tools I was missing.

    My 1st 30-frame Blender Animation came out pretty good.

    I sort of Tricked-Out the ChessBoard, BackGround, Pawn, Lighting and Paths + added 150-Frames amd WOW... Awesome Output !

    Appreicate this site very much !

    Much Thanks,
    Orion

  6. This tutorial is very educational.

    Im a newbie so I struggled with this one a bit. Would be a good idea to mention that duplication can be achieved with SHIFT-D.
    I also managed to create the chess board as part of the pawn object :/
    I'm still trying to work out how to separate it out into a descrete object.
    These things may seem obvious to experienced users, but you can't assume too much for the people who need the tutorial the most.

    I hope these suggestions are useful.

    I'm gonna have a crack at the other ones on this site.

  7. This is by far the best tutorial i've done!...I gained so much from this!

    This was my first introduction to animation and all the rest looked so complicated,
    But when you said press alt + A i was amazed at what i had done without much work at all!

    Thank you so much!

  8. wtf i cant add a color to just half the squares.... when i select half the squares then add color it adds it to all the squares

  9. i cant figure out how to find the New effect button in the Anim Buttons window, i just dont see it can someone help

  10. B13nd3r 633k on

    Here's a helful hint: When making your pawn, if you find that there is a hole in the top or bottom of it, simply select all the vertices around the hole, press [w] , select merge, then select 'to center'.

  11. new 2 blender on

    WOW! thats all i can say. exept that i never thought it would be so easy to animate something like this thankyou very much. :)

  12. Christian Blackburn on

    Dear Author,

    Thank you so much for taking the time to make this tutorial. I have every intent of following it to completion. However, I am sure the steps below leave a number of things out. For starters if you created that plane in Front view, you wouldn't be able to have it lay directly on the grid. Please revise this portion and send me the steps, because as it exists now I can't follow.

    >I start by adding a new plane to my scene. In front view, enter editmode ([TAB]), select all vertices ([A]) and >extrude the vertices upward a bit ([E]). With the vertices still selected, scale them down somewhat to create >beveled edges.

    Thanks,
    Christian Blackburn

  13. Hello,

    I too would like to thank you for this tutorial. I have really enjoyed learning how to do the modelling and rendering and now I get to add animation to the list. I just have one question. When I play the avi everything goes perfect. Makes me thrilled! But when I go to watch the video on winamp or any other program it just shows a black screen. Did I miss something??????

    Thanks for your time,

    Laura J.

  14. Great tutorial!

    I have one question though. If we make the pawn and the chess board separately. How do we import the pawn into the chess board scene?

    thanks

  15. Felicidades por el tutorial
    Lo seguí paso por paso, claro que previo ya había visto
    2 o 3 tutoriales. Excelente tutorial para aprender algo
    más sobre rendering.!!

    Muchisimas Gracias.

  16. Nice tutorial! I'm rendering mine now. One little comment: rotating 180 degrees doesn't seem to make the "black" squares fit, you have to rotate it 90 degrees instead.

    @Barney: I'm sure there's a way to do that, but personally I just didn't make them separate. Since the pawn in the first frame is pretty high up, it doesn't get in the way of the board.

  17. first of all im only 15 so i prolly shoudnt be messing with this program but im trying to figure
    out how to delete the default cube . as well as understand how to get to the point in which you can draw out the object i can move it i can copy it and make mutiple of the same i just dont get alot of this if any one would no of a manual or a starters guide that would be much apriciated

    obsticle714 osc official stencil crew dbk drippy bomber kids

  18. blender newb (matt) on

    This tutorial is awesome! Didn't realize it was so easy to make a smooth, good-looking animation. Props man, very well explained, it introduced a lot of new concepts and helped me practice a lot that I already knew but was still uncomfortable with.

  19. Hello,
    I wasn't playing much with animation in Blender before and found this tutorial really nice.
    I have encountered a small problem though. I'm using Blender 2.42a and for me the pawn sinks a little into the "ground" when it's rotated on frames 12-15 and 17-20. It looks like if the rotation is calculated by Blender using the object center.

    Rotation was created with 3D cursor as a pivot set on the bottom edge of pawn and manually rotating the pawn was looking correct. Keyframes 11, 16 and 21 were set with pawn position and rotation as shown on pictures in this tutorial.

    Did I miss something?

  20. GREAT TUTORIAL

    I'm a begginner and this is one of the only tutorials I actually understand. I have a question though (it's not about the tutorial itself but about blender and my computer) is it normal that it takes so much time to render an animation?
    thanks for answering

    Anonimous

  21. BIG EXTRA

    PS: this is a big extra if you want to make it neater (you really should consider it). To make the pawn land in an elastic way on the shessboard, first go to frame 41. Now move the pawn to the right and down so it is at floor level. Rotate it so it's horizontal. Then make it like in frame 16 (squished). Insert keyframe (I) LocRotScale. Now go to frame 51 and make it like befor (z axis: 1.3, y axis: 0.7 and x axis: 0.7). Now insert keyframe (I) LocRotScale. This will make the pawn land elasticly. GREAT WAY TO IMPROVE: IT LOOKS REALISTIC.

    thanks for acknowldeging.

  22. hi when I press [I] in the animation part of the tutorial i do not see the key option LocRotSize all I see is LocRot, could somone help me pls?

  23. Wow that blur is cool, but it slows the render r-i-g-h-t d-o-w-n!

    Thanks from a Blender noob. 8-)

    Oh and chuckwagon, in my version of blender (243) it's LocRotScale in the key-frame menu.

  24. Hello Bart,
    I found it easy making animations in blender. I'd be so grateful if you started some tutorials on 'Lighting' and 'Texturing and shading'

    Thank you

  25. The squashy effect really is brilliant, and so simple to do. thanks!

    This is a great tutorial, and has left me inspired with an idea for my first Blender comedy short - "A Prawn in a Curry" :p

  26. a really nice tut
    I know it has nothing to do with this but, do you know how to make more human shapes?

    thanx

  27. for all the other newbs (like myself) that had issues with the pwn being attached to the checkerboard ... i figured it out!

    when go you to make your surface (" ... I start by adding a new plane to my scene. In front view, enter editmode ([TAB]), select all vertices ([A]) and extrude the vertices upward a bit ([E]). With the vertices still selected, scale them down somewhat to create beveled edges ...") make sure that all other objects are deselected. That was is. Happy modeling

  28. hi im having trouble with this step

    On frame 16, Place the 3D cursor at the base of the object. Enter scale mode and start decreasing the object's size by moving your mouse vertically. Next, click the MiddleButton to indicate that you only want to change the objects Z size.

    where is scale mode?

  29. just want to say thankyou for sharing your knowledge openely so that others can get to grips with the tools on blender complete beginner!!! but following your instructions is much welcomed many thanks again
    mark

  30. CAn anyone tell how to add extra points to the bezier curve because when i hold ctrl and left click on the endpoint it doesnt do anything i also dragged it and it made a gray line but then it went away when i left go of the mouse click

    can sum1 tell me what im doin wrong plz

  31. wait i worked out a different way to do it i think its coz i got versoin 2.44

    but its such a good tutorial thanks!

  32. When i spin it it tuns into a wierd cup like thing or sometimes the normal one but with curved lines but when i press all the things and press z and 5 it satys the same and doesnt go 3-d or anything

    can sumone help me please

  33. Astrono (Roel) on

    Hello Bart,

    It's great that you make tutorials to help us all getting better in such a fun program but i have some problem.
    i tried out your tutorial but as strange as it is when i ended part 2 of the tutorial i stopped because i inserted all key frames with the I key and LocRotScale but when i play the animation it isn't animating, but just at the same place.
    I don't know why it is doing like this though.

    - Roel

  34. Astrono (Roel) on

    Hello again Bart,
    it is getting even stranger now, i just made a short animation of something like 2 seconds where you see some model rotating while it moves a little, i did it by using the LocRot buttons at different Keyframes but the strange thing is.
    If i try the same thing again now in other new projects, it doesn't work :/

    Maybe you can help me out?
    Help is appreciated.

  35. Astrono (Roel) on

    Oh, i think i already found out what the problem was, just switching to object mode while pressing the I key and using LocRot seems to work.
    Thanks anyway, and especially for the great tutorial. :)

  36. How do i apply the materials to multiple objects at once. i have selected all the chess board objects and select the colour i want, but it just appears on the last square i clicked.

    Fantastic tutorial,
    many thanks.

  37. very good tutorial, but in the machine world ther is always a weird problem, here's mine:

    http://img340.imageshack.us/img340/407/model2rf6.jpg

    can you see those extrange shadows in the squares?
    i tried changing the light but it doesn't seem to be the problem.
    before rendering and before seting them smooth i could see that too in the 3D view.
    i'm more curious than worried, if someone knows what causes that.
    unfournately i'm using win XP so maybe that's the problem XD

  38. Help wanted,
    why is it that when I render on Mac tiger, all I see is black surface on blue background? but when render on PC, I se the fully shaded textured object??
    Thanks.

  39. In the tutorial the second figure with the curves of the pawn is there a larger picture somewhere because when I zoom in it gets blurry? But other than that a great tutorial.

  40. I'm having trouble creatingthe shape of the prawn with the bezier curves, it's really hard controlling the lines and stuff, I guess this is the 3rd tutorial I've stuffed up already.. ;__;

  41. how do I delete keys? I mean, ive got a little problem with the keys I dont want... they eat up my animation sequences. please help!

  42. @Andrew: This is what I was talking about with the pic being small and have wondered if there was anyone out there who has a bigger pic with the bezier curves for the pawn.

  43. Ik wil beginnen met blender . Wie kan mij helpen? Hoe en waarmee start ik?Waar kan ik terecht voor een avondcursus / privécursus in de omgeving van Antwerpen?

  44. @desseyn johan: To start I suggest the book 'The Essential Blender' it's for 2.44 but it can still work, the Blender.org website, blenderartists.org, Introducing Character Animation With Blender. These should help you get started.

    DJ_Boxer

  45. I found a link on the wiki page for modeling a house to a pdf of the Blender Tutorial Guide. It is from the NaN days but it is still good to get started. I will post the link later when I can.

  46. Very good tutorial, Although I modeled my pawn using extrusion. The steps were nice and clear, And you actually explained what you were doing, As opposed to some other tutorials.

    Next, Do a Complex Texturing tutorial!

  47. TOILETREE Kenny on

    Hi guys this tutorial totally rocks my socks. We have to do this in our animation course at school.

    p.s. i like it hard.

  48. Hey everybody,

    I'm just staring with this 3D esign program,it's very nice, but unfortunately I'm stuck at the beginning of the third page of the Pawn : I made my pawn smaller and fatter while being on frame 16, but when I pres the [I] button to click on RotLocScale (or size), all my sequence is made of pawns that are just ... fatter and smaller, but no bouncing !
    If anybody knows what I did wrong, I'd appreciate the help.
    Thanks.

  49. Not Very Clear...

    "You can add extra points to the curve by selecting an endpoint, holding down[CTRL]and LeftClicking. Try playing with the curve a bit before going on - also pay attention to the way the 'handles' affect the direction of the curve in a particular point. Shape the curve as indicated below, and pay special attention that the endpoints on the left are located on the blue axis (the Z-axis). I will be using the Z-axis as the axis of rotation later."

  50. im confused... i have the 'Bezier curve' but now i dont know what to do next... if anyone could help me that would be rly nice...

  51. Ive made the pon but i want to use it in an animation with somethingelse , when i import something it replaces the other one, can anyone help me , please thank you

  52. Dan Blue,

    I had the same problem for a long time and just barely figured it out myself.

    To import something from another .blend, go file>append and select the file you want to import from. You will be given a list of classes. Select "object," and then select the name of the specific object you want to import.

    Good luck.

  53. Hi,

    I have already done some tutorials and everytime I add something (mesh - bezier curve ) it always
    comes in the TOP VIEW. I mean when I do NUMPAD 1 for the FRONT VIEW and than I ADD CURVE BEZIER CURVE, I only see a straight line. I have to switch to TOP VIEW to see the curve and to work with it.

    It was the same when I made a dolphin with the tutorial, the result was that the fin didn't stand on the
    dolphin but lays flat.

    Can you work with a bezier curve in the front view, and how doe I doe it.

    Please help

  54. Same question as JEF, top view is fine but most of these tutorials say to start off in front view which is making a thin straight line, How can we work with planes/cubes/curves in front view?

Leave A Reply

To add a profile picture to your message, register your email address with Gravatar.com. To protect your email address, create an account on BlenderNation and log in when posting a message.

×