About Blender

Blender is the open source software for 3D modeling, animation, rendering, post-production, interactive creation and playback. Available for all major operating systems under the GNU Public License.

You can download Blender free of charge on www.blender.org. On the Blender site you will also find a gallery with cool Blender art.

Introduction

In this tutorial, we'll be playing around with curves and procedural objects a bit.

Starting off with only a handfull of shapes, we will make an animation of a ride through an abandoned mine. The technique used will allow you to make changes to the shape of the path easily and not have to worry about recreating stuff like the motion from scratch.

Also, I will try to include some relaxing statements here so after reading, Ton will be ready for work again! ;-)

Hit it!

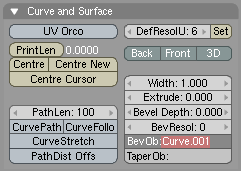
In the side view, add a Bezier curve. Go to the EditButtons screen, and select the button '3D'. This will allow you to move the vertices 'out of the plane', or make the curve truly 3 dimensional.

With the curve in editmode (TAB KEY- the vertices should be visible), add some points to the curve with CTRL-LeftMouse. When finished, you should have something like this:

Now, we'll attach the camera to the path. First, select the camera. Hold the shift button and select the path. Make the path the parent of the camera with CTRL-P.Next, select the path and go to the AnimButtons screen. Now, when you select the CurvePath button, the camera will move along the path. (Animate with ALT-A).Note:Depending on how your curve has been drawn, the camera can be displaced when you select CurvePath. Just drag it back in place – that should do the trick.This is nice, but not enough – we want the camera to look in the right direction, too! Fortunately, there's a button for this, too: CurveFollow. (Make sure the cam's up vector points the right way!)Note:For some reason, the camera will rotate 90 degrees when you select this button. As in the note above, just correct this motion and you should be fine.

Creating the rails

The rails will be creating by applying a bevel object to the path. In front view, add another curve and create the shape for a rail – something like this:

Hint: you can close a curve by pressing [C] while in editmode.Scale the shape down, and duplicate it. Join the curves together by selecting them both, and pressing CTRL-J.In the bottom-right of the screen, you can read the object's name. It's probably something like OB:Curve.001 (it is for me, anyway). Now select the main path, go to the EditButtons screen and enter the object name you just found in the BevObj: field.

bevelobject

If all goes well, you're now looking at some cool rails. Chances are, though, that the rails are 90 degrees rotates relative to the rails shapes you just drew:

To correct this, select the rails shapes, enter edit mode, select all vertice (AKEY), and rotate them 90 degrees (RKEY, next hold down CTRL while dragging the mouse. CTRL will restrict the rotation angles to multiples of 5 degrees).By now, we should all be happy campers and have a model like this:

Procedural Objects

Now, the fun part starts. We'll use procedural objects to create some of the woodwork you find in mines. We'll start off with the ties; these are the wooden blocks that connect the rails.
Start off by creating a block, a bit wider than the two rails.

Make the rails the parent of the block. (Select the block, hold down the shift key and select the rails. Select CTRL-P). Now, when you animate, you'll notice the block is following the rails, too. Select the block, and go to the animButtons screen. Select the button called 'DupliFrames'. This option will create a 'virtual copy' of the block for each frame of the animation.There are a bit too many copies right now. Increase the value of 'DupOff' until your rails looks good to you. (I used a value of 2).
Now, create a shape like this:
and give it some depth (set the extrude parameter if you used a curve, or use the extrude command when you've created a mesh). Again, place the shape on the beginning of the rails, make the rails the parent of this shape, and set DupliFrames. Fiddle around with the DupOff value untill you're satisfied.
For lighting, create a spotlight, place it just above the camera and parent it to the camera. (Make sure it points forward ;-). This will simulate a light being mounted on your mine cart. However, because the lamp's direction will follow your viewing direction exactly, the lighting will look too artificial.Create an empty, and place it a bit in front of the camera. Parent it to the rails. Select the lamp (first!) and then the empty. Select CTRL-T (Make Track) to make the light follow the empty. When you do this, the direction of the spotlight will probably be screwed up again. Correct this by rotating the light untill it points to the empty.Select the empty, go to the AnimButtons screen and set TimeOffset to a small negative value (like -3). This will cause the empty to run 'ahead of the light' (in time).The direction of the light is now uncoupled from that of the camera and the resulting lighting will look much better.
Finally, I've created a rock wall by making another extrusion along the path. Each path can only have ony bevel object however, so you need to duplicate the rails path first (use shift-D, NOT alt-D!), create a rock wall outline and extrude it.
Finally, after adding some decent textures and lighting, here's the result:


173 Responses to “A Ride Through the Mines”  

  1. 1 ishwar

    Hi,

    i found this tut very useful

    thanx alot !

    PS can you move a point in a NURBS curve in thru the z-axis ?

    whenever i try, the point moves in x and y but not the z

  2. 2 bart

    Hi Ashwar,

    NURBS curves are 2D by default. You can switch them to 3D though in the EditButtons Window (F9). In the 'Curves and Surfaces' tab, select '3D'. Alternatively, you can use Bezier curves.

    B@rt

  3. 3 White Knight

    i did what it sayd but the curvefollow botton dosent work any ideas

  4. 4 bart

    HI White Knight, I just checked in Blender 2.40 and it still works ok. Just be sure that you have the curve selected and then switch to the Edit Buttons (F9). The option CurveFollow should be there and it should work fine. If it doesn't, please email the file to me and I'll take a look. (Contact me with the contact form at the top of the page first to get my email address).

    B@rt

  5. 5 Alec

    Great, simple intro to some really powerful features! Thanks very much for the tutorial.

  6. 6 Daniel

    Hi,

    Your tutorials are really great but I had a problem with this one:
    I can't add a point to the curve at the beginning. Ctrl left click simply doesn't work. I'm in editmode, I can see the vertices but I can't add any points.
    Please help me!

  7. 7 Jacob

    What's a Bevel object? Here at Morgan High School we've discovered a "Bevel" option in the "Specials" menu, but it, in no way, works towards the goal of this tutorial. I have one curve, and I shaped a cube to the shape of a rail segment, but now I don't know what's going on.

  8. 8 bart

    Hi Jacob,

    I've added some extra information above. For starters, be sure that you create the outline of the rails from a curve, not from a mesh.

    Cheers,

    Bart

  9. 9 Jacob

    Ok, thanks for the help. I'm basically done, but I might do some more to touch it up, but this is a rough render of my mine track:
    http://i48.photobucket.com/albums/f232/Cob_Studios/3D Animation/MineTrack.jpg

  10. 10 newbie

    i might have done something wrong but when i type in Curve.001 the curve has the shape of the rail i made but its a jummbled mess,nothing like what i made.at parts of the track it it gets all scrunchy, black and crummpled.am i doing something wrong?

  11. 11 eb264

    yeah, daniels right, CTRL-Left click doesnt work for me either. any ideas?

  12. 12 Brian

    You guys having trouble with CTRL-LftClick to add vertices, in order to add vertices that way you have to have only one vert selected, and it must be an end vert.

    If you have none selected, or if you have a vert that is in-between two other verts, nothing will happen, or if you have an end vert and another selected, nothing.

    ONE end vert only.

  13. 13 Richard

    newbie: I had exactly the same trouble with my rails. Turns out, if I typed in Curve.001 as the bevel object whilst my path was in Object mode the rails went all scrunchy as you observe. I found that if my path was in Edit mode when I typed in the Curve.001 bit, it all worked fine.

  14. 14 eb264

    when u have to connect the two rail parts together, CTRL-J doesn't work. any ideas?

  15. 15 eb264

    sorry. figured out the problem.

  16. 16 eb264

    Whats an empty?

  17. 17 Richard

    An empty is an object that can be used to manipulate other things. It can be positioned, scaled or animated just like any other object, but it is entirely invisible in the final render. It can be used to track cameras, scale or orient textures, or alter just about any feature which can map to another object. You`ll find it in the root of the "Add" menu.

  18. 18 Matt

    Hey, i cannot find the ‘DupliFrames’ option. Where is it? (i have downloaded the latest version of blender)

  19. 19 Jesse

    not to be a tool, but the wooden boards between the rails are called rail ties.

  20. 20 bart

    @Jesse: thanks! You're the first one to comment on that remark in, oh, 8 years? I've updated the text! :)

  21. 21 Nelsiny

    Wasup everybody,

    I dont know why but I am not very good at this. I have the 2.4 version and I still cant figure out how to make the rails/ I mean I cant do the first step of the Tut. I dont know if somebody can help even more, I steps are very good and what not but I need a little more help. If anybody can help Thanks alot I would like to done some nice things to the Caves and all that.

  22. 22 dnx

    hi,

    out of some reason my rails wont show up in the render? what up?

  23. 23 eb264

    this actually works now. it worked before the empty but i dont think the empty did anything. thanks for the tut. works great.

  24. 24 Caleb

    Nice tut! I am in the process of creating a rollercoaster. I knew how to do everything but make the ties. OK now to my problems. I believe that both problems are related. First problem, the camera goes way to fast. Second problem, the rails are to far apart! HELP ME!

  25. 25 Ryan

    I have a problem…. I've made the rails and the tie (and i made a parent to follow the rail). It will follow the rail in the animation but in your picture, you have all the ties at once. What's my problem?

  26. 26 AS

    Well, as usual I am having my troubles! I have gotten to the step where it is time to "BevOb" the rails onto the curve. Now when I do this, I get something kind of funny. Firstly, the track I have created is all black, yet no material is applied. Secondly, it is sort of twisted up at the ends, and there's little mutations and stuff on it. Now I noticed that both Newbie and Richard appear to have experienced a similar issue. Richard offered a solution–apply the BevOp in edit mode rather than object mode. However, I have tried this operation in both of the two modes, and each in turn produced identically problematic rails. So now I am lost. Would it help if I emailed you the .blend file B@rt? If so, at what step should the file be when I send it?

    Thanks,
    AS

  27. 27 Ryan

    Ok… well I realized the problem was the dupliframes. I turned that on but I'm having the problem of the objects following the path not being positioned correctly. Ties are sometimes too far below the rail and sometimes the cave-brace things are IN the rail. What can I do to fix this?

  28. 28 Paul

    B@rt,

    Thanks for this fun and useful tutorial. I found it pretty straight forward after going through all the preceeding ones. Figuring out which views to use while editing the rail curve was a good exercise too. I had to redo the curve a couple times before I got it looking good. I don't understand the relationship between the length of the intial curve and the number of frames it takes to traverse it yet, but I'll figure it out eventually.

    Regards,
    Paul

  29. 29 Jonnyappleseed

    Caleb,
    If you are femilare with the IPO editor, you can fix the problem by extending the length of the curve in the ipo window.

  30. 30 laughing cheese

    Hi there!

    These are great tutorials, but I'm having trouble making them work with 2.41! (Sorry, you probably get that a lot…)

    You start out by saying "in the side view". Which view is the side view in? And Blender never starts in two windows :confused:

  31. 31 bart

    @laughing cheese: press NUMPAD+3 (with numlock turned on) to switch the 3d view to sideview. Press NUMPAD+4 for top viev, NUMPAD+1 for front view

  32. 32 laughing cheese

    Alrighty! I'll give a shot!

    Thanks very much!

  33. 33 laughing cheese

    Oh…….I was thinking of what viewports; So their both 3D windows?

  34. 34 shane

    ok im a noob at this stuff and i dont no what every thing means right now.. im stuck where it says.. animbuttons, and the curve path button… where are these at and what do they look like?

  35. 35 shane

    ok so far i only got to the animation part… when i tried to put that /_\ thingy onto the rails it never works.. all i get is to rods… what am i doing wrong???

  36. 36 Thord Johansson

    Help! Can I download this somewhere? Someone who is finished and would like to send the finished file to me, in some kind of exported format that I can show without Blender???? I have Blender, but that shouldn't be necessary should it?

  37. 37 ahhhhhhhh

    coooool hahaha…

  38. 38 sasa

    heyy everybody~

    nice tutorials, but i wonder how can u make two windows (*first pic) , coz i can nv manage to do it…i asked my fds, but they cudnt figure it out too~ XPP
    and seriously~ blender is not my stuff, lol….so mani buttons!! (*scream)

  39. 39 anonymus

    Hi, I'm kind of new to this, could someone tell me how to make a rock wall outline out of a path?

  40. 40 Thord Johansson

    I'm kinda serious here.
    Help! Can I download this somewhere? Someone who is finished and would like to send the finished file to me, in some kind of exported format that I can show without Blender???? I have Blender, but that shouldn’t be necessary should it?

  41. 41 bart

    @Thord: the whole point of the tutorial is that you have to do it yourself :) Go ahead, it won't take you more than a few hours.

  42. 42 anonymus

    Hello, could someone answer my question?

  43. 43 anonymus

    Ok, I figured out how to do it.

  44. 44 ARF

    DETTER PROGRAME ER DET BESTE JEG HAR SETT I HELE VRDEN

  45. 45 Duncatty

    The camra is going to fast, how do i change that?

  46. 46 Danny K

    Hello

    It was a great tutorial and I had a lot of fun.
    but I had one setback (almost every tutorial bears one)- in render mode the rails (the path) did not appear!! why?? why?!! wwwwwwwhy????!!!!!

  47. 47 Thord Johansson

    @ ARF: Ja, men jag är ju nybörjare – jag vet inte :D

    I hope you understand swedish.

  48. 48 Danny K

    no, I dont understand swedish, you heartless viking.

  49. 49 Thord Johansson

    >:(

    WE HAVE HEARTS! >:( >:( >:(

  50. 50 Antipeopleperson

    Ok a great tutorial…. i got everything done and it wasn't to hard. But i want to extend on to the mine to make it alot longer and a bit more fun that just a few twists and what not. So is there a way to add on to it with out making a whole new mine?

  51. 51 snowboard
  52. 52 Amateur free vidieo
  53. 53 Hooty

    im just a beginner using blender and while i was creating my own picture after the picture got bigger and bigger i wasn't able to slelect some of the parts of the picture anymore and after a while they dissapeared. Wow im really stumped on this and i can't figure out why, my guess is that the picture is just getting too big i guess but like i said im a noob to this and i would appreciate any feedback please.

  54. 54 My Name

    How can I slow the camera down? I read something about the ipo editor, but HOW!?!?!?

  55. 55 difool

    @my Name: In the edit menu there's a tiny gray field where it says "path length" Normally there should be set a value of 100. If You increase this value, the camera will slow down eventually.

    As for myself, i have the same problem as dnx and Danny K. The rails won't show in the final render. Any ideas?

  56. 56 Happy Blending

    Oh my GOD! Thank You!

    You got the solution for my problem!
    Im working on a rollercoaster… The Mesh is ready and UV-Skinned
    (cause it's gonna be a special 1 with Jet Engine and Afterburner LOL, should be fun to ride with…)

    But the point was that i actually didn't know, how to create those damn Coaster-Tracks!
    I've been searching for a long time now… …and this WORKS !!!!!

    THANK YOU MAN
    Best Regards

  57. 57 TheBeast9

    Hey, This looks awsome so far, but one problem, after making the first rail part, and creating its other-side-counterpart, joining them, and renaming it as "Rail" I select the pat, and put in "Rail" on the BevOb: but nothing changes…. I tried this without the name changed, in edit mode, in object mode, and even joining both the rails in edit mode instead of object mode. What have I done wrong?

  58. 58 Anna

    I have a nice rails with all the woodwork, but when I animate it, the rail ties and the other thing still move along with the camera. What am I doing wrong?

  59. 59 Consolidated

    I was wondering if there was a way to change the number of frames it takes for the camera to track its way around the line. 'Cause I wanted to make a large scale one, and 100 frames is just a little too quick. And cutting the frames/second just kills it.
    Any help?

  60. 60 Consolidated

    Wait, never mind, I just read 'My Name' and 'Difool's convo.
    Sorry bout that.

  61. 61 skejoe

    Hi :)

    Very useful tutorial but i've got into a problem.. I'm making a rollercoaster, and what is a rollercoaster without a loop ? :P So i've made a loop on my path, but when my camera is going at the loop it's going on the outerside of the loop, not staying inside as i want it to.. Is there any solution to this problem?

    Thanks
    Sebastian Skejø

  62. 62 SnakesonaPlane!

    Hey… thanks for this tuorial! As all the others here, I have a problem. I've been going through the tutorial and when I get to making the ties(/the "Dupliframes" part) it doesn't work… I'm in the "Anim settings" window and I pressed down the "Dupliframes" tab, but nothing happened. I think my problem is that I'm not using a "procedural object". I only think that because I don't exactly know what they are. All I know is that it's not a "Mesh", a "Lattice", or a "Curve". (At least they don't work like the tutorial said they should. I think I'm using Blender 2.37, but I'm not really sure how to find the version number… Anyway, if someone could help me with that, I'd be very appreciative. Thanks.

  63. 63 Anna

    @SnakesonaPlane: Did you make the rails parent of the ties?

    I still have the same problem as above. Do I have to make the original tie invisible or something like that? I could upload the .blend file on my webspace if someone wants to see it. Please help.

  64. 64 SnakesonaPlane!

    @Anna, I did make the rails the parent of the ties. (selected the rails, held "Shift" and selected the rails, pressed "ctrl p" selected the option of "Follow path" set to "curve follow", and then pressed "DupliFrames"- nothing happened…) thanks for the effort though! You know, it actually looks as though we have the same problem ( I may be wrong)..

  65. 65 Anna

    No, DupliFrames works fine here. I think I used the 'Normal Parent' option, maybe that will work for you too.

    My problem is that the original tie still follows the path, although DupliFrames also works. I'll make a screenshot.

    http://www.hetleesbeest.nl/zooi/blendermijn.JPG

    The red arrow points to the thing that follows the path. The rest is DupliFrames stuff.

  66. 66 Anna

    No, DupliFrames works fine here. I think I used the 'Normal Parent' option, maybe that will work for you too.

    My problem is that the original tie still follows the path, although DupliFrames also works. I'll make a screenshot.

    (Seems like I can't place a link here… let's try this. Just type www. in front of it.)

    hetleesbeest.nl/zooi/blendermijn.JPG

    The red arrow points to the thing that follows the path. The rest is DupliFrames stuff.

  67. 67 Anna

    No, DupliFrames works fine here. I think I used the 'Normal Parent' option, maybe that will work for you too.

    My problem is that the original tie still follows the path, although DupliFrames also works. I'll make a screenshot.

    (It doesn't seem to work to post an URL here… Maybe this works. Change the -'s into .'s)
    www-hetleesbeest-nl/zooi/blendermijn.JPG

    The red arrow points to the thing that follows the path. The rest is DupliFrames stuff.

  68. 68 AS

    I cant figure this tutorial out. Ive tried it many times and run into the same problem each time; the BevOb. B@rt, could you please try going through the tutorial in the new version of Blender? This and the other tutorials are (sadly) becoming hopeleslly out of date :-(. Amazing how fast Blender keeps changing, but its confusing for us out here! Thanks for your time ;-)

    AS

  69. 69 Drac0

    Ok, so I got up to the part where you make the sahpe for the rail, but im not exactly sure how to go about making the curve into the actual rail. Thanks to anyone that helps.

  70. 70 Scott

    I'm hoping it's not just me, but I had a heck of a time finding the dupliframs button, or the animbutton. Took me like an hour of searching on google before I figure out that you press F7 to get to the screen. I was assuming it was under F10, and had maybe been removed from Blender 2.42 and replaced with Sequence Arrays or some such. Hopefully that helps someone other then me.

    Peace
    SJ

  71. 71 SnakesonaPlane!

    I just figured it out! Thanks a bunch, Anna! Because my thanks comes in bunches… just like bananas… And you think I'm joking.

  72. 72 Mike

    GREat! i even made another animation it took a bezier curve and i just made it a circle and i typed in curve and used "follow path"and Alt+A and whoa it was awsome just the cube part of Dumpli frames part!

  73. 73 Fallen_Demon

    I fractaled the supports by 10 or 20 if I remember properly. That on top of a cloud bump map worked really well

  74. 74 !dj_-of-_D00M!

    dood cant you make a underwater city tut that would be awesome

  75. 75 Odie

    Hi,
    I don't understand what you mean with 'join the curves' at the rails. So I tried to extrude the cuve and then make it follow with dupliframes. But it didn't work…..

  76. 76 dj2j

    thanks for the tutorial,
    but where is the curvepath button?? i`am using blender 2.42
    can somebody please tell me where it is

  77. 77 anonymous

    anonymous, i am having issues with the ties i know where both animation buttons are but when i click on them it is the same and there are no "drop off" buttons why HELP!

  78. 78 anonymous

    FOR ALL U NUBBINS ITS IN THE OBJECT BUTTONS SECOND OVER :) it took me 23 somting minutes to figure it out NICE TUT

  79. 79 pieman

    @snakesonaplane or ne1 who knows how, please tell me how to use dupliframes.wenever i try to use it, the button goes down, but nothing happens to the ties.

  80. 80 Jetto

    This a very intersting tutorial. Thanks.
    I want to control the speed of the camera along the path. I read that this have to be done from the IPO window. But after many try I haven't been able to edit anything in that window. I think there is a black line at speed 1.0 with rails selected and path in the IPO header choise but I can't select the line.

    I'm lokking for help on this, thanks.

  81. 81 Ben

    I'm about to go insane…..

    Everything looks fine in the 3d windows, but when I render it out the rails aren't visible!

    Someone PLEASE help me with this.

  82. 82 Ben

    I solved my own problem…well, a guy on a forum did. Turn off "dupliframes" on the curve.

  83. 83 josh

    when i go to render window it's not animated!?
    please help me.

  84. 84 Mark

    Hey, thanks for this tutorial! I'm a complete noob in Blender (d/l'ed it this week) and I got my "ride through the mines" up and running with about 5 hours work, including putting in my own (rather nasty) textures.

    All I need to do now is work out how to convert the rendered .avi file to put it on my 3G cellphone… ;)

    First frame if you're interested: http://img.photobucket.com/albums/v726/markfiend/mines_frame1.jpg

  85. 85 Barek

    Very nice tutorial, it helped me out a lot. Blender is such a sweet program.

  86. 86 jonathan

    ok im just having trubble getting 3d meshes to curve. like i hava a tube and its gunna be a power wire to a computer but i cant figure out how to use the curvs to get the tube to curve. can you help out a noob………………………please.

  87. 87 Realcoolguy

    Bits of Advice.

    I noticed I had to give my rails a material to get them to show up. Try that if they're being invisible on you. As for the dupliframes part, make sure your track is un-selected. I found having the track + something else selected when hitting dupliframes doesn't do anything to the other object, so make sure you deselect everything, and only pick the one object you want dupliframes enabled for.

    jonathan, I've seen a few awesome tutorials on wires, one even did the curvy telephone wire, and was awesome. Do some google searching and good luck ;)

  88. 88 lazykate

    Another great tutorial – I got caught out by the dupliframes on the rails and rocks making them disappear too, so thanks for the comments. Looking forward to extending the ride and maybe adding some skeletons…

    Does anyone know how to select the duplicated objects ie. the beams and sleepers in the 3d views? I keep having to flick over to the Scene Outliner and choose them from the tree there, as I can't right-click on the original or the dups (Blender 2.32).

  89. 89 Cyborg_572

    This was a great tutorial, it's always fun to learn something new about blender. been using it for years and didn't know about any of this stuff. thank b@rt.

    @lazykate – you can selected the duplicated objects by right clicking on the copy at the end of the path

    @josh – to get the camera to animate, go to the first frame of the path and insert a loc keyframe (select the camera and press the I-key), and then do the same on the last frame of the path.

  90. 90 bubba lubba

    Hey, got a problem.. i cant find the "curvepath button" and "CurveFollow", help plix

  91. 91 thekid

    This doens make scense. when i try to make camewra follow the path, it ends up sie ways.

  92. 92 jerry

    In the very first picture, which view is the split screen on the right?

  93. 93 John

    Is there any way to use bullet physics to make the camera/other object go on the track with gravity/friction, rather than just slide along at a predefined speed? (if so I will make some kind of game with this.)

  94. 94 shnomoe

    i cant figure out wy my beizer curve doesnt have verticies…. and i cant add any. i can go to 3d mode, and it still doesnt do anything. it just has things on the end of the curve that allow you to bend it. help?

  95. 95 Trickey

    Looks like a great Tutorial. However I can't get to the end as I hit a problem.
    I am trying this tutorial with the latest build of Blender (2.44) and whenever I try to create the rails, by putting the Curve.001 into the Bevob of the path – the rails just come out as a mess and bear no relation to the path.

    Can anyone help, I have tried several things – including doing the relevant step in both Object and Edit mode and the same thing happens. I can't seem to find a way to fix it!

    All help really appreciated, I would really like to get a grasp on this, but it is proving almost impossible at the moment.

    Thanks

    Trickey

  96. 96 Axslinger

    Trickey,

    I had the same problem with the cave walls. I found that the problem was that I was creating the cave walls with a 3D curve instead of a 2d curve. So I started over with the cave walls, did a 2D bezier in view 7 and it worked great. I found it helped immensely to have two views open. 7 in one view and 0 in the other, that way I could manipulate the cave wall in the 7 view and see the results in view 0. Also, keep in mind the orientation of the initial rail or cave walls to the path is not important. It will align itself when you do the DupeFrames.

    Here's my problem. My supports are hollow. Can anybody tell me how to select the ties or the supports after they have been "dupeFramed"? I can't seem to select them in either Object or Edit mode. Or, how can I put faces on them? They have sides but no faces.

  97. 97 gumanoed

    there is a russian translation of this tutorial.

    If you are russian Blender User – look at here:

    http://b3d.mezon.ru/index.php/%D0%9F%D0%BE%D0%B5%D0%B7%D0%B4%D0%BA%D0%B0_%D0%B2_%D1%88%D0%B0%D1%85%D1%82%D0%B5

    Soon gonna appear on the http://blender3d.org.ua

  98. 98 GrandDukeAdense

    I don't get it to work at all :P :P :P well, i'm a hopeless modeler when doing stuff like this. hehe

  99. 99 AbhisheK

    Hi!
    I read this tutorial, and I get succes to makeing this. This tutorial so helpful for me,
    thanks….

  100. 100 Cuby

    This tutorial is great! I love it! it's helped me a lot. Thanks for posting it here.

  101. 101 me

    Thanks alot for the tutorial but, is there anyway to use curve paths in the game engine???

  102. 102 Me

    Thanks alot for this tutorial. It works in modeling but it doesnt in the game engine. Is there any way of using this in a game???

  103. 103 Eugenijus

    OMG this tuttorial was one of the most usefull i have ever done! It really helped me to leaarn the basics of the animating and how powerfull curve tool could be! Thx alot!

  104. 104 Waz up

    This is too hard!!!!!!!!!!!!!!!!!!!!!!!!!!!!!!!!!!!!!!!!!!!!!!!!!!!!!!!!!!!!!!!!!!!!!!!!!!!!!!!!!!!!!!!!!!!!!!!!!!!!!!!!!!!!!!!!!!!!!!!!!

  105. 105 Morten

    Hi Bart,

    I can't manage to make the cave's "walls" or whatever you call it. What shall I use to make it? A curve or maybe a mesh? And can I somehow just make a little bit of the wall and then parent it to the rails? So I don't have to make every bit of the wall, around the rails.

    And thank you for taking time to help all us who cant do it by ourself.

  106. 106 just-about-exn00b

    Just made it to work, and Yay!!! This is so cool!!!!

  107. 107 camote

    yahoooo!!!!!

  108. 108 mr.noob

    hey i just downloaded blender a day or two ago so i realy have no cloo what im doing. but my real problem is i cant get the track to go down hill \
    \
    \.\\
    \.\\
    \
    \
    \
    \
    \
    \
    \
    \
    \

  109. 109 mr.noob

    ……….**……….
    ………./\……….
    ………//\\………
    ……..///\\\……..
    …….////\\\\…….
    ……/////\\\\\……
    …..//////\\\\\\…..
    ….///////\\\\\\\….
    …////////\\\\\\\\…
    ../////////\\\\\\\\\..
    .//////////\\\\\\\\\\.
    ……….||……….

    :P

  110. 110 bohlool

    متشکرم

  111. 111 Beef

    Looks like an interesting tut but I have come to a stopping point. When attempting to make the rails; I make the first bezier curve, duplicate it…and then when I join the two curves, nothing happens. Is this correct? I'm expecting to see the two curves visually connected, but I am probably mistaken. Any suggestions?

  112. 112 Anders

    Thanks for a great tutorial! Easy to follow.
    A tip for others. Align, camera, rails and ties with the curve at the starting point before making the curve parent.

  113. 113 ()Alf

    1. copy and join the railcurves
    -> /'\ *copy* => /'\ /'\
    When you copy in object mode you have 2 objects, join them into ONE object. When you do both of them in editmode, they already one object.

    2. Making your tunnel
    -> copy your very first bezircurve (now your railway) and delete the BevOb (F9) => you see the curve between your railway, now do same how you did your railway with the copied curve (make a shape with bezir-curves and put its name into BevObj of the copied curve)

    3. Don't forget to play around with the centers of your objects and realign them!!

    I hope this helps to overcome some stops i had myself, and never give up ;)

  114. 114 Shadow

    I made the rails which do look little diffrent…
    But when i try to add them I am completly clueless… If i go to the rails and go to the BevOb there's nothing there… I do know the name is cruve.004
    And if i enter that in the BevOb of the rail Nothing happens
    Please please please!! help me!

  115. 115 Ismo Bond

    Hi! This is very good tutorial, but when It's done, how do I save it?

  116. 116 RCS

    Thanks for creating this tutorial, I have found it very useful – although it took me a couple of attempts to get it correct (all part of the learning process).

    I have a slightly off-topic question about texturing the procedural objects.
    Using procedural textures, I either get a texture which tracks with the animation and appears to move over the objects or a texture which is fixed to the scene and thus looks different on objects which are rotated relative to each other. In the example at the end of the tutorial, the textures appear to be correctly mapped.

    Please could someone suggest a way to achieve this? I have seen other tutorials suggest converting the procedural objects with 'make real' as a possibility. Is this the best solution, or is there a better way? Would UV mapping work?

  117. 117 dann

    i cant do anything because yall are using a different blender than me. i am using the newest one and noting works… HELP!!!

  118. 118 RCS

    Solved it! ORCO mapping (which I started with) works as expected. The problem was that my textures had too many fine, high contrast lines in them. This caused interference patterns which appeared to move with the camera.

    @dann

    Which version? Works alright for me with 2.45 (which is the current released version). Some of the panels arranged in a slightly different way, but no major differences.

  119. 119 dann

    I typed Curve.001 into BevOb: but the rails came out mucked up and kept turning sharply back on themselves

    What have I done wrong!!!

  120. 120 sean

    i must be using a different blender…please help!!
    I dont have half the options hes talking about (atleast, not in the menus he says they're at…)
    :(

  121. 121 Joe

    Great tutoral
    how ever I see a problem
    if you make a rail line with more then a 90 degree turn in it. When you duplicate it the 2 paths will run together.
    Even in your screen shots you can see that the 2 rail lines get closer together. This one is particularly good example. http://www.blendernation.com/wp-content/xoom/tutorials/mineRide/Mine6.jpg Rail cars can't have the 2 lines become closer together or farther apart, they will pop off. In order to make a turn and ceep the rail lines equall distance, the curve in the one rail needs the same center as the curve in the other rail. its geomitry.
    My blender skills are not high enuf to do this easly. :( or i would explane how.
    I find your tutoral very usefull and i refure to it quite often. So dont get ridof it or any thing. :)

  122. 122 insomniac

    Hi!
    I'm a Fine Arts Student, and my prof requires us to use Blender in our plates. Currently, we're doing an animated electric fan. Can't figure it out, man. Geez.. I'm failing the subject. ;c Hope this tutorial will help. We'll find out soon, but not now. Haha ü

  123. 123 Quartz

    Ummm… woulden't making the rails with a cube be better? 'cause i can't seem to make the rails with just the curve…

  124. 124 salmiak911

    How do you slow down the speed(it seems that its just able to make it in 100 frames)? i did just make the framerate 12 to slow down and how do you make the camera move slower when it goes uppward and faster when it goes downwards?

  125. 125 noob

    insomniac, just model the fan, change to animation mode and hi-light the fan and press i and chose LocRot then set the current frame of animation number to 15 or such (above your buttons pannel) turn your fan in the dirrection you want it to turn by 90 degrees (or until your fan looks the same as it was before rotation it) and press i and chose LocRot agian and in the Ipo curve editor window (to your right by default) and select the line (right click you wont notice anything except that a Rot to your right has high-lighted) that has just appeared going up or down on the chart and click the Curve menu go to Extend Mode and click Extrapolation and then when you press play your fan should turn continuosly

    Or If Your Fan Is In The Game Engine
    model the fan, change to animation mode and hi-light it and go into the logic pannel, add a sensor and set on always (will turn non-stop) or set keyboard and chose a key (which when pressed will turn your fan only when your running the game engine, must be in object mode and press P to get into), add a controller and actuater, join them all together by clicking and dragging from the little circle next to them (2 joins, del to get rid of the connections when mouse is over them the connection will turn white) and on the actuater area set one of the 3 choises next to dRot to 1 or -1 if it's turning backwards (or whatever speed you want it to turn) (if its turning on the wrong axis just set the 1 or -1 to a differant spot under dRot and reset the previous 1 or -1 to 0 again or it will turn on two axis at the same time) and click off L at the end of the row to remove local rotation wich can muck up the rotation.

    I think this is right?

  126. 126 noob

    SORRY dont go into animation mode in the second paragraph just high-light it

  127. 127 elias

    tnho uma placa de 16 mb ram
    sera q aguenta a criaçao de um jogo?????

  128. 128 the rubenator

    I don't get the first part " hit it !" ,,
    but your tutorials are nice

    grtzz ruben

  129. 129 Mutchumektron

    this guide sucks!

  130. 130 EASYYYYY

    lol took me a few mins

  131. 131 Dave Heinemann

    [Mutchumektron] this guide sucks!

    Yeah but in a good way!

    If you have a specific problem, ask and someone can probably help. If you're new to Blender, it can be difficult to learn (even the button changes between versions, since there are so many buttons), but time spent is well worth it. If you just like telling people what sucks, none of us can help you with that problem.

    Well happy birthday to me (I'm 36,000,002) – learned something useful. One glitch with the original tie following along (the rest of the ties are fine) – I'll keep at it though.

    Peace etc.

    Dave Heinemann

  132. 132 Spunkycomics

    Great Tutorial!! I had a few issues with jumbled up rails (same as alot of the other comments)
    But by experimenting a bit i figured it out.

    The bezier curves are a great addition to blender, and it looks as if alot can be done with them with the right knowledge! :)

  133. 133 Spunkycomics

    Oh, and as to the people having problems with dupliframes, i had the same thing. Make sure that you only have the tie selected when enabling dupliframes.

  134. 134 Lalaboy

    Man, I don't get how to curve a line, every time I try,I fail. What should I do, someone please help!

  135. 135 Asdam

    Great tutorial! Is there any way to vary the speed throughout the ride? I was thinking of making a roller coaster animation, and I think it would be A LOT more fun if the camera sped up for the hills…

  136. 136 Hellot

    I like the tutorial, but i have been having a lot of difficulties with it. How do you create sharp
    corners with a curve? i get completely confused once it comes to creating the rails.

  137. 137 Hellot

    lalaboy; To curve a line, add the bezier curve and right click on one of the endpoints. on each end of the curve there should be lines with three different points that you can click on to manipulate the curve in different ways.
    To add more vertices click on an endpoint and then hold ctrl and click where you want the next vertex to be.

  138. 138 Lost

    Ok i did everything up until the bevel thingy i don't know how to make the box around that shap that you made us make

  139. 139 good

    i cannot find the ‘DupliFrames’ option.

  140. 140 Flexo

    great tutorial. it taught me lots of things as I'm a complete noob.
    anyways. I decided to add cart and a lamp hanging on stick in he cart to make it look more realistic.
    what I don't understand is ho do u get rid of the block between the rails that keep following the path? I mean got dupli frames right but I can't get rid of the original and it keeps following the cart. I use blender 2.5

  141. 141 Bryan

    I'm using blender 2.46 and I am having trouble adding the bezier curve and how do you make the screen split like in the beginning?

  142. 142 jayasree

    nnnnnnnnnnniiiiiiiiiiiiiiiiiiiiiiiiicccccccccccccccccccccceeeeeeeeeeeeeeeeeeee

  143. 143 Blake

    Great job! I love the tutorial. I'm continuing to make my track longer, which I'm not having any problems with. But, is there a way I can make the camera move slower? The camera moves really fast and it makes it hard to watch the final video.

  144. 144 waker51

    Hey! I can't figure out how to create the walls . Do I just create a section of the tunnel and dupliframe it? Can someone help me?

    Thanks a lot!

    **great tutorial, by the way! keep it up!

  145. 145 waker51

    @Blake:

    there's a way to slow the camera down by going into the edit mode of your Path. You increase the Path lenght (Pathlen). It increase the numbers of frames required to go trough your path.

  146. 146 yo mama

    yo mama be usin blender 2 bust a fat 1 off when u not home

  147. 147 Blake

    @waker51: Thanks, it works great!

  148. 148 abcdefghijklmnoprstuvwxyzzyxwutsrqonmlkjihgfedcba

    great tut helped a lot

    alphabet man =P

  149. 149 Enzio

    it's cool that you can modify the main curve at the end of your work and all things are moving with it

  150. 150 Stardust Lightning

    hey, can anyone tell me how to import more than one object in blender 2.47, cause when i import something it just replaces the other one PZZZ

  151. 151 Gary

    Has anyone figured out the problem where the first rail tie follows the camera? Please post the solution if you know how to fix this. Thanks!

  152. 152 Ireckin

    The BevOb is blank and when I type in curve.001 I get an error that says cant bevel/taper own object. How do I turn the Rail curves into the rails on this version? Can someone help me? Didnt see an answer in any of the forum above.

  153. 153 duee

    can u make the videoooo for the learning coz it will more easier for the beginner like meeee

  154. 154 mike5424

    how did you make that part for the rails with the second curve

  155. 155 spiderspy

    Cheers! thanks a lot its a really really old tutorial but still great :D! even though took some ages figuring out how to do stuff in v4.8 :P but still i learned a lot!!^^

  156. 156 Josh K

    Here's my version:
    http://www.facebook.com/v/541356914531

    That was a pretty cool tutorial. Now I have to figure out something else cool to do with blender..

  157. 157 Andrew

    Im having a problem making the rails how do you make the starting shape with a curve???????????????

  158. 158 TheSpook

    there are like 999999999999999999999999999999999999999999999999999999999999999999999999999999999999999999999999999999999999999999999999999 comments here! cosh!

  159. 159 Dace

    @Flexo: the best solution is simply to move the camera a little ahead of the board, so when it moves, the movement is off camera. To everyone else, the majority of your problems have already been adressed, all you have to do is look through the comments, and you'll find a solution.

  160. 160 Alex

    Great tutorial. Finished it in about 30 mins. There were a bunch of things that didn't work as explained here, I had to experiment a bit and use some workarounds.

    The finished product:
    http://www.youtube.com/watch?v=iqkSmFNcG6k

    It's not perfect, but it looks nice!

    Thanks!

  161. 161 Willshire

    Do you think you can go a little bit more into detail on how you created the rock wall? I'm using Blender 2.48a and I had to find just about every control on my own from scratch to this point and and I have no idea how to do what you are asking when it comes to this wall. Up to this point, my project is kick a$$ but I'm not sure how to do this and I'm not ready to give up! Please help. Thanks

  162. 162 Sean!

    thanks alot mate

  163. 163 beth

    verrrrrrrrrry nice : )

  164. 164 TheSpook

    soo muuch comments!!!!

  165. 165 LukeDavis

    Sry for being such a noob but do you think you could post an updated version with some more pics, it would be soo much easier :P

  166. 166 Orion28

    Too Kewl!

    Thanx for taking the time to create this!

    O

  167. 167 HolyDiver42

    How did you create the bevel object from a curve? It's not a curve if it's made up of angles. Help!

  168. 168 HolyDiver42

    How did you create the bevel object from a curve? It's not a curve if it's made up of angles. Help!!

  169. 169 HolyDiver42

    okay i figured out the bevOb thing with the rail shape curve but i dont get where to join the duplicated object and when i put in Curve.001 in the BevOb field the track is WAAAAYYY scewed up. Could someone please be more specific on this part? why am i the one of the few who dont get this?

  170. 170 HolyDiver42

    Ha i fixed it. I didnt have it set to 2d and in view 7. my bad:)

  171. 171 Matt M

    Thanks for great tutorial!

    I have same problem as Anna (from 2006 posting):

    "original tie still follows the path, although DupliFrames also works"

    I set DupOff to 2, and get good spacing for my ties. But, the original tie still follows along the path in between the other ties (i.e., it doesn't get offset like the stationary ones). Is there a way to turn off the original ties and only render the "duplicated" ones?

    Thanks for any help!

  172. 172 HolyDiver42

    To Matt M:
    Not that <> know of. just adjust the camera angle and position so the original rail tie and shaft support are not inside the black rectangle on the screen in view NumPad0.

  173. 173 HolyDiver42

    sposed to say not that i know of. and why did it italicize the words??

Leave a Reply


My Sponsors