Renderlight Renderer.
 These just keep popping out all over the place! Renderlight is another unbiased rendering engine with support for Blender.
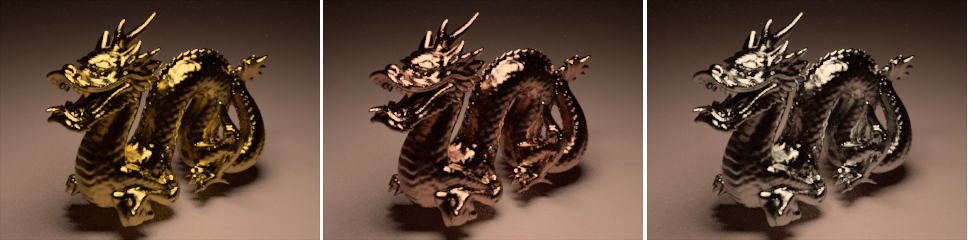
Renderlight works via a python script, simply place the script (r3d_export.py) in the Blender scripts folder and run it. A nice gui comes up with various settings and rendering can even be initiated directly within Blender. Below is a screenshot showing part of the gui.

Current Features Include:
Rendering
- Camera model with full lens simulation supporting spherical and planar lens. Lens are specified in a tabular format (wide angle, double gauss, fisheye and telephoto lens included)
- Thin len camera model
- Camera shift
- Depth of Field
- Dispersion (Sellmeier formula or user specify spectrum (Ohara, Schott and Sumita glass catlog included)
- Physical based sky model
- Polarization
- Rendering can be stop and resume
- Spectral color
- Texture map
- Unbiased progressive rendering
Materials
- Anisotropic metal
- Dielectric (can act as polarizer filter, glossy has been disable for this release)
- Matte (texture mappable)
- Plastic (texture mappable)
- Approx. 600 material measurements (nk file, Ohara, Schott and Sumita glass catlog) included
Geometry
- Bilinear patch (texture mappable, can act as area light source)
- Box
- Cylinder
- Rotational Sweep
- Sphere (texture mappable, can act as area light source)
- Sphere Sweep
- Super spheroid (texture mappable)
- Super toroid (texture mappable)
- Torus (texture mappable, can act as area light source)
- Translational Sweep
- Triangle mesh (texture mappable, can act as area light source)
Exporter
- Blender
The main Renderlight website is located here. A support forum is also available. The latest version of Renderlight can be found in the News/Announcement section of the forum. But if you’d like to just download it immediately, here is the link. Be aware that little documentation currently exists, but the forum is a good way to get started with any questions you may have.


Is it open source and is there a linux version? There seems to be no information on the site/forum…
Is it open source and is there a linux version? There seems to be no information on the site/forum…
It’s not open source and so far it’s windows only. You would have to try running it via Wine (like indigo).
It works great and has a lot of nice features. A render engine to keep an eye on.
But what sets it apart from indigo then? Dont get me wrong it looks nice and all, just wondering.
As far as I know. It is not open source. I’d ask on the forum and see what he says.
I think its just another alternative to Indigo…
Hmm.. Why isn’t there any open-source unbiased renderers.
Don’t know why there aren’t OS renderers of this kind, I think they’re quite difficult to develop.
A skilled blenderhead is running a project for an open unbiased renderer
http://sourceforge.net/projects/cassata/
It’s at early developement, but I think we will see interesting results in the future!
the differences from indigo:
+es
different camera types
more primitives
transparent nks
-es
no SSS (yet)
no BiDir (yet)
no Normalsmoothing (yet)
…
there are kinda many -es compared to Indigo, but all of them are ’cause of the young history ;)
It will get very good, kinda soon :D
Tinman does a great job, as OnoSendai does B)
Man.. what would you get if you one would put Tinman, OnoSendai and all those others that are writing free/OSS renderers in one room…
I think the resulting renderer could easily surpass Brazil or VRay..
yes, actually, I told them, that, already^^
(hmm… not shurew, if I told Ono, but I think so… I definately said that to Tinman :D)
2 things to change in my first post:
1) renderlight HAS BiDir, which I didn’t know and
2) next Version, which will be there in 2-3 days, will also have Normalsmoothing :)
I found it much easier to get to render, but it outputs a weird image fromat that I can’t open unless I use the image view that came with the program, another thing is that the image is black during render until the very end.
To get your image earlier, you have to lower the save time period.
Standard is 5 minutes ;)
I wish one could bake those renders into Blender materials.
you mean, you’d want to do hi-qualtiy textures, by rendering them in there?
Hum… a texture should be ortographic and neither indigo nor renderlight has an orthographic mode, but else: what’s so hard?
render the texture in there and then, UV map a model and use the image….
An other way would be:
FIRST bake, THEN render a plane with the texture, then use the texture in blender…..
Hi
When I try to export into the r3d format thingy it gives me an error in the python console, something about no module named “os”
can you post Bugs in the Forums?
http://www.renderlight.co.uk/forum/index.php
Tinman hopefully will help you. ;)
Since it’s not open source, I’ll stick to Indigo :)
Indigo is not open source either…
Or do you mean “I wait for an unbiased Open Source renderer”?
I like this renderer, I have tried it and it works fine!
I’ll keep an eye on that:)
What is this guy’s problem? EVERYONE knows that test renders in Blender HAVE to be of a glass Suzzanne with caustics:).
which can be added to a
– SSS suzanne
– Simple Difuse Suzanne
in a complex scene, where you also can test radiosity (I don’t mean a cornell box…) and such…
oh, and reflective suzanne, too^^
And then, all of the primitives and so on…
It should be able to test ALL the features of the renderer…
The closest thing to a similar open-source project is WinOSi — http://www.winosi.onlinehome.de/