In response to a question on the Blender StackExchange, Sam Walker posted a detailed tutorial. He submitted it for republication here.
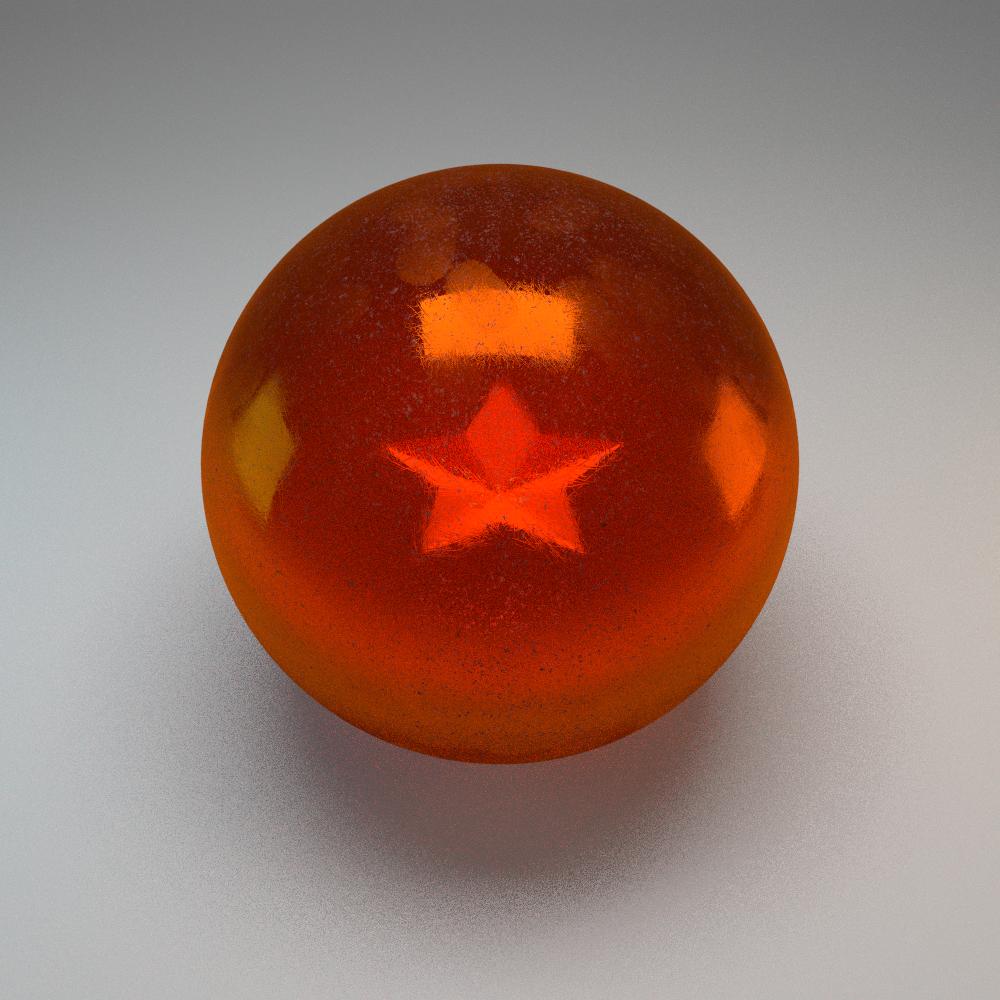
This is along the lines of what we'll be creating, rendered at 150 samples:
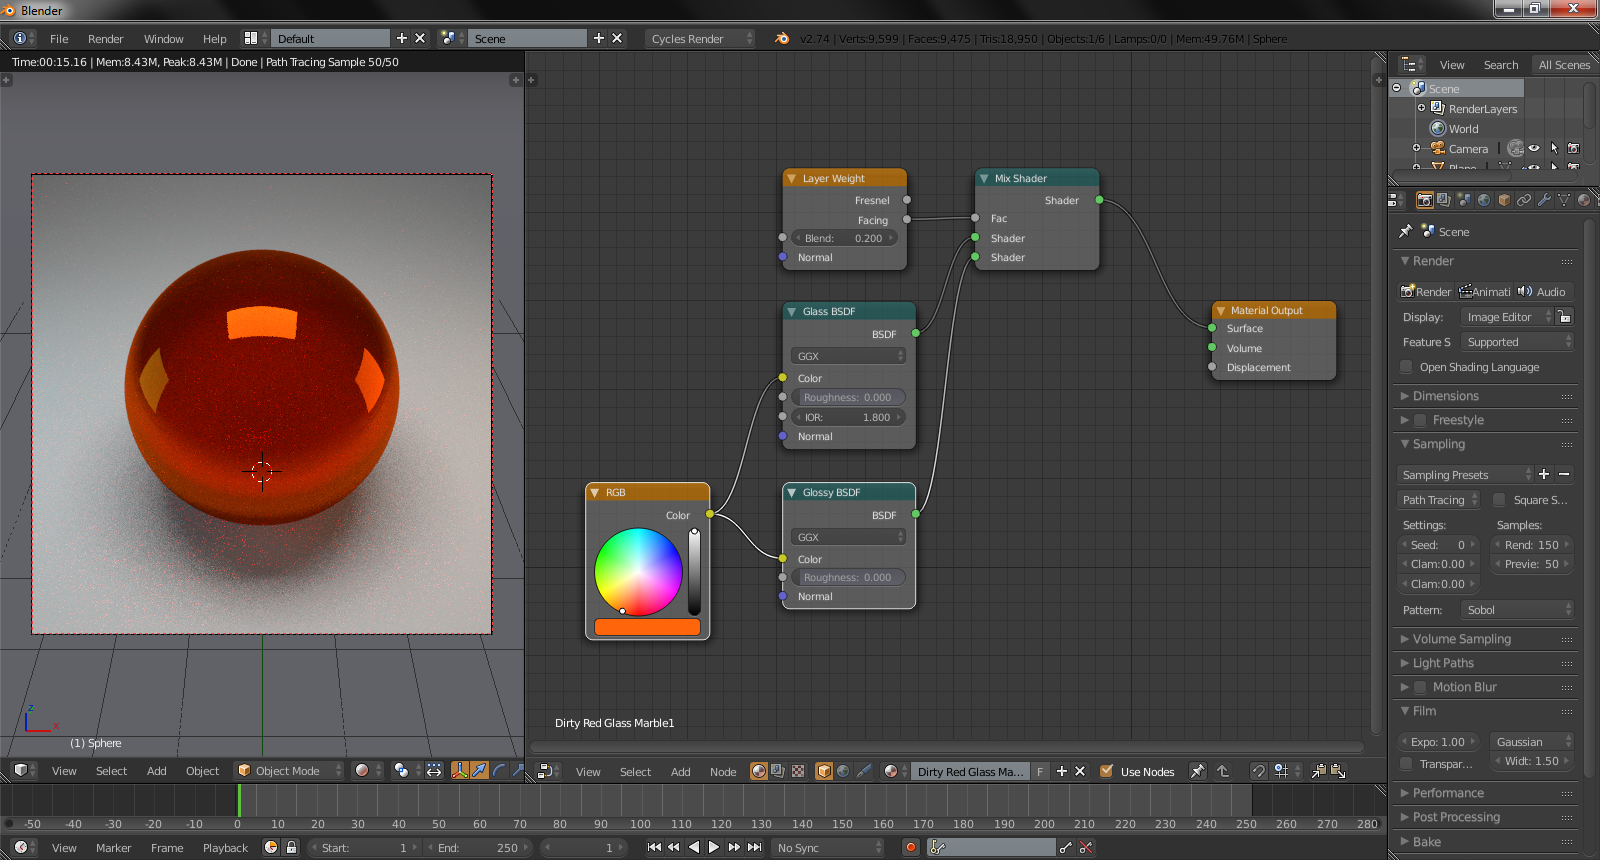
To begin, I've used a relatively simple scene setup comprised of a UV Sphere, backdrop and 3 emission Mesh Lights.

Diving in head first, we'll jump straight on over into the node editor! The basic glass material will be comprised of 2 Shaders, a Glass BSDF mixed with a Glossy BSDF, with a Layer Weight node's Facing output plugged into the Fac input of the Mix Shader. Set the Blend of the Layer Weight node to 0.200. Change the Glass BSDF's light distribution type to GGX, and the IOR to a value of 1.800. Finally, add an RGB node and plug the Colour output of the RGB node to the Colour input of both the Glass BSDF and Glossy BSDF. Change the colour of the RGB node to the values shown in the following screenshot:

Now we've got the basic glass set up, let's add in some fingerprints! Glass is rarely ever 100% clean, and unless it's been recently polished or moved by machine it's going to have little bits of human grime on it in the form of fingerprints. We'll add this photorealistic detailing in through the use of a custom 'Finger Print Map', which I created using chain's brushes. You can download my Seamless Texture from the imgur album link at the bottom of this post :)
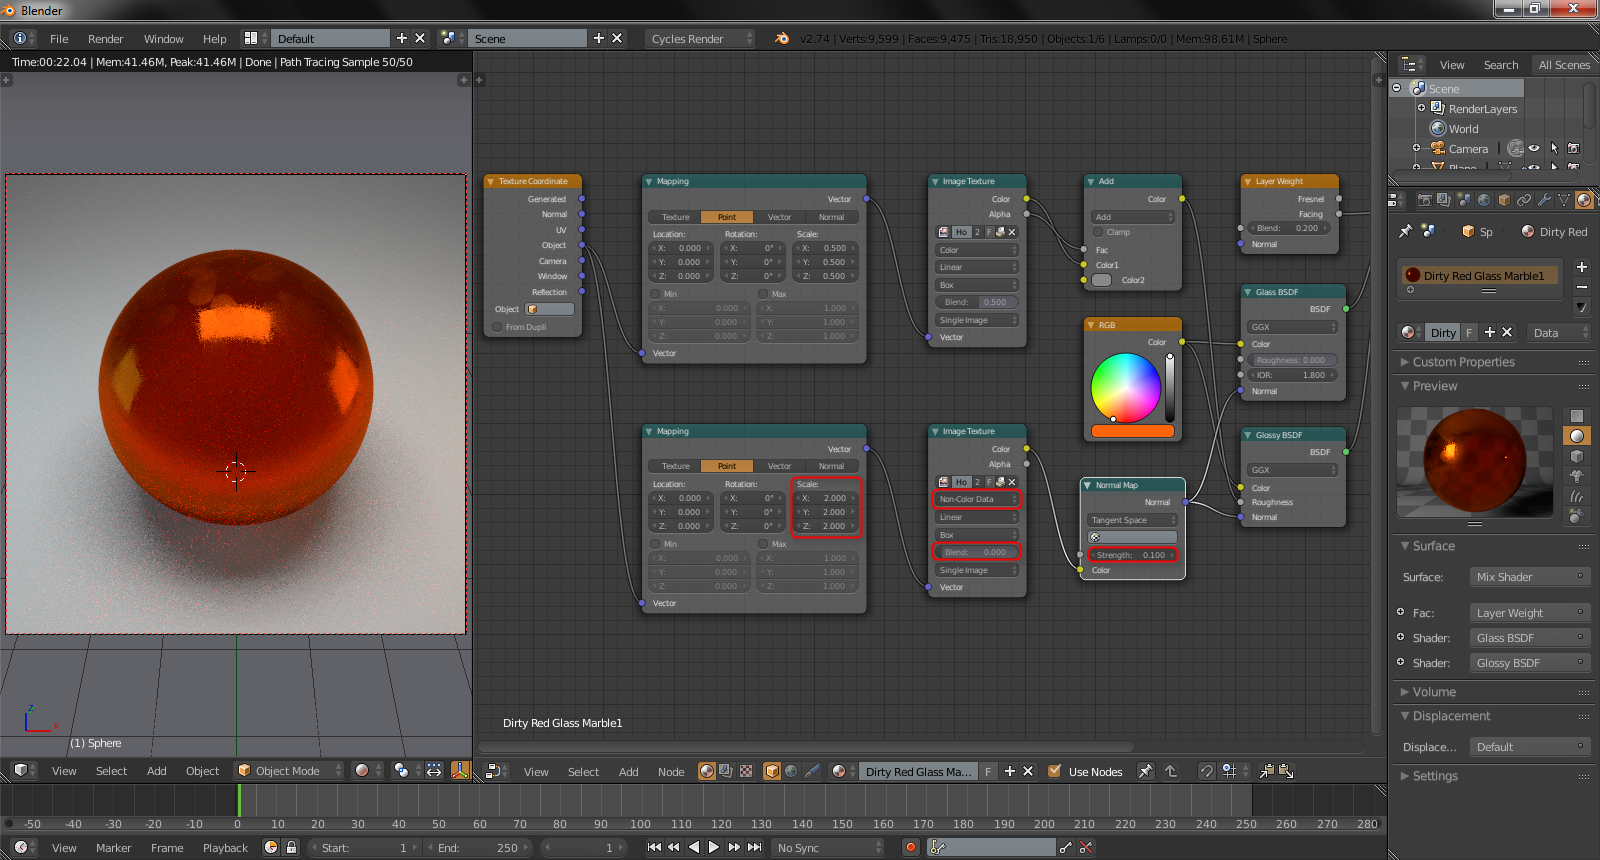
Start by adding a Texture Coordinate, connected via the Object output to a Mapping node. Change the Mapping Node's XYZ Scale values to 0.500 and connect to an Image Texture Node. Open up the 'Fingerprint' texture into this node and set the projection type dropdown from Flat, to Box, with a Blend of 0.500. Finally add in a Mix RGB node and set the blend type to Add. Plug the Image Texture into the add and the Add into the Roughness Input of the Glossy BSDF shader as follows in the screenshot. Finally change the Colour 2 input of the Add node to a more greyish colour, i found changing the RGB values to 0.250 to work quite well. This just helps to mute the fingerprints slightly and make them appear more realistic.

Next comes the scratches! These tiny details will add both roughness and surface texture to the marble, all the while enhancing the realism! Again I created this Seamless Scratch Texture from, well scratch, using KeepWaiting's brush set located at http://keepwaiting.deviantart.com/art/11-Scratch-Brushes-for-PS7-177075258 , again you can download the Normal Map of the texture in the imgur link at the bottom!
Start by duplicating the Mapping and Image Texture Nodes and connecting them up to the Texture Coordinate Node as we did in the previous step. Change the scale of the Mapping Node's XYZ to 2.000 and open up the 'Scratch Normal Map' in the Image Texture node, changing the Colour Space from Colour to Non-Colour Data and the Blend to 0.000. Next, add in a Normal Map node and connect it to the Image Texture and Glass/Glossy nodes as shown in the screenshot. Finally, change the Strength value to 0.100. This will add subtlety to scratches that are really only visible around light sources reflected off the glass, but it'll help sell the weathered effect by a million percent! ;)
The final step! And arguably the most complex, so it'll be easier to explain it by showing, rather than explaining. Using the custom dirt map that I have edited from this original image: https://hmmatthews.files.wordpress.com/2012/07/table_colour.jpg , we will overlay it on top of the glass, adding an effect similar to that caused by limescale and grimey water and dust drying on a window surface... or a marble in this case! :P This image will also be available in the imgur link at the bottom.
Begin by repeating the process of adding in Mapping and Image Texture Nodes, change the XYZ Scale to 1.000, load up the 'Dirt Map' Texture and set the Blend to 1.000. Next add in a Diffuse BSDF (with a colour of that shown in the screenshot) with a Transparent BSDF, and mix them together. Plug the Dirt Map Texture into the Fac input of the Mix Shader. Add a second Mix Shader and insert it as the last node before the Material Output, blending together the rest of the nodes with the 'Dirt Map'. Again plug the 'Dirt Map's input into this second Mix Shader's Fac input, however this time add in a ColourRamp node onto the connecting node branch, and edit the stoppers as shown in the screenshot. This causes that subtle speckled effect that is definitely totally not noise...! (Don't worry it becomes more obvious with more samples!) ;)


(Optional Step:) Below are several setup screenshots of my render settings for the final image at the start of the tutorial, using my CPU.

And there you have it, the final result alongside a sweet node Setup! :P

And as I mentioned the techniques and textures can be used with a variety of different materials in a variety of different scenes!

Hope this helps! :D

2 Comments
Nice post!
I was planning on answering this, but I never got around to it. Probably a good thing because my answer wouldn't have compared to this :D
My only comment, is that the scale of the textures look off in your review images, but otherwise this is really good. It's inspireing enough for me to mess with some materials and play with scratches and finger prints etc.
Thanks!
@TardisMaker, glad you found it useful and that I could inspire you! Means I'm doing something right! ;)
Yeah I was aware that the scale of the finger prints in particular was a bit disproportionate to the marble itself when writing the tutorial, giving it the marble an appearance of being really big (or the fingers holding it being really small! :P), but I decided to leave it in the end as I felt it actually helps to highlight the versatility of the techniques, and the fact that one simple value change can make a world of difference to aspects such as visual size, etc. :)
Thanks for the kind comments!