Two polished commercials by Jasper van Nieuwenhuizen, made with a combined Blender/Maya/After Effects workflow.
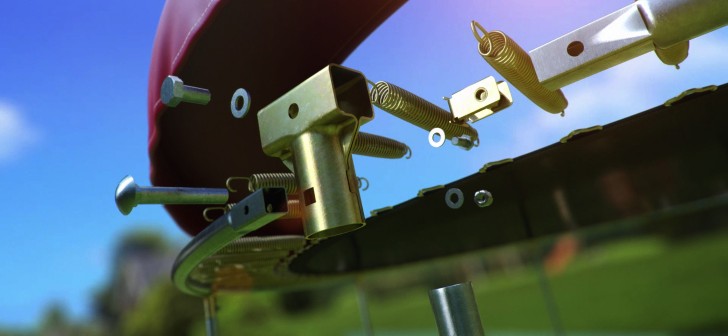
Some time ago we finished 2 commercials for BERG to promote their new go-kart and trampoline. The CAD models the client provided us needed to be cleaned for which I used Blender (still my favorite modeling tool to date). Some rigging and the animation were done in Maya. Most of the time I use point caches to export (skinned) animations to Blender, but in this case they were way too large because of the (extreme) high poly models. Also as the models didn't deform, it seemed a bit overkill. Still I wanted a way to import (the latest versions of) the animations without changing anything else in my render scene. So I wrote some very simple im-/export scripts to get the animations out of Maya and into Blender.
The rendering was done with Cycles. Cycles and it's nodes are a charm to work with and it's really simple to get good looking results. The lighting was extremely simple, I just used a great script to import a light setup from sIBL GUI. The only thing I needed to do afterwards was tweak the settings a little bit. For the materials I only used UV-mapping for the stitches on the trampoline and for placing logo's, everything else is done with box mapping. Most of the textures were created by scanning and processing material samples we got from the client and I also used some procedural textures.
The compositing was done in After Effects.
All in all it was really nice to use Blender and Cycles in my part of the production. Cycles still tends to be a little bit slow and can be noisy, but you get great results without much effort. Also after the recent optimizations in Cycles I did a test with the trampoline and it already rendered a lot faster then during production. So, a big thank you to all the awesome developers!
Trampoline
Buzzy Skelter


21 Comments
Great look and feel! Congrats.It's great to see that Blender is used more and more in commercial products.
What is the average rendertime for the beauty pass?
Great job Jasper! I'd be interested to know the strategy for the grass field in the Trampoline ad. Was it particle grass under trampoline and then fading into texture grass in the background? It appeared seamless if that was the case.
Thanks Todd! If I recall correctly (I don't have the production files at hand) there is dense particle grass in the foreground, then particle grass with less density and lastly the background, which is just an image on a cylinder. The beauty pass of the grass was rendered by a colleague in Cinema 4D by the way, because I just didn't have time to do it before the deadline.
Nice work. Very professional.
очень круто, достойно.
So one big tipp for everyone. Render not with 1000 samples. render with 250 or so.. then render one image with your specified rendersize , but only one sample. on white backround.
then you take the sample image in after fx or nuke inside the denoiser as Noise Pattern... so you get rid of 99% of all noise on your final 250 sample frame
When you say 'on white background', are you meaning set the world background to white?
I mean top camera shooting on the ground direkt only to get the noise sample
Thanks for the tip. As I didn't do the compositing I don't know much about de-noising in After Effects. Is there a good plugin or does AE have a built-in de-noiser?
There is a denoise tool in after fx
Thanks for the tip. The render time is killing me.
Set yourself the goal, that a rendertime over 10 min a frame is not acceptable, i work this way since 10 years. And learned alot in lowerering rendertimes.
I would be great if we could have a blender-only alternative to this denoising challenge.
Thats a great tip! Cycles is a fantastic renderer, but it requires a lot of samples for a smooth render, so I am very interested to learn about ways to reduce render times. I am experienced in After Effects but fairly new to Blender, so please forgive me for being a bit slow.
But could you please explain how you make the sample image to be used as noise pattern. You say top camera shooting direct on the ground - does that mean that you place a second camera in top view and create a white ground plane?
You can use for denoise the picture itself, because the image denoiser in nuke or after effects use the image noise to calculate a algorithm for the denoise. if nothing helps you can use a noise pattern too to create this specified algorithm too. So how to get the noise pattern? Render only one sample in blender with cycles on white ground. or blue ground -> what you like, the only important thing is to have the noise...then use it as pattern
I want to understand what you mean by white ground.
Is the workflow is this?
- Rendering the whole animation with low samples (200 for example)
- Rendering the whole animation with one sample with a blank on all objects
Denoise with the 2nd animation as a noise pattern
I'm Right?
You render your shot with maybe 250 samples. The whole shot. You dont need alot of samples. If the image is larger you need less more. On 1920x1080 you need only 250 in most cases, on 4k you need 100. If you ready with your image you need one frame with only one sample. In your noise sample scene you create a plane, 0.5 grey material on it. Then you size it up make ambient occlusion to 0.5 . Then render from top view, or move the camera to the top position, shot straight against the plane, and you get a very noisy image. This image is the sample pattern. Important fact.: your sample pattern has to have the same resolution like your image sequenz. ! After that you can use the sample pattern in the denoise tool to reduce most noise.
Thank you for reply.
So in the seqence animation i must to have the same seed (rendering pannel in cycles) for all the sequence?
No
Now I like to buy a Trampoline :)
Well, go ahead! ;D