 With the new GLSL features in the Blender Game Engine we're starting to see some handy little tutorials popping up. Heres one about normal mapping, written by Lancer on Blenderartists.org
If you saw one of the latest articles on Blendernation, The Retopology Tutorial, or if your working on a game with with the new GLSL settings then you'll probubly find this very useful.
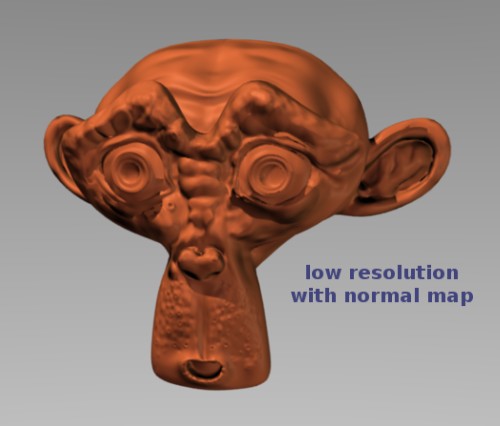
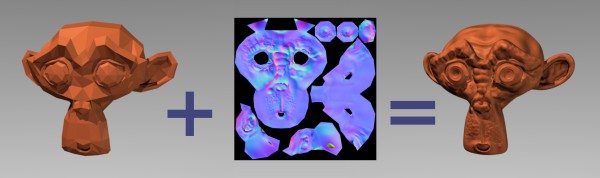
Once you've created a low poly and high poly version of a mesh object you have the ability to make normal maps from the high poly (possibly sculpted) object and then 'bake' it onto the low poly model. This 'normal mapping' technique is very effectively used for games to get extra detailed looking objects and characters.
The tutorial is nice and simple, with easy to follow steps. Its also good to have something like this around to refer back to, in the case a step or two have been forgotten.

16 Comments
This is soo unbelievable!
Its incredible cool!!
wow thx 4 the tutorial
very usefull guide
runner up, wohoo
Hey, that's great! Very good to have, and when I need it and search for how to do it this tutorial will probably pop up in the search results and I'll go "oh yeah! I'm sure glad that tut is there - now I can use it!"
Strip the "#post1262826" from the link
Link updated, thanks!
Oops, the link still scrolls down to the same post... the correct link:
http://blenderartists.org/forum/showthread.php?t=138194
Link updated, should work fine now.
Ill get it right one of these days... ;)
hey; esta genial...
en muy pocos pasos tienes unos buenos resultados...
se agradece...
saludos...
Great tutorial, but the image is misleading. The low-poly with the normal map won't look exactly like the high-poly, like on the image. I would change the image of the monkey head (that is after the equal sign, it can be seen, that it is the high-poly one) to the normal mapped low-poly.
You will note that the shadow does not render the same since it does not recognize the normal map. If you are making a game or a still image with a stationary object then you should probably save and apply the high poly's shadow layer to your object as well.
I wonder if it is possible to fix this in future versions of Blender, or to add the option of affecting the shadow layer with a normal map. That would make add a lot more realism, especially in the game engine, with hopefully a minimum affect on performance.
There is a normal map shader that solves that problem. Called self-shadowing bump map.
http://forums.facepunchstudios.com/showthread.php?t=529746
Awesome! Thanks a ton Temaruk.
You are welcome!
Good tutorial. That is really cool.
It was a nice surprise for me to discover my tutorial found its way onto BlenderNation. Thanks everyone, and especially Alex Delderfield (AD-Edge) for the kudos. The feedback has been amazing and I've now made minor adjustments to improve the clarity of one or two areas in the tutorial.
but what if I want to apply a normal mapped image onto a flat surface without making a high poly version?