Compositor: Unsharp Mask and Ambient Occlusion
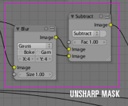 Matt Ebb has developed a simple setup in the Blender compositor to achieve an Unsharp mask. Unsharp mask is based on calculating the difference of a blurred copy of an image and the original, so he only needed two nodes to create the filter. He then goes on to apply a modified version of the filter to get a fake ambient occlusion effect. Pretty cool stuff!
Unsharp mask is a popular way of sharpening images, which generally gives much better results and flexibility than simple convolution filters. It may not be widely known, but it’s actually a wet darkroom technique, and is very easy to recreate with some simple blurring and blending. Unsharp mask finds areas of high local contrast by comparing the original image to a blurred version of itself, checks where it differs the most, then uses this mask to enhance constrast in those areas, usually in the luminance channel. The blur radius determines the size, or frequency of features that will be found.
This is quite simple to rig up in the compositor, below is an example with a deliberately grainy and blurry render to clearly show the effect of the unsharp mask.
What caught my eye here is that the compositor is already becoming powerful enough to achieve such specific results. I remember the days back at university when we needed dedicated hardware to do such digital image manipulation calculations ;-)
Link:


Sounds good i will try that later
Talking about developing PS filters with compositing nodes….
I have made a nodesetup to calculate grayscale images by using chanel calculations.
http://blenderartists.org/forum/showthread.php?t=87873
thanks alot for this food
[quote]What caught my eye here is that the compositor is already becoming powerful enough to achieve such specific results.[/quote]
Yes that is true – really fascinating… One should found a research group that plays with the compositor for some weeks to find out how powerful it is
well there’s a lot you can do with it I suppose, but does anyone knows how to use the node editor to make WIREFRAME settings work? It’s something I’m trying to get correct without having to use edge in the render options (doesn’t do exactly what I want) or duplicate the mesh(which seems a cheap and sloppy trick for the sake of creating a material option).
But as of yet I haven’t been able to do that with nodes. Or rather haven’t figured out how to do that with nodes.
Hey, Matt or anyone, could you tell me please what is that node between Substract and RGB Curves, used to “tweak the mask strength across different areas”? :P thx. FreakyDude, I’m sorry I don’t know about how you can do that…
@Freakydude: Check BlenderArtists: http://blenderartists.org/forum/showthread.php?t=89067 and Search for Wireframe; scripts abound. Enjoy!
KiZa: It’s the Math node, set to Multiply. It’s available in 2.43 :)
@ Roger: WOW that seems to be what I was looking for! gonna test it now.
I never quite understand why a sharpening filter is called ‘unsharpen’…
It’s not. It’s Unsharp Mask. It makes a blurred version of the image, and compares the blurred and the original image to find edges. It then increases contrast on those edges to get them to look sharper. It’s called Unsharp Mask because it has to blur it to sharpen it.
I have just tried the technique out, and I must say it is GREAT!!! I’ve even gotten it to look better in the compositor than it does in Gimp!